Uno
Multi Store Responsive Shopify Theme
- created: 12/20/2016
- latest update: 12/22/2016
- by: EngoTheme
- email: engotheme@gmail.com
If you have any questions that are beyond the scope of this help file, please feel free to contact us via email : engotheme@gmail.com or visit our support forum at: http://support.engotheme.com
Getting Started
Introducing Uno - Multi Store Responsive Shopify Theme
Uno is a highly flexible, Multi Store Responsive Shopify Theme. It's built on Bootstrap 3 and looks great on Desktops, Laptops and Mobile devices. With unique cool designs, modern, stylish, intuitive assistant and 9 Unique Home layouts, Uno is a good choice to build your online store. The Uno shopify theme supports 3 view modes for product listing page: Grid view, List view and FullWidth view, all the views are lean, show info that user wants.
Download and Installation
After purchased our theme, you need to go your download area, click on button Download and select download All files & documentation.
Once the download is complete, unzip the file and you would see the following packages:
- Guides - our detail documentation for the theme
- Licensing - the theme license
- Samples - Sample data for manual installation
- PSD - the PSD files of the theme
- Source - All Themes include
Theme Installation
To install the theme, please log in to your Shopify store and go to the Online Store/Themes. From there, click on Upload a Theme and upload the .zip file from the ‘upload’ folder included with this package.
- Step 1 – From your Shopify admin, click Online Store > Themes
- Step 2 – Click Upload a theme in the top righthand corner
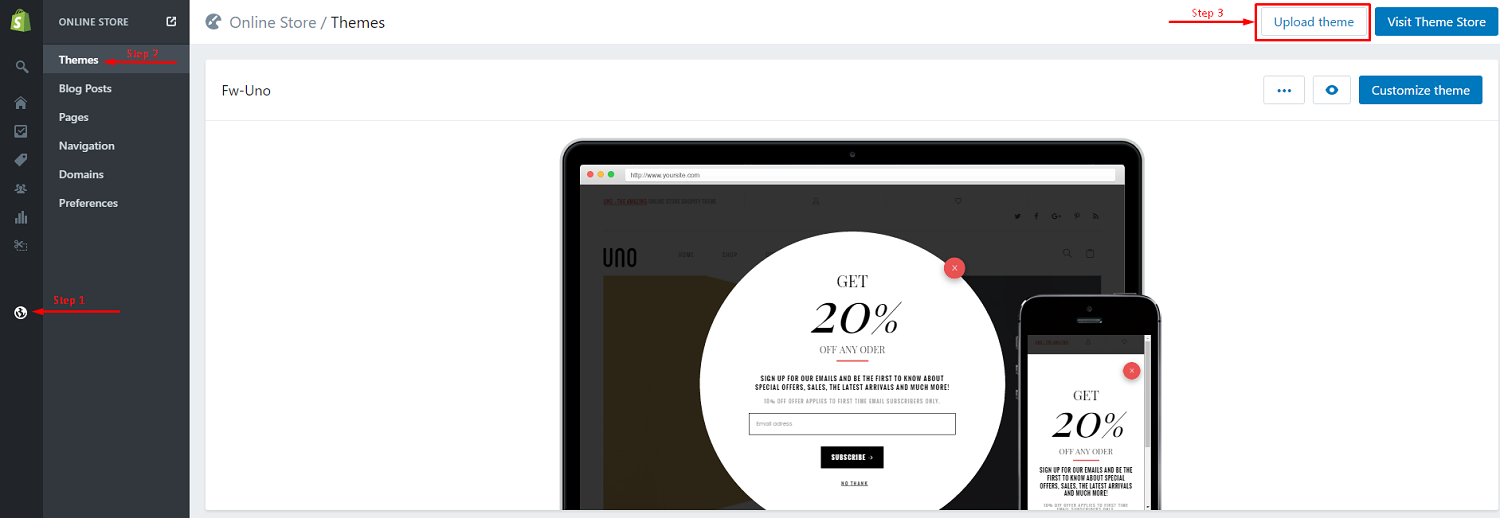
- Step 3 – The Upload A Theme dialog displays. Click Choose File to select the uno_homex.zip file you want to upload, then click Upload.

You need choose "uno_homex.zip" file in SOURCE folder and set up for your website

-
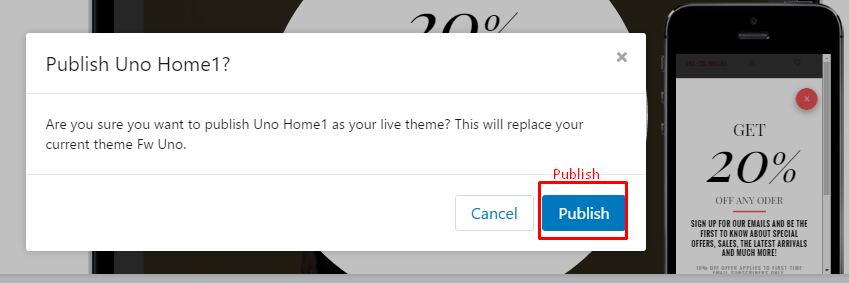
Step 4 – The uploaded theme appears in the Unpublished themes section of your Themes page. Now that you've installed the theme, you can publish it or customize it as you choose.

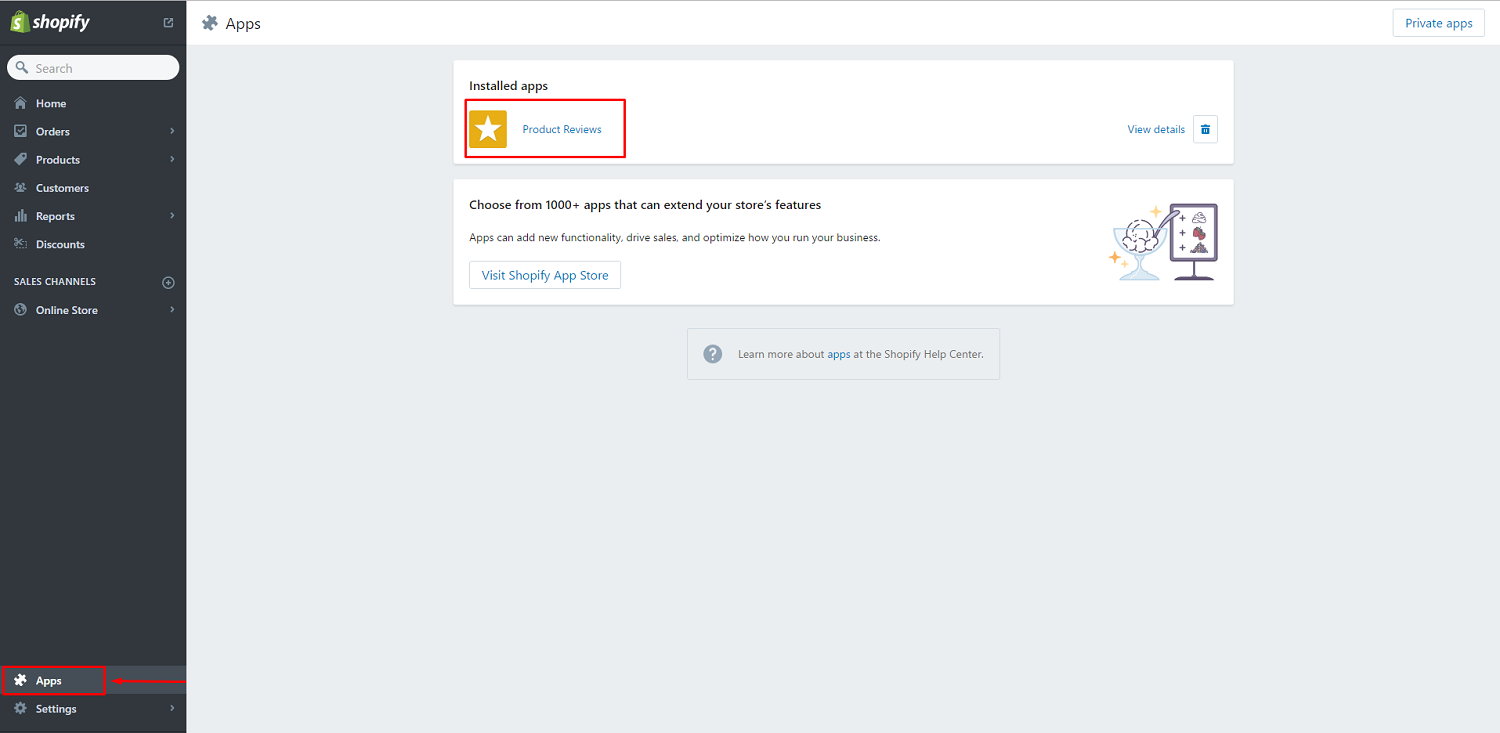
App install
- https://apps.shopify.com/product-reviews
Theme Configuration
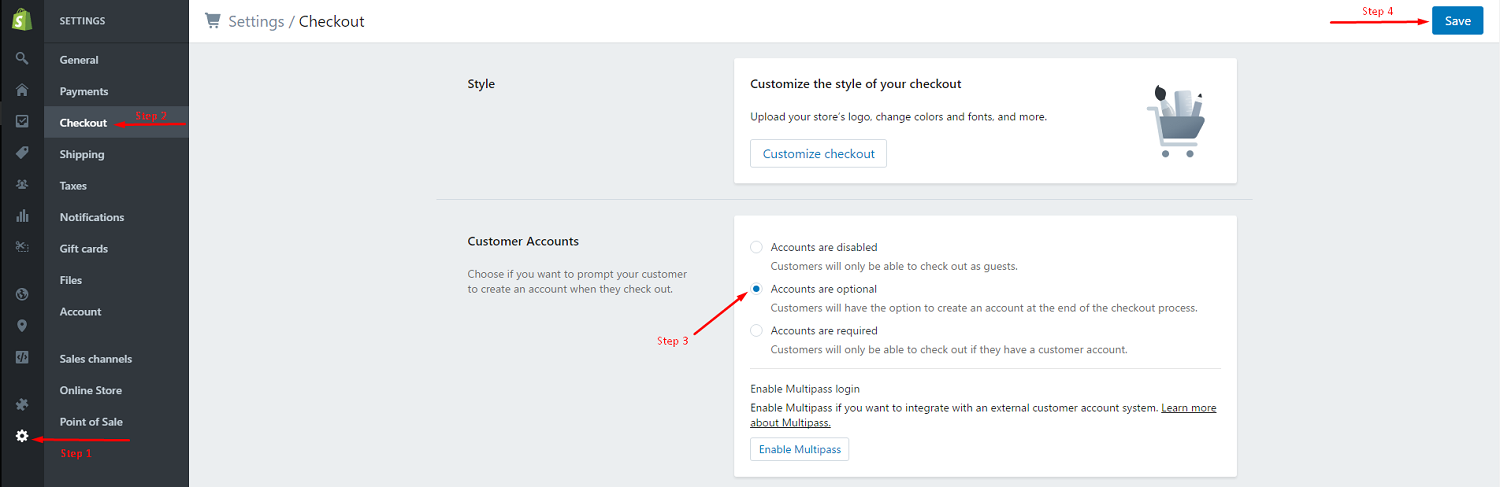
Enable Customer Registration Form
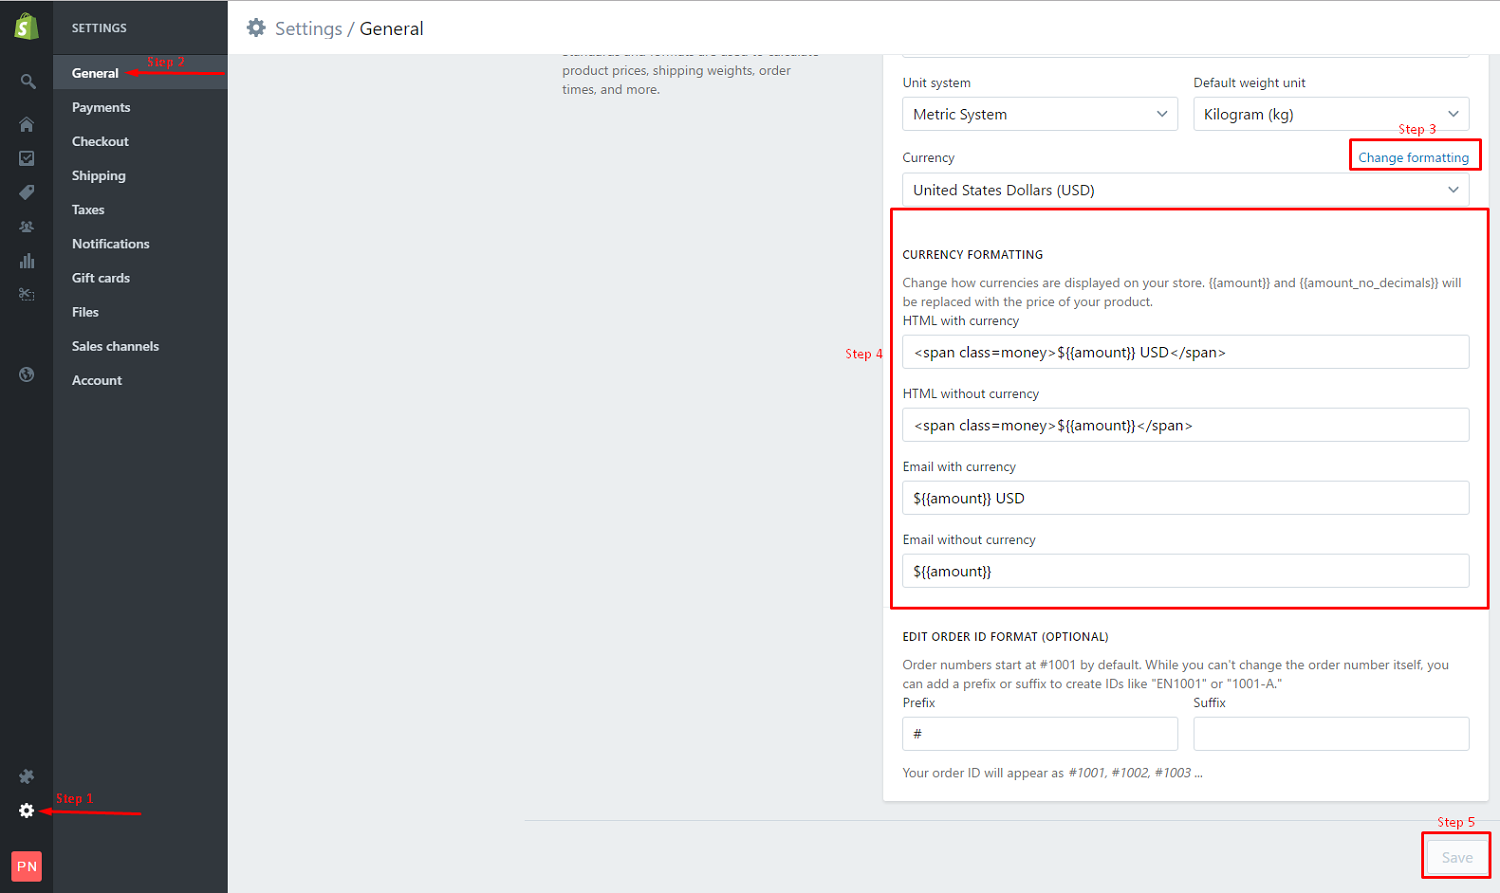
Setting Currency
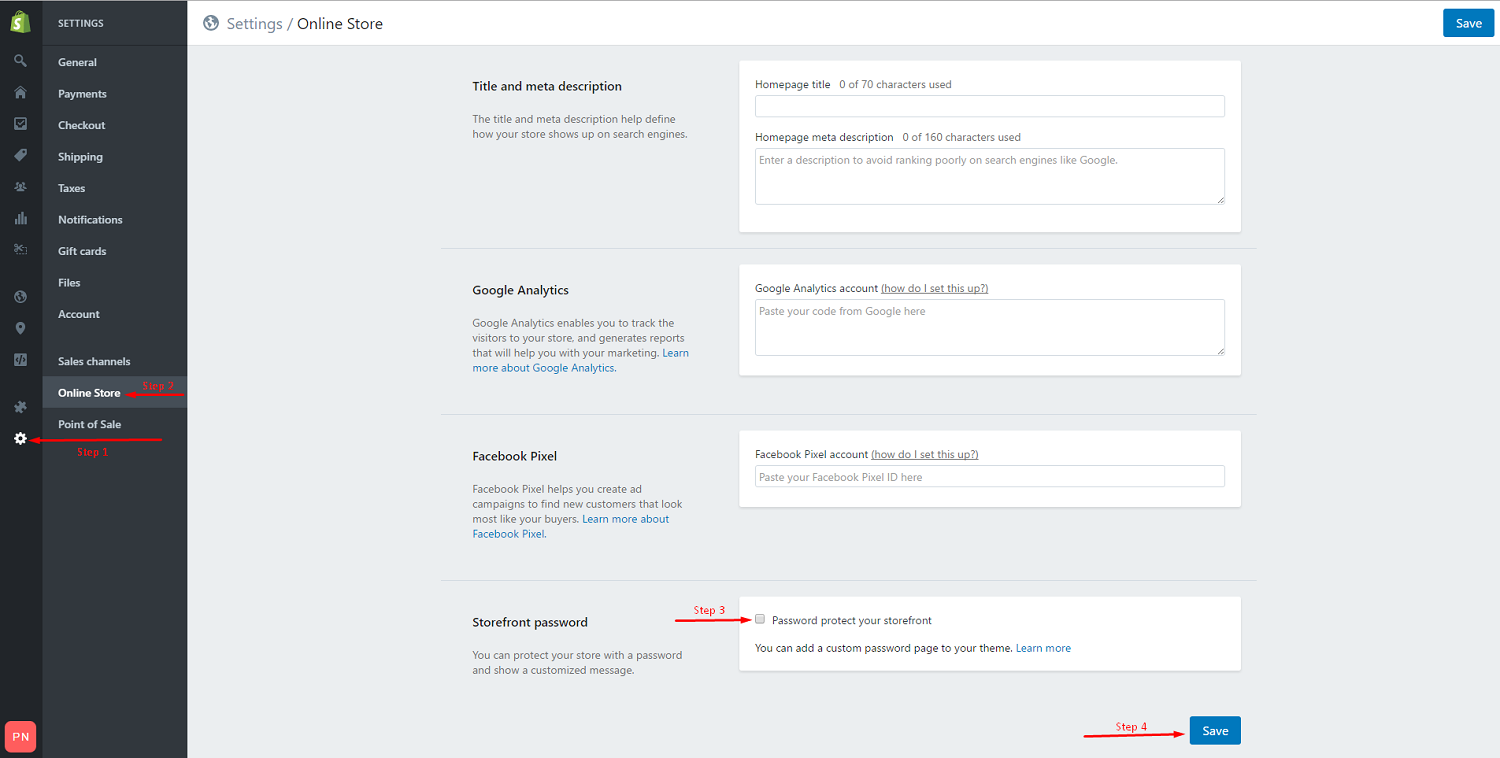
Enable Store
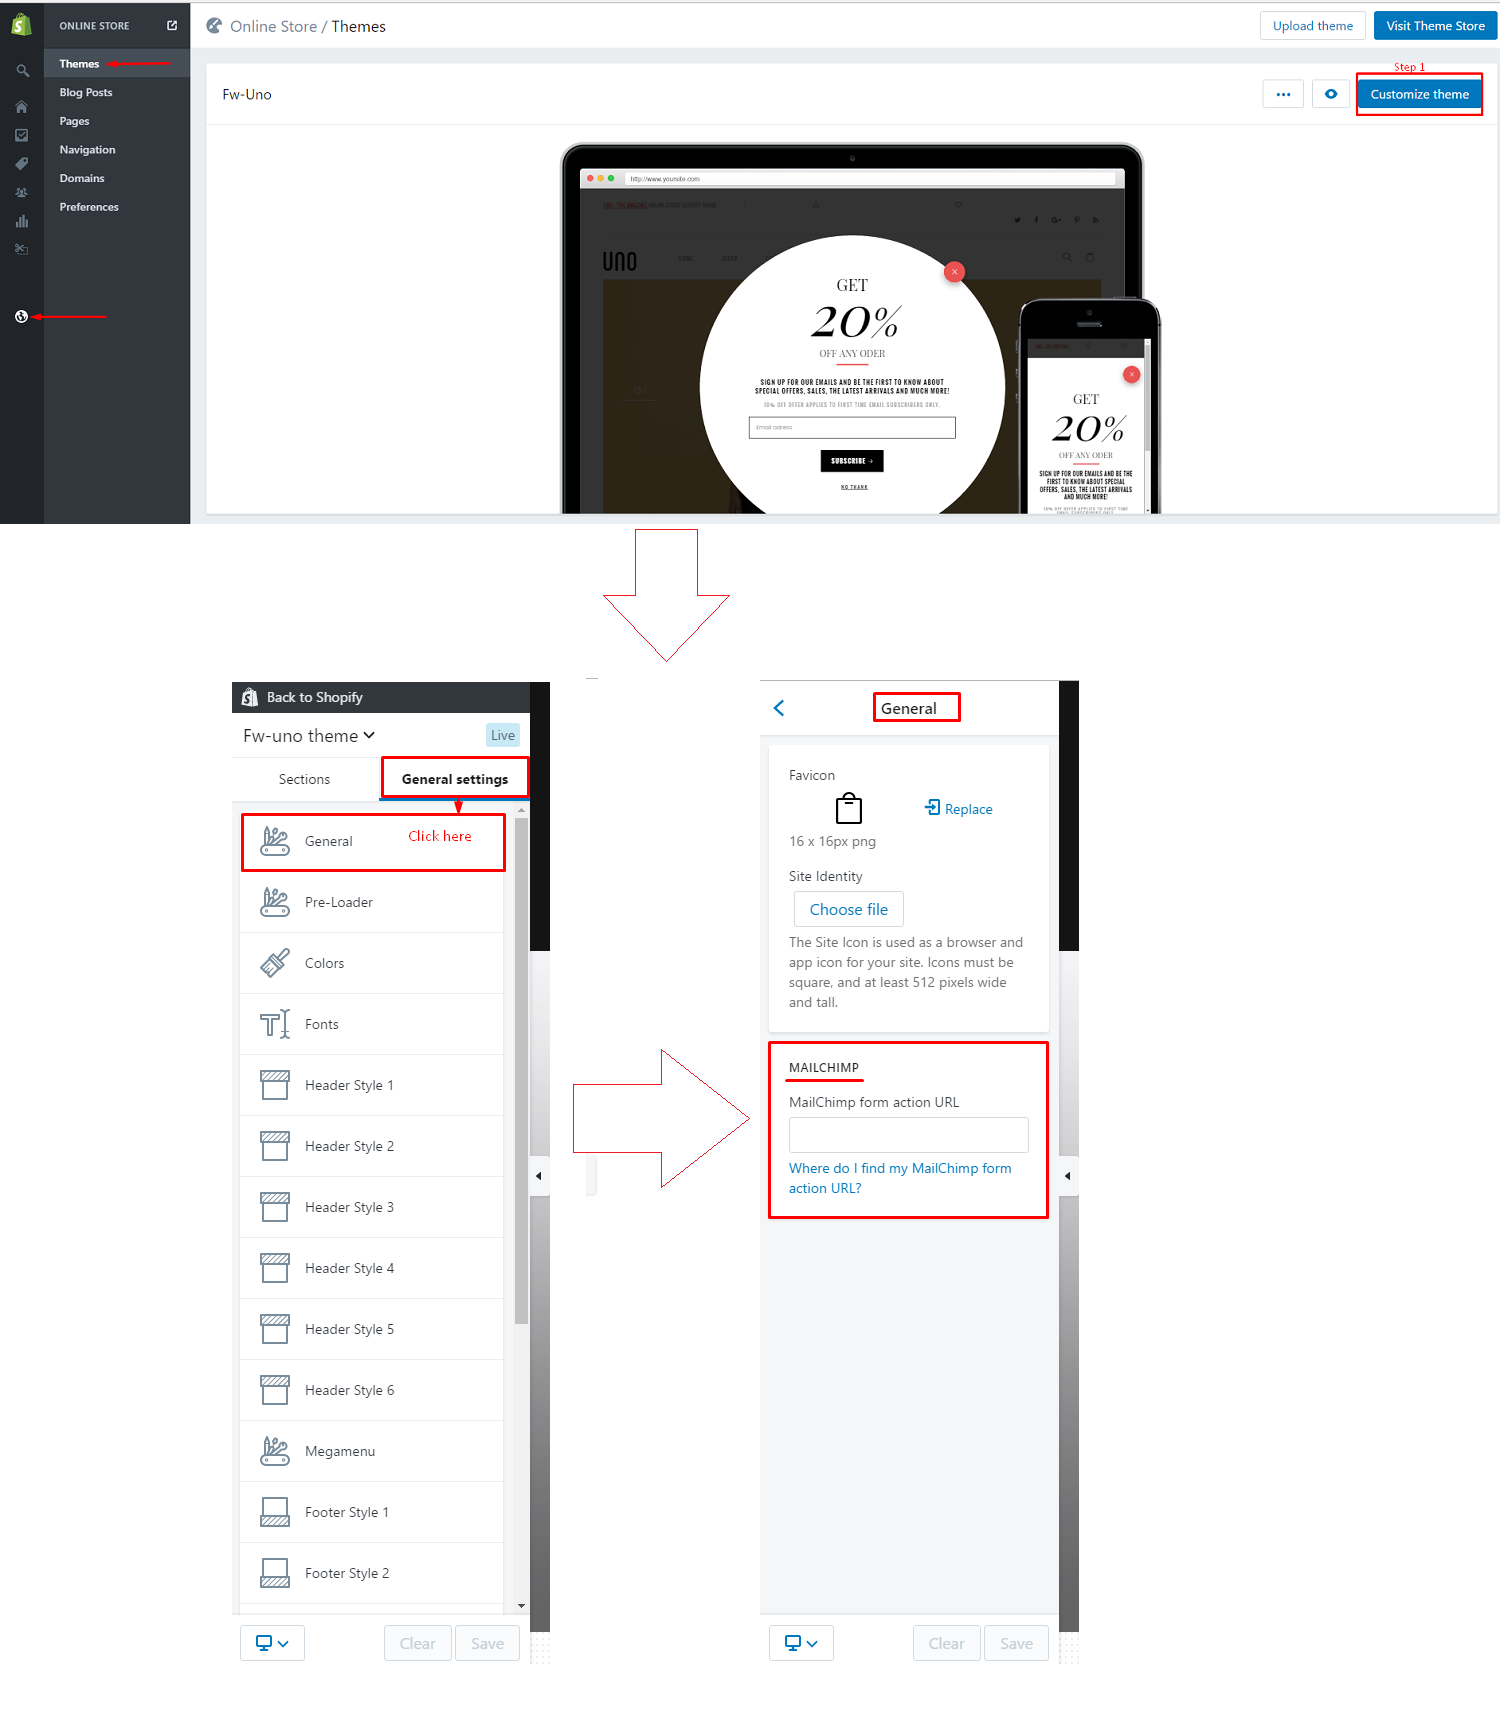
Mailchimp Config
Login Store > Customize theme > General settings tab > General[MAILCHIMP]
Popup Newletter
Login Store > Customize theme > General settings > Popup Newletter
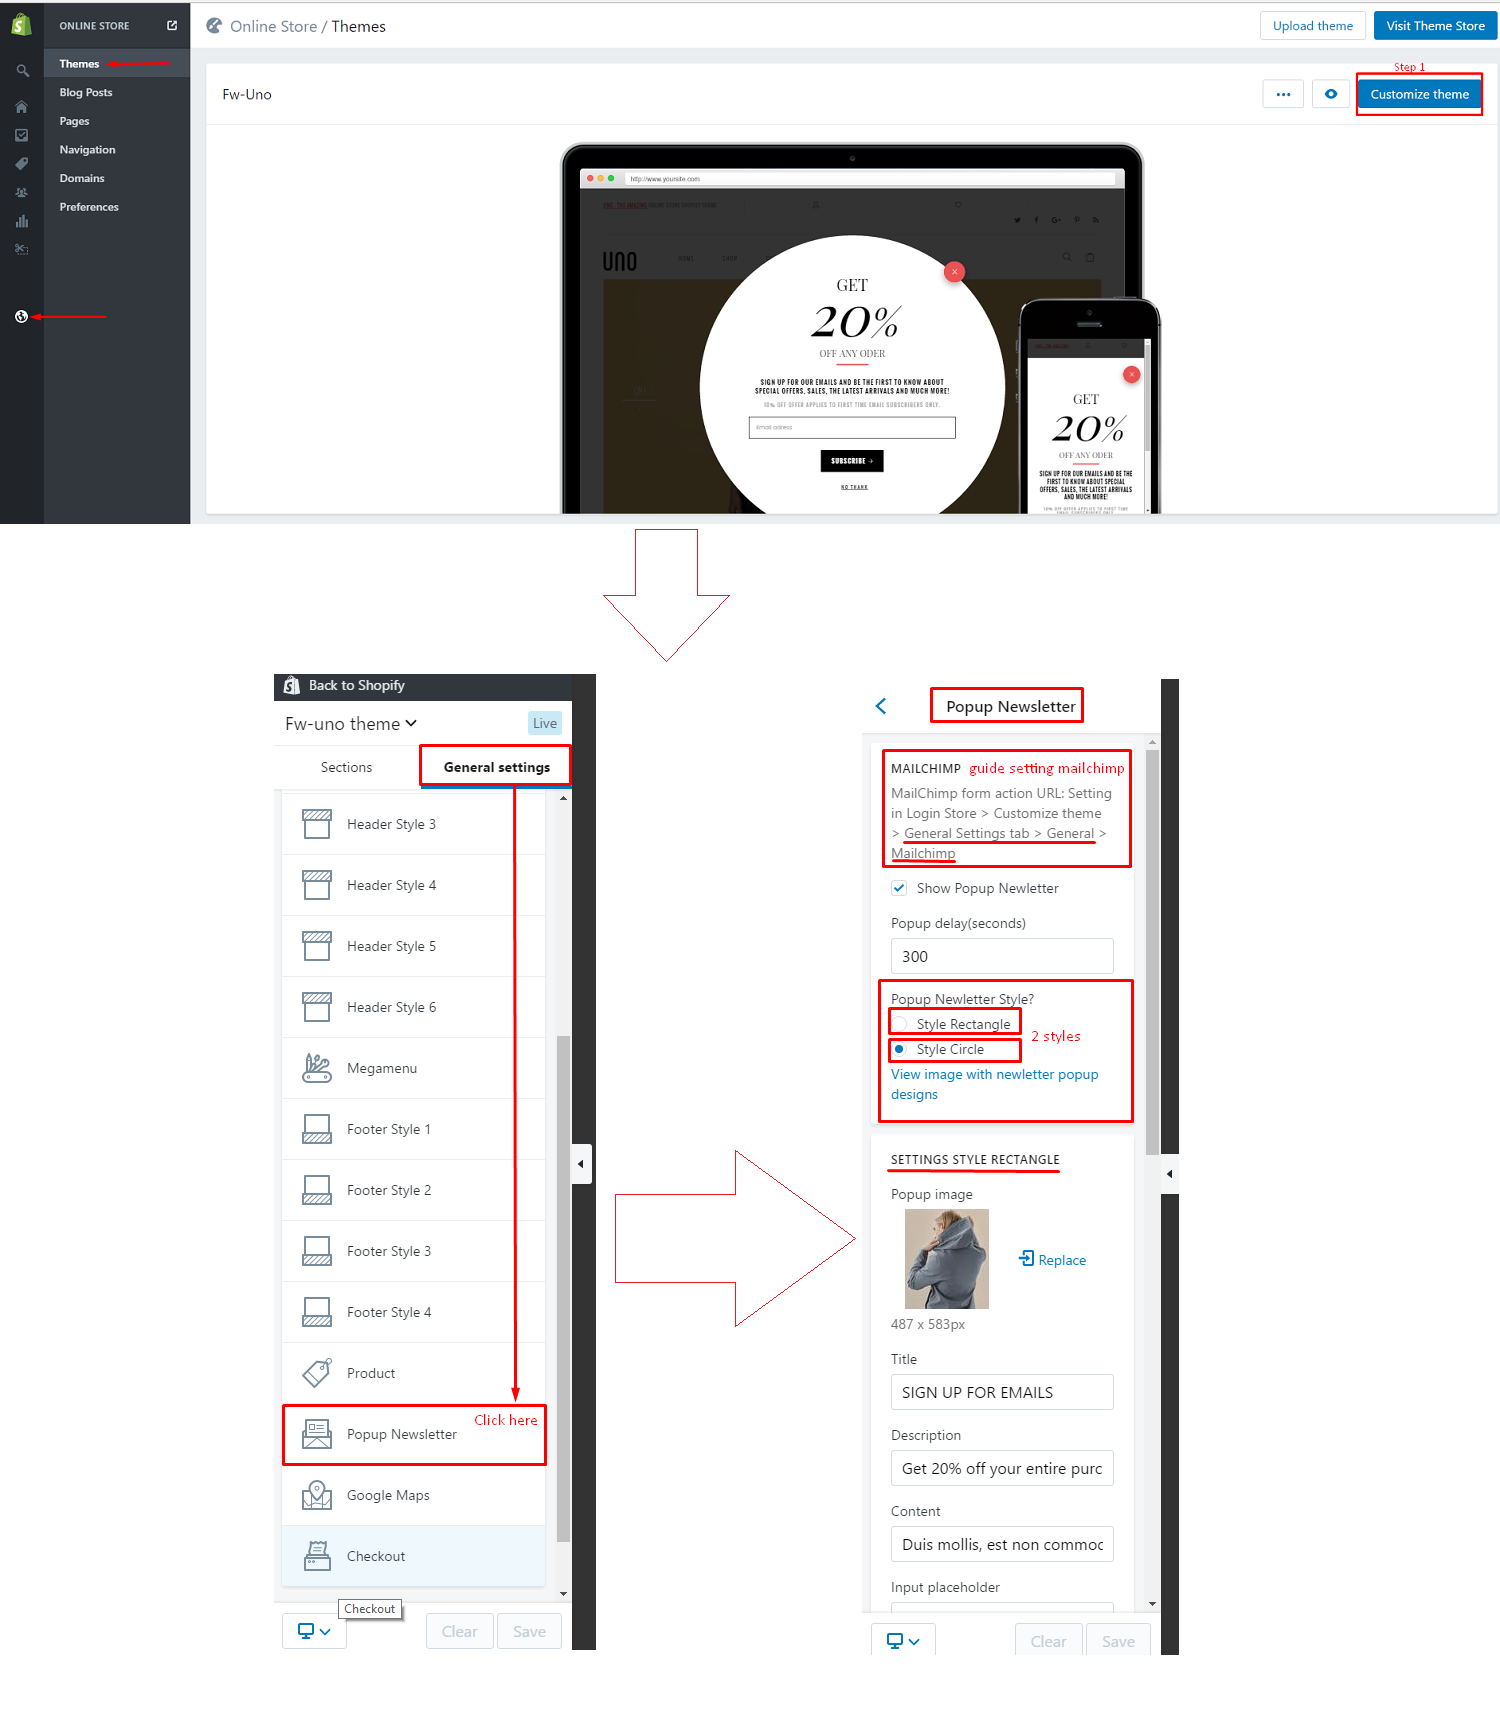
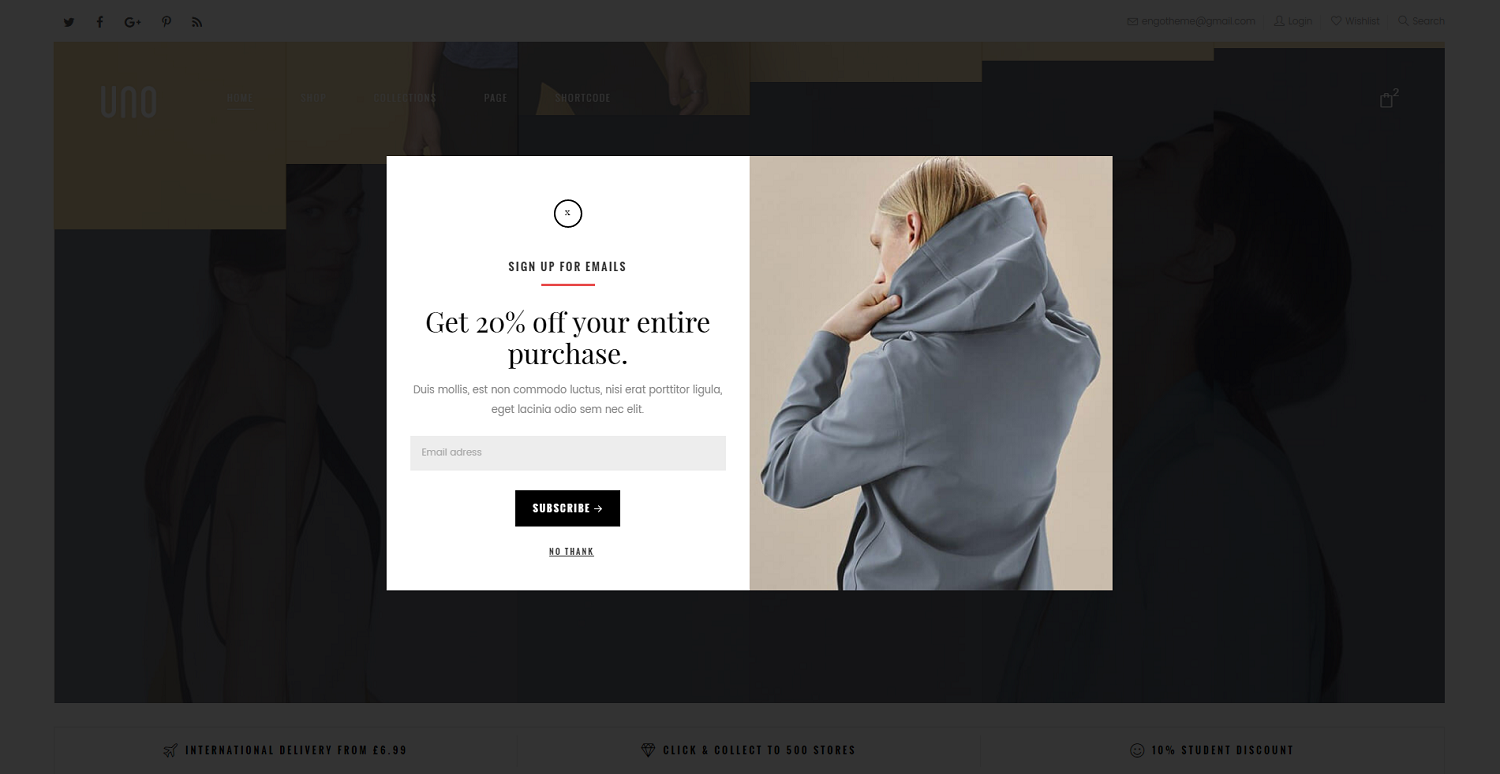
Popup Newletter: Style Rectangle
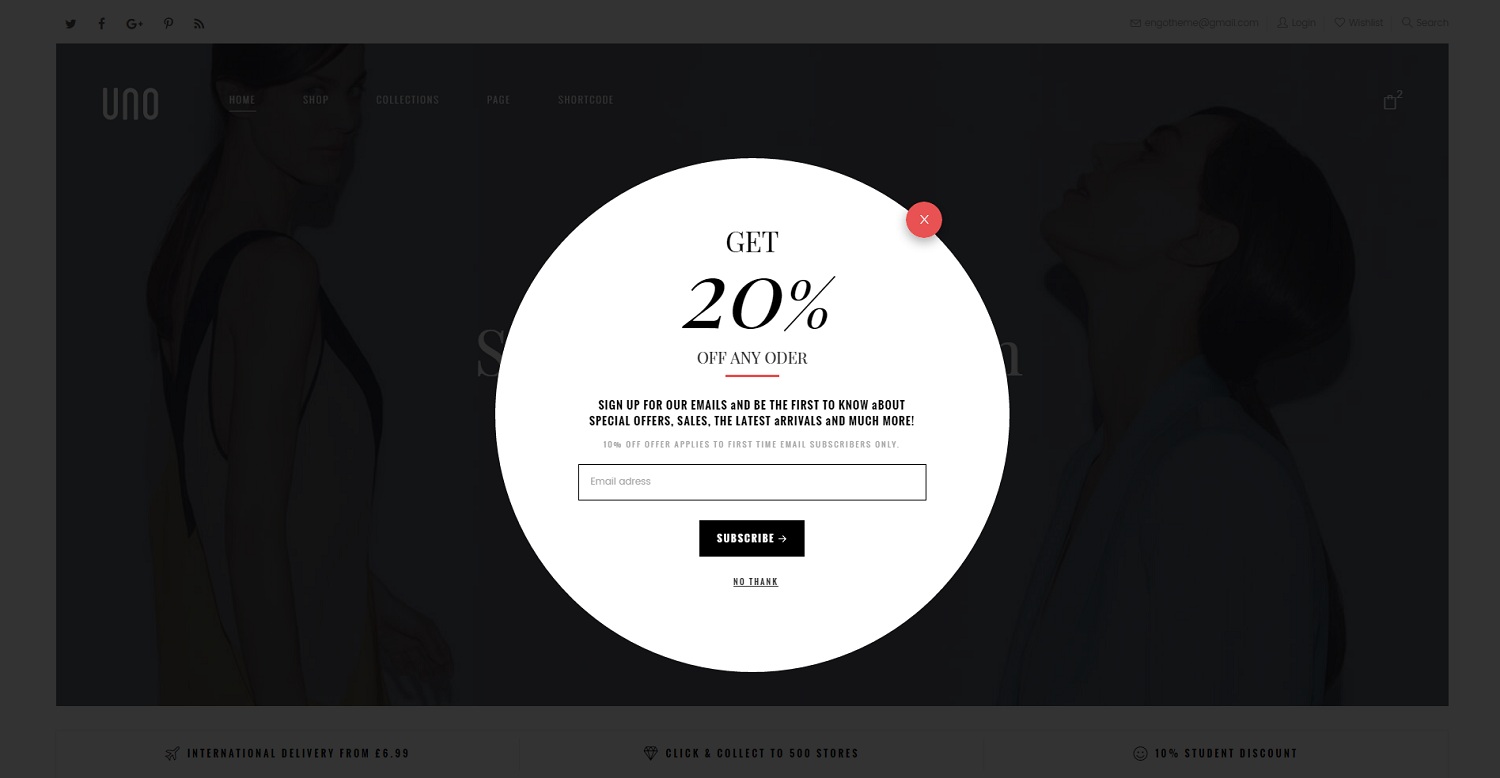
Popup Newletter: Style Circle
Navigation and Megamenu
Creat menu navigation
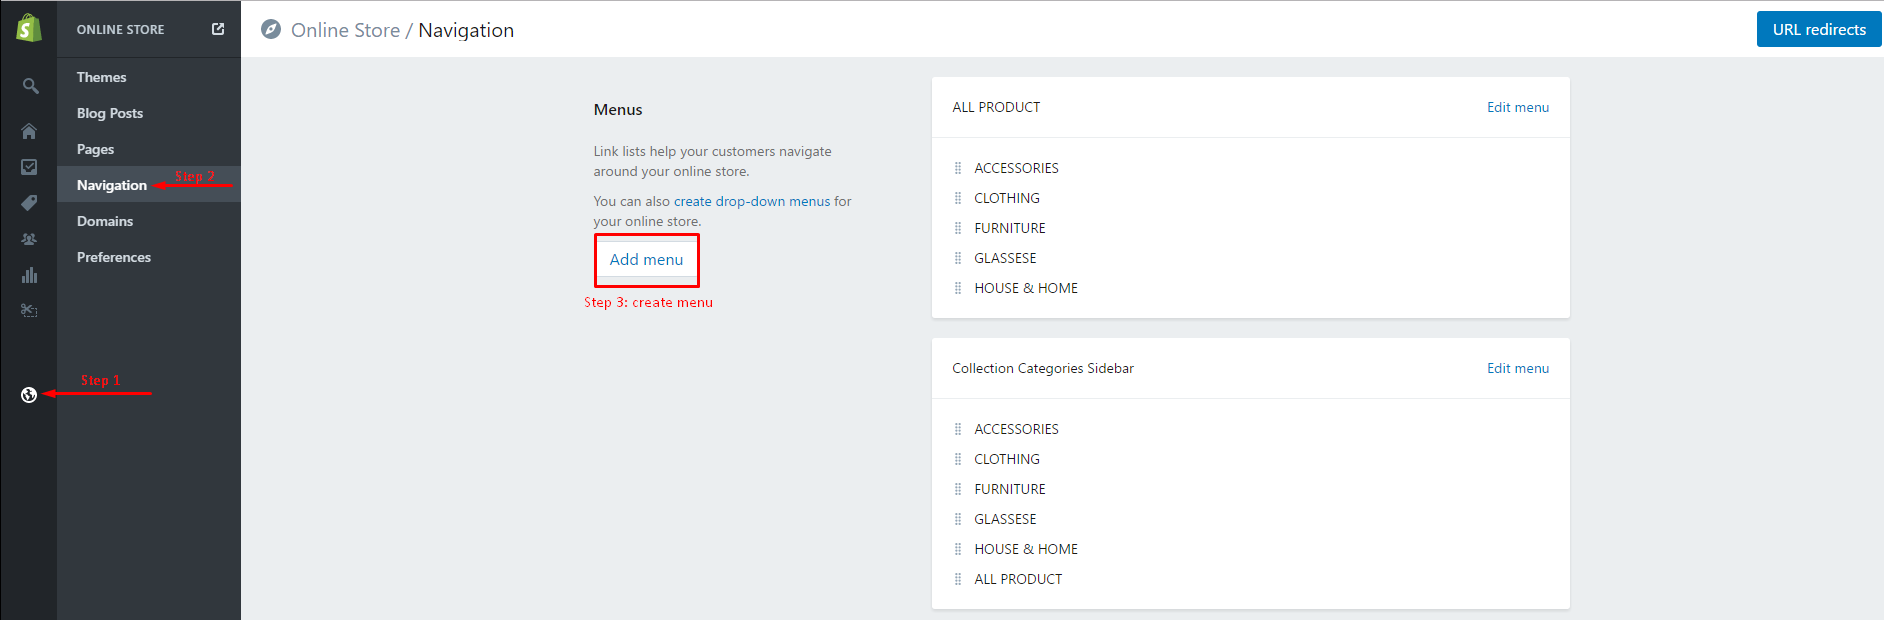
Add new menu
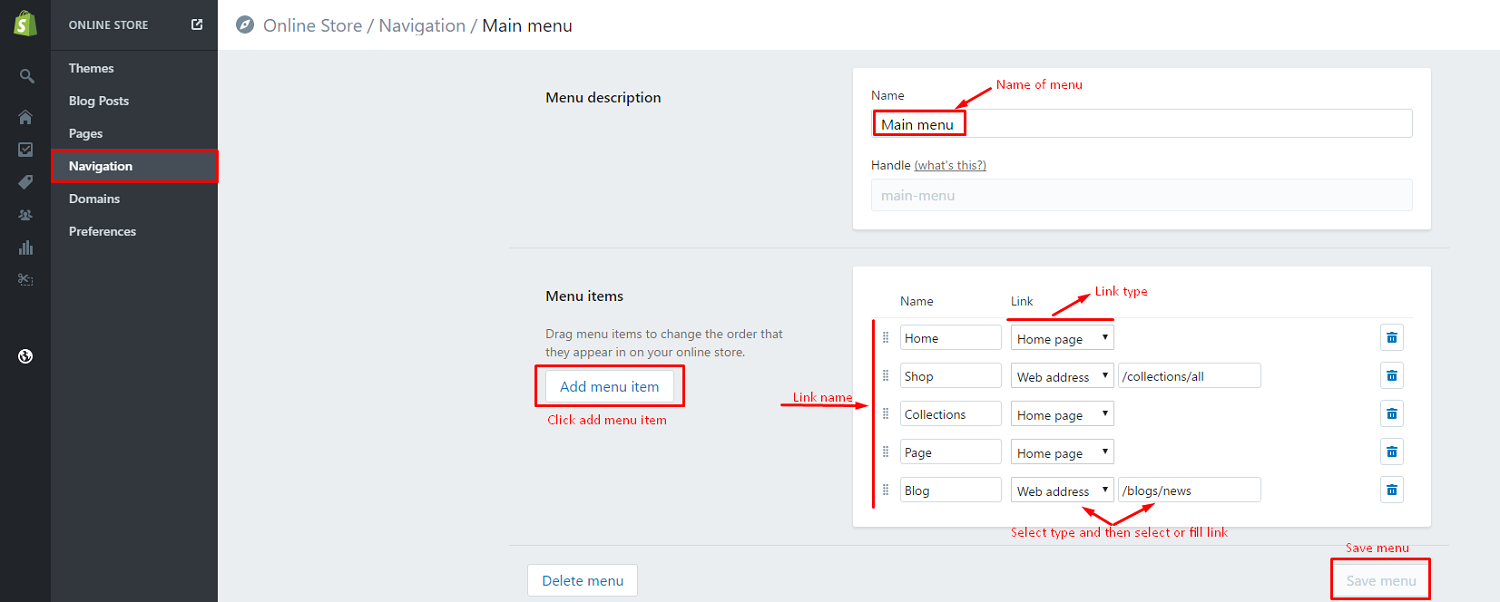
Create Dropdown Menu
Go to this page https://help.shopify.com/manual/sell-online/online-store/menus-and-links#create-a-drop-down-menu to know how to create dropdown menu in Shopify.
How to show Mega Menu
Step 1: You need to create menus.
Step 2: Put the items you'd like to show as Mega Menu at Mega Menu Items in Settings.
Step 3: Locate the menu item.
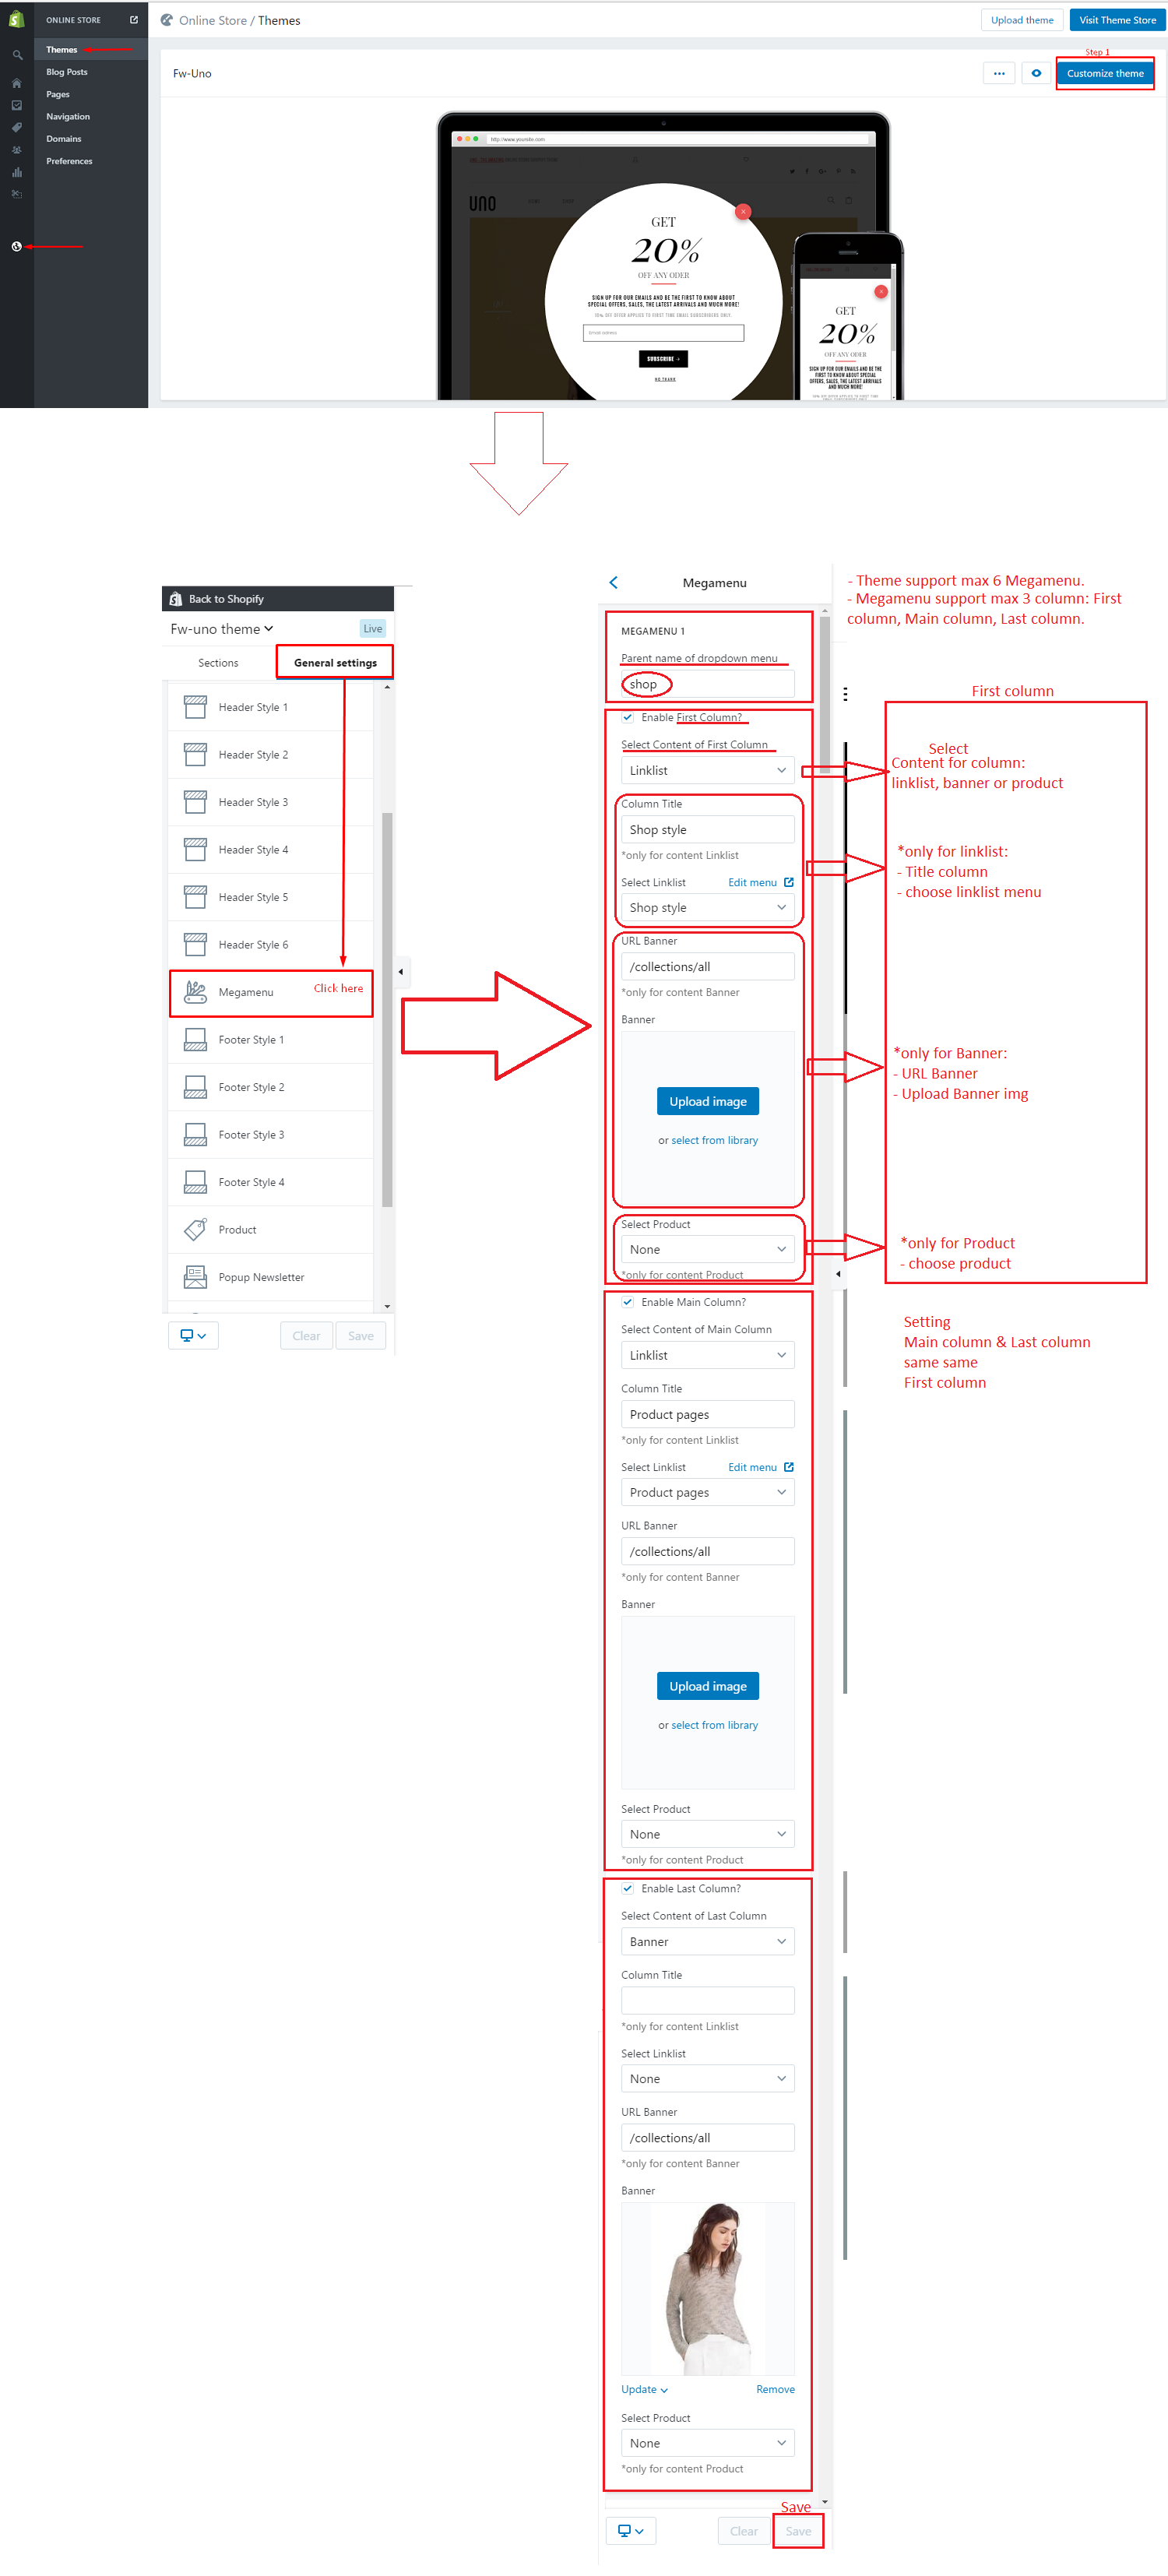
Step 4: At Megamenu, you need to choose content for 3 column in Megamenu.
Mega Menu demo
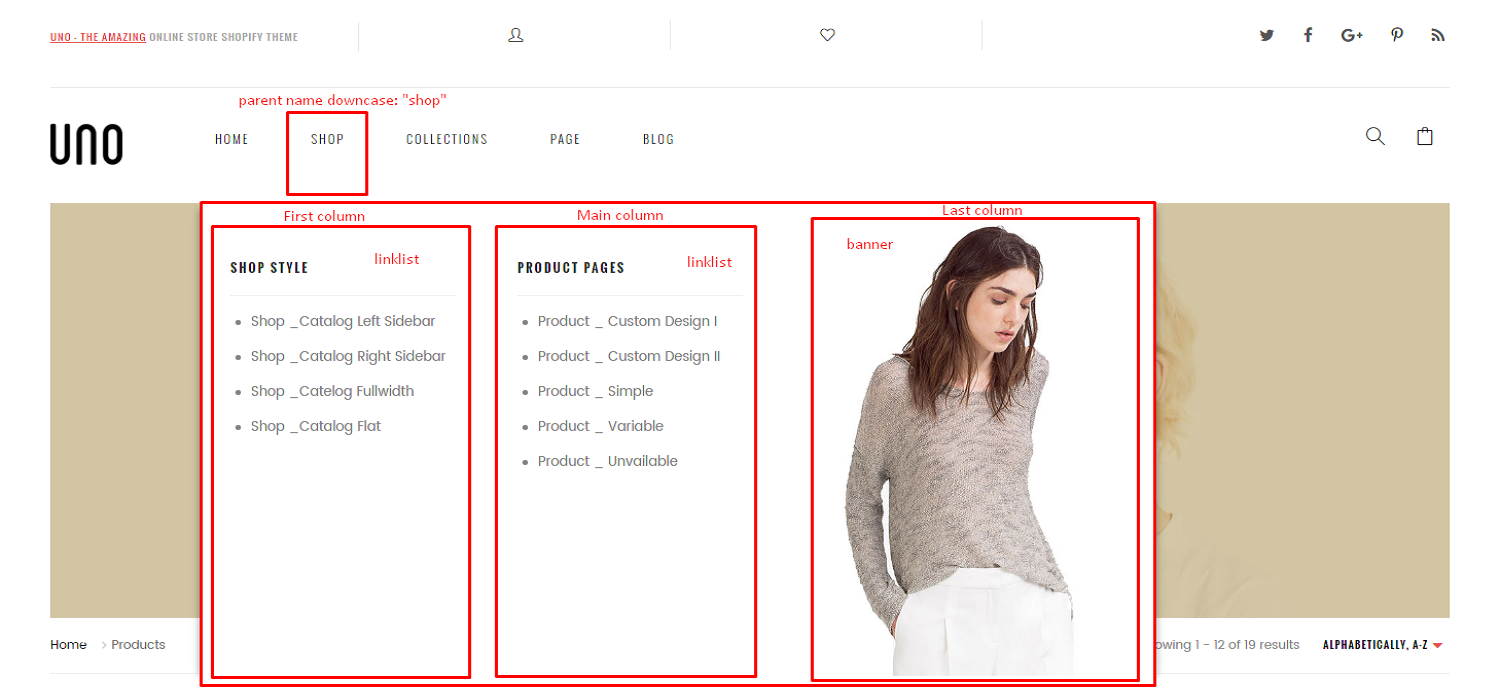
You'd like to display Shop as Mega Menu, you need to:
1. Create the Shop collection link list in Navigation.
2. In settings, please put shop(lowercase) text into Parent name of dropdow menu.
3. Locate the Shop item in Menu is 1.
4. In settings, at MEGAMENU 1, please do follow the below image.
Setting Colors & Google Fonts
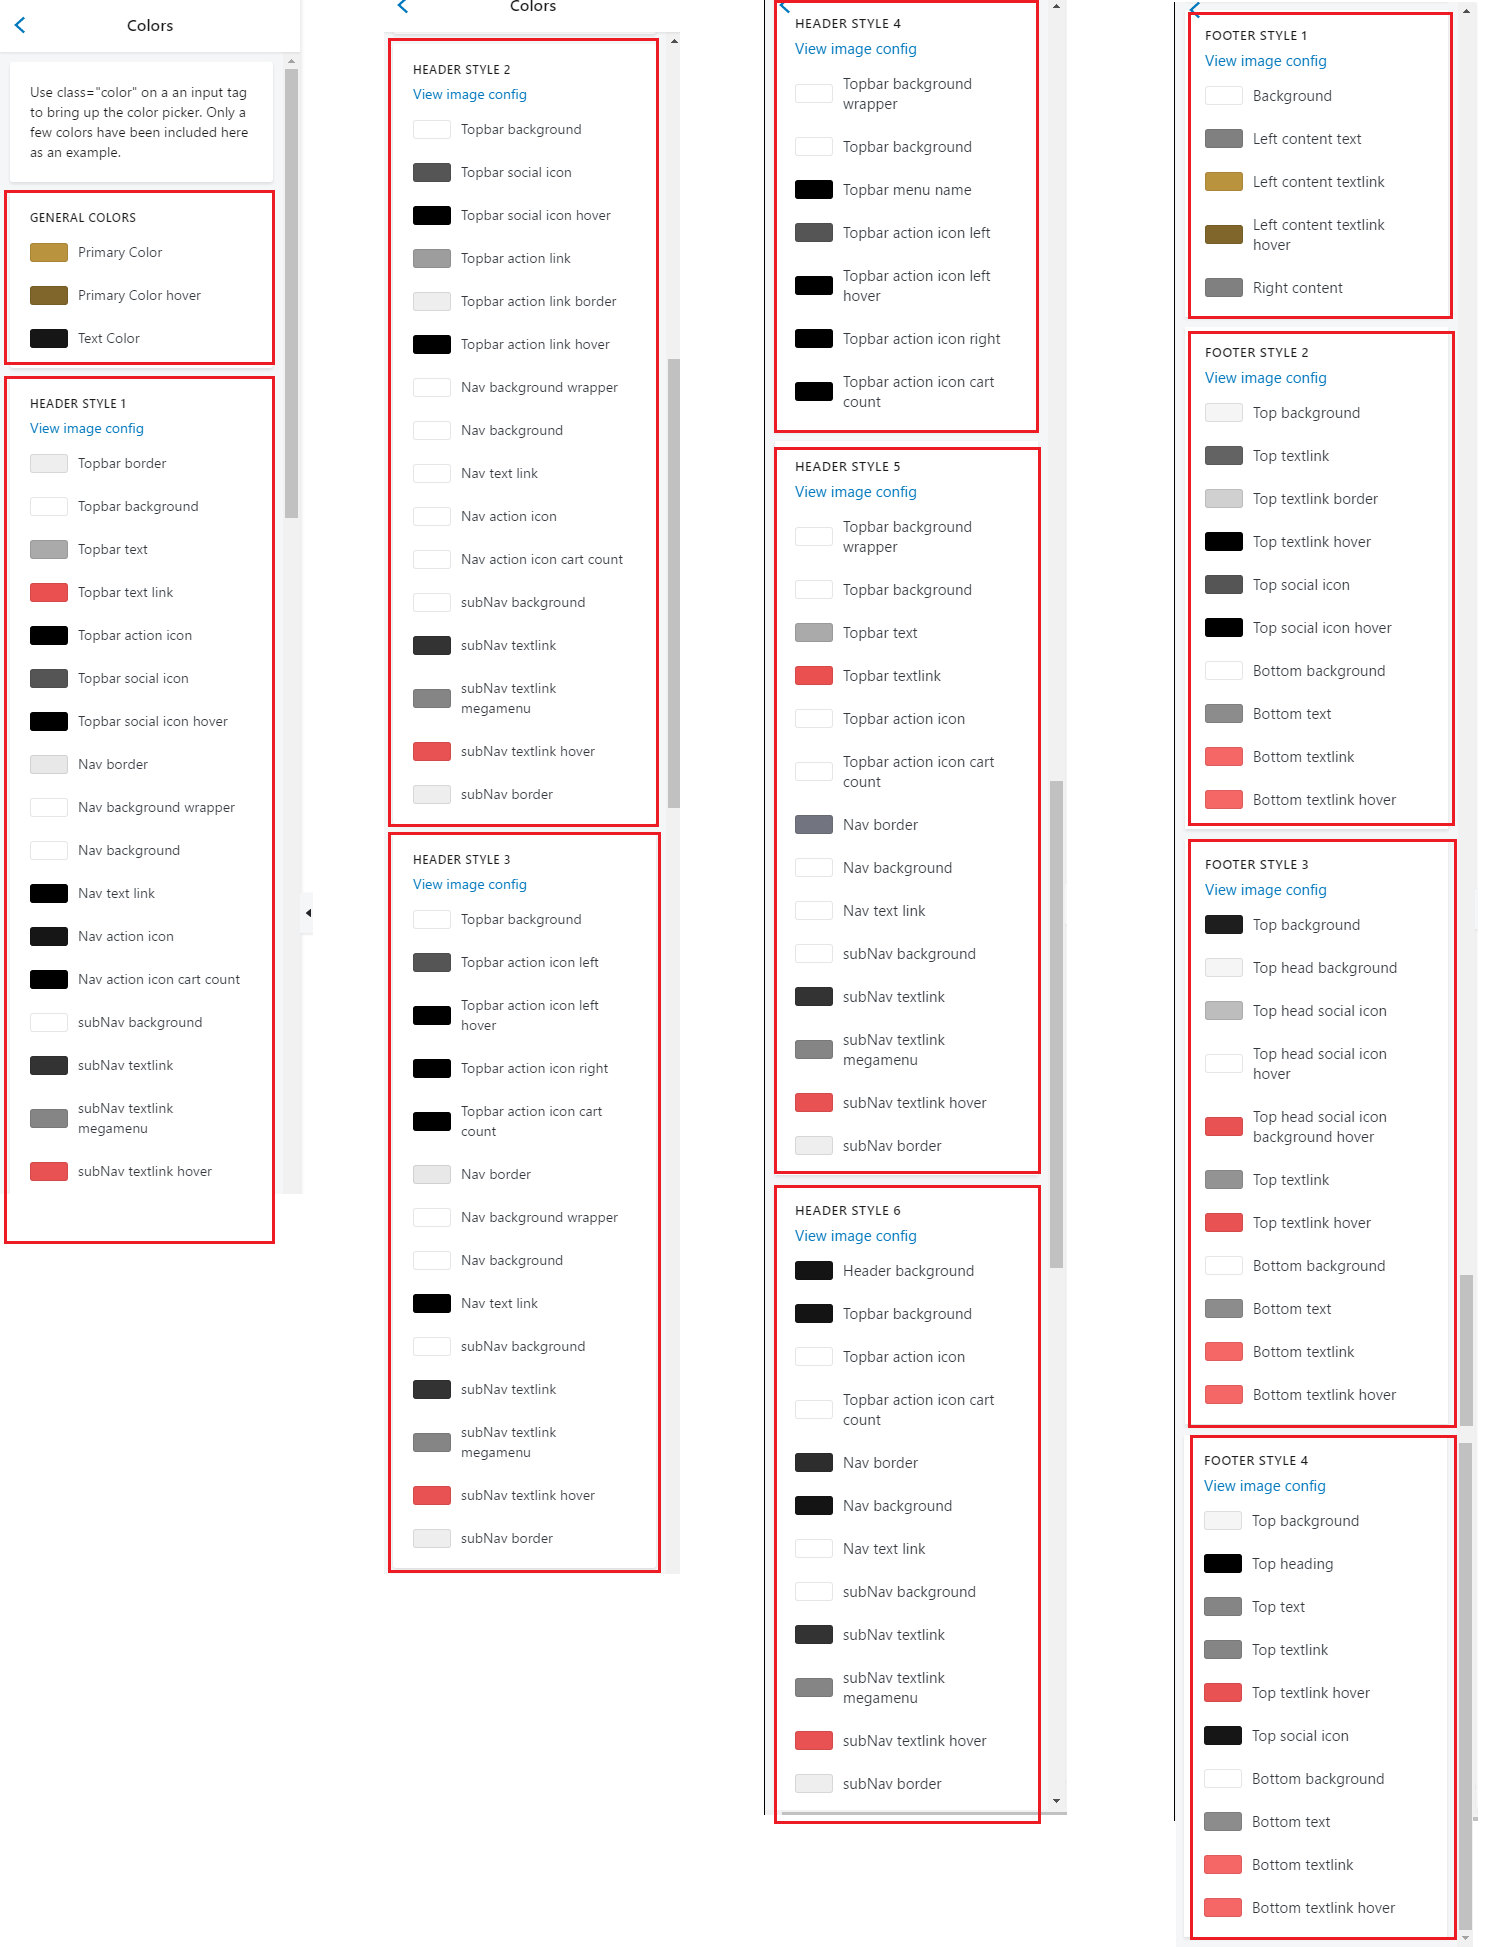
Colors
Setting colors in Colors (Login Store > Customize theme > Settings tab > Colors)
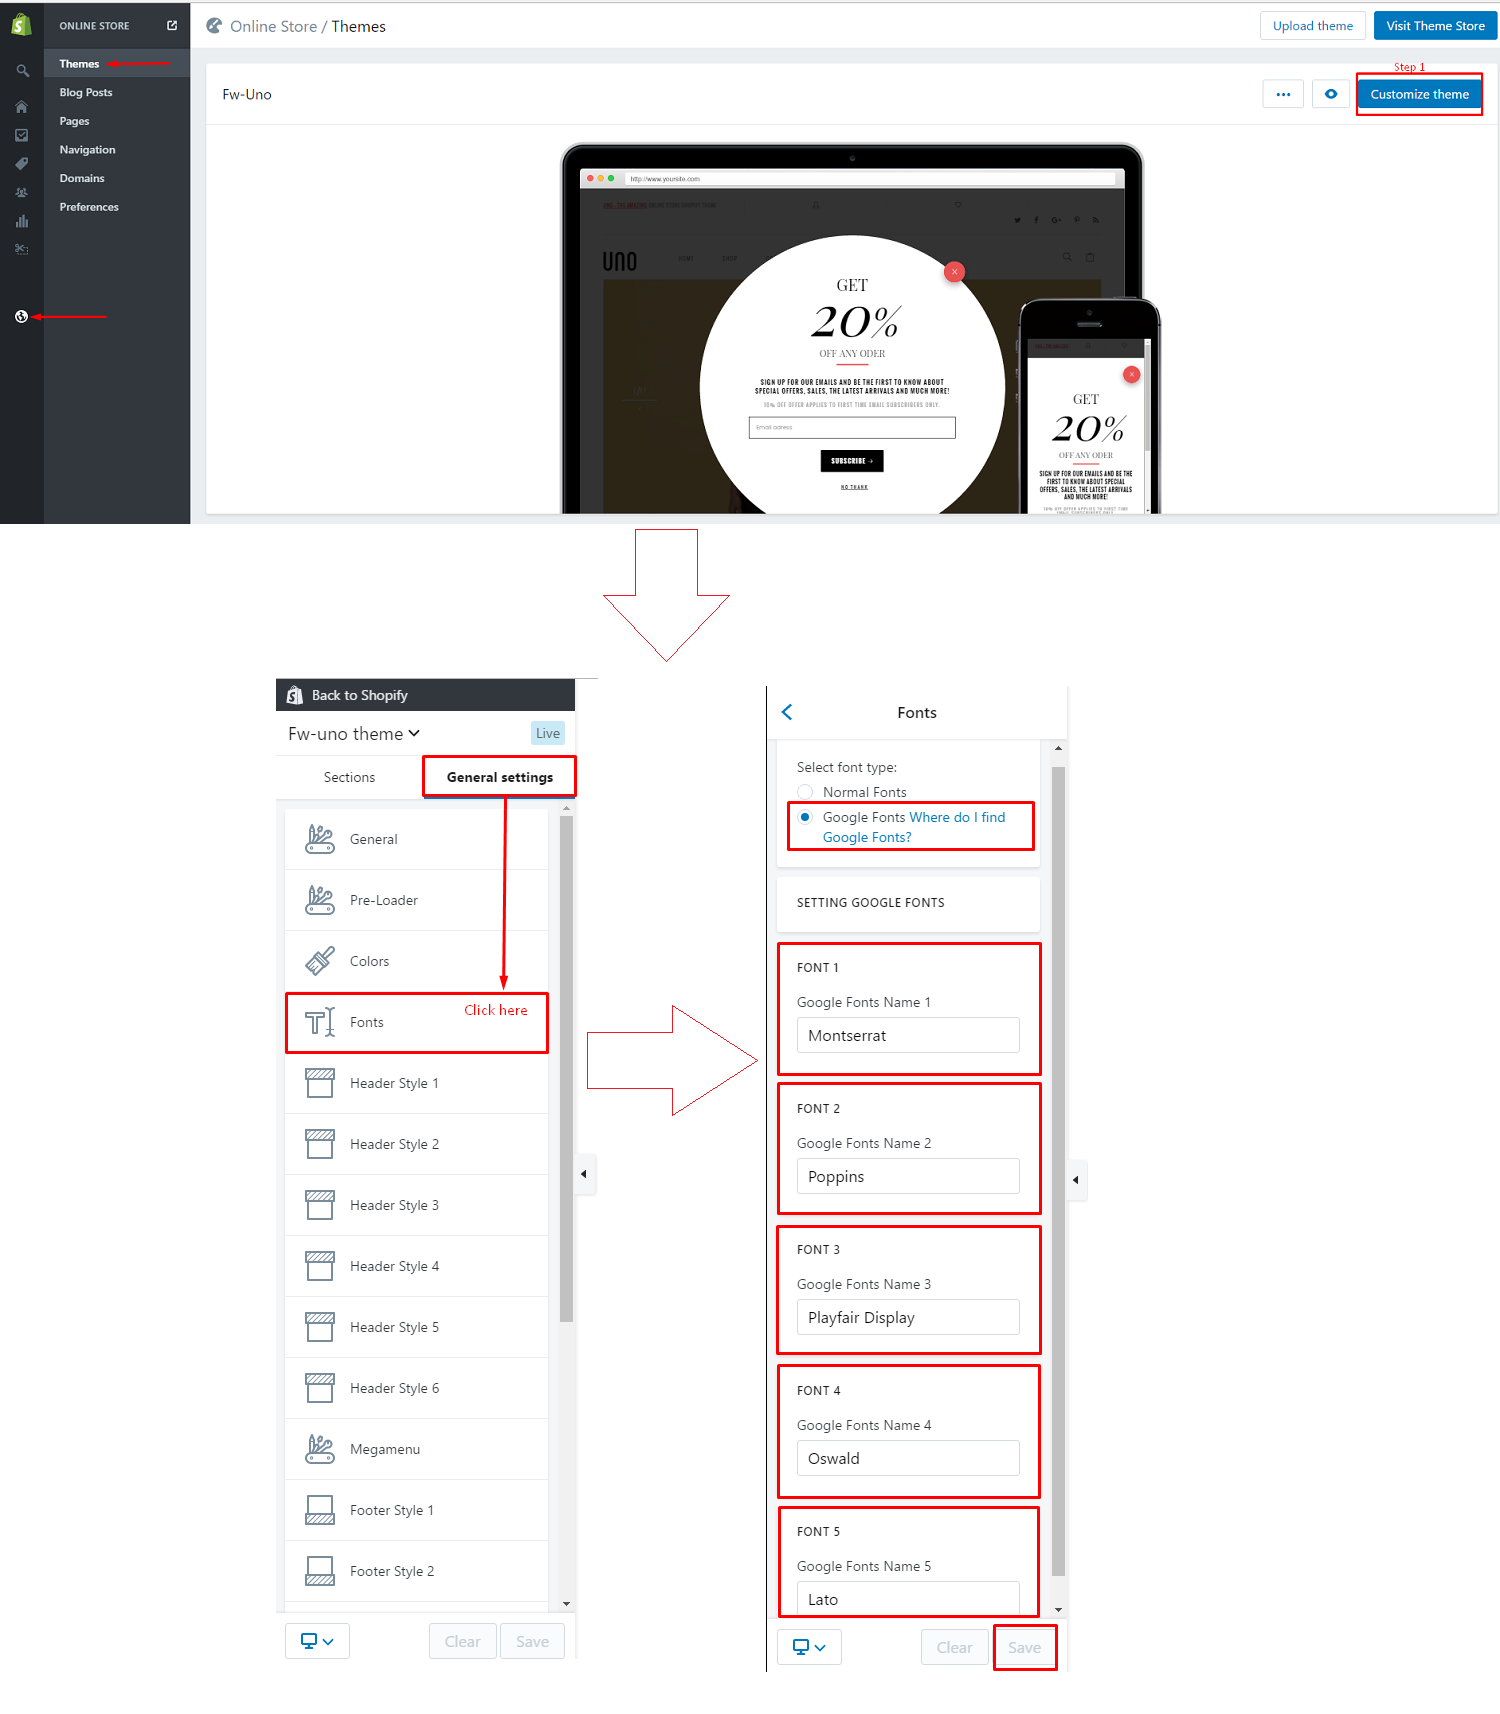
Google Fonts
Setting google fonts in Fonts (Login Store > Customize theme > Settings tab > Fonts)
Using of Color Variant Product
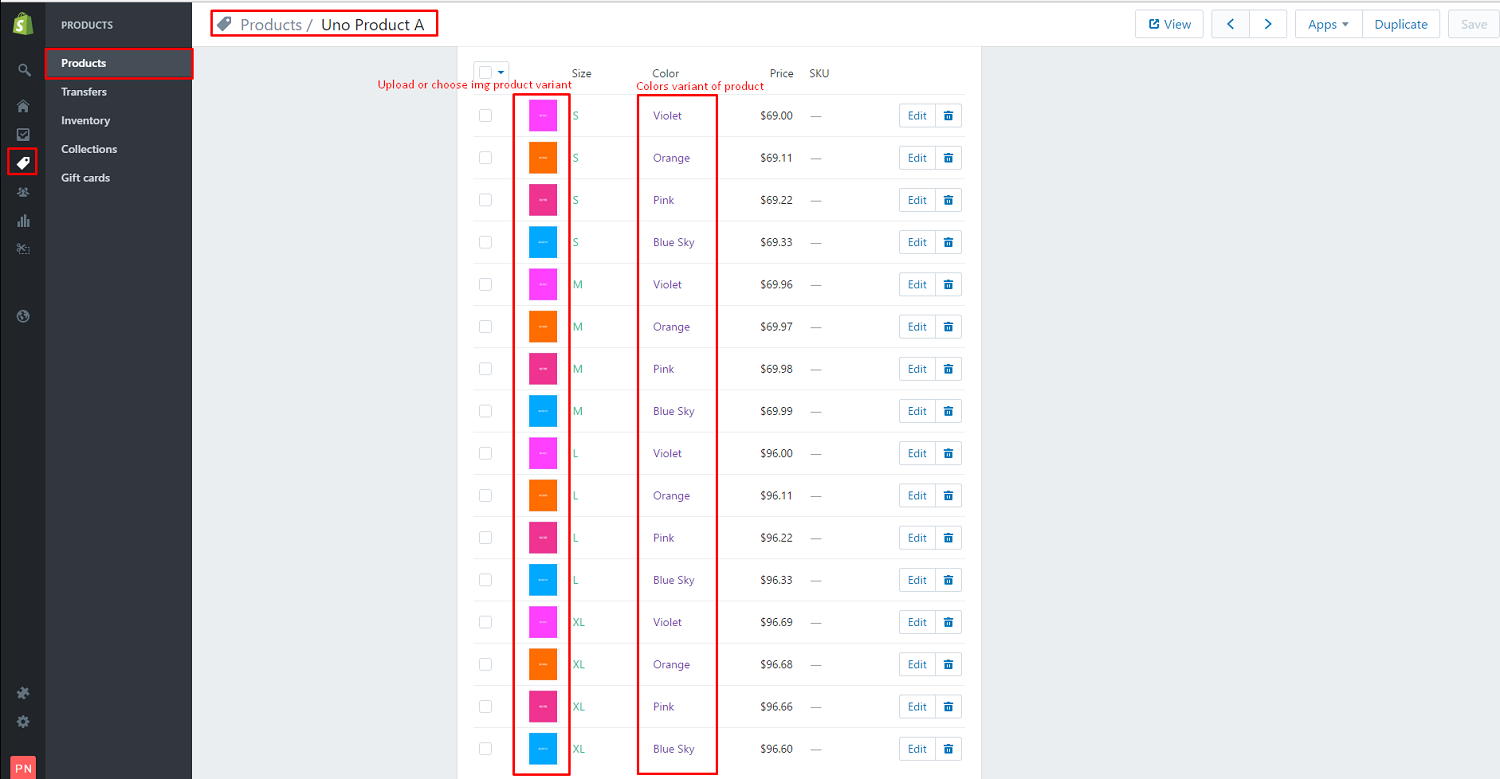
To create product with color variant as in our store, you need to do following steps:
Login to your Shopify admin panel and go to Products, then click on the product you would like to add color variants.

In Variants section, you need to upload image of the variants.
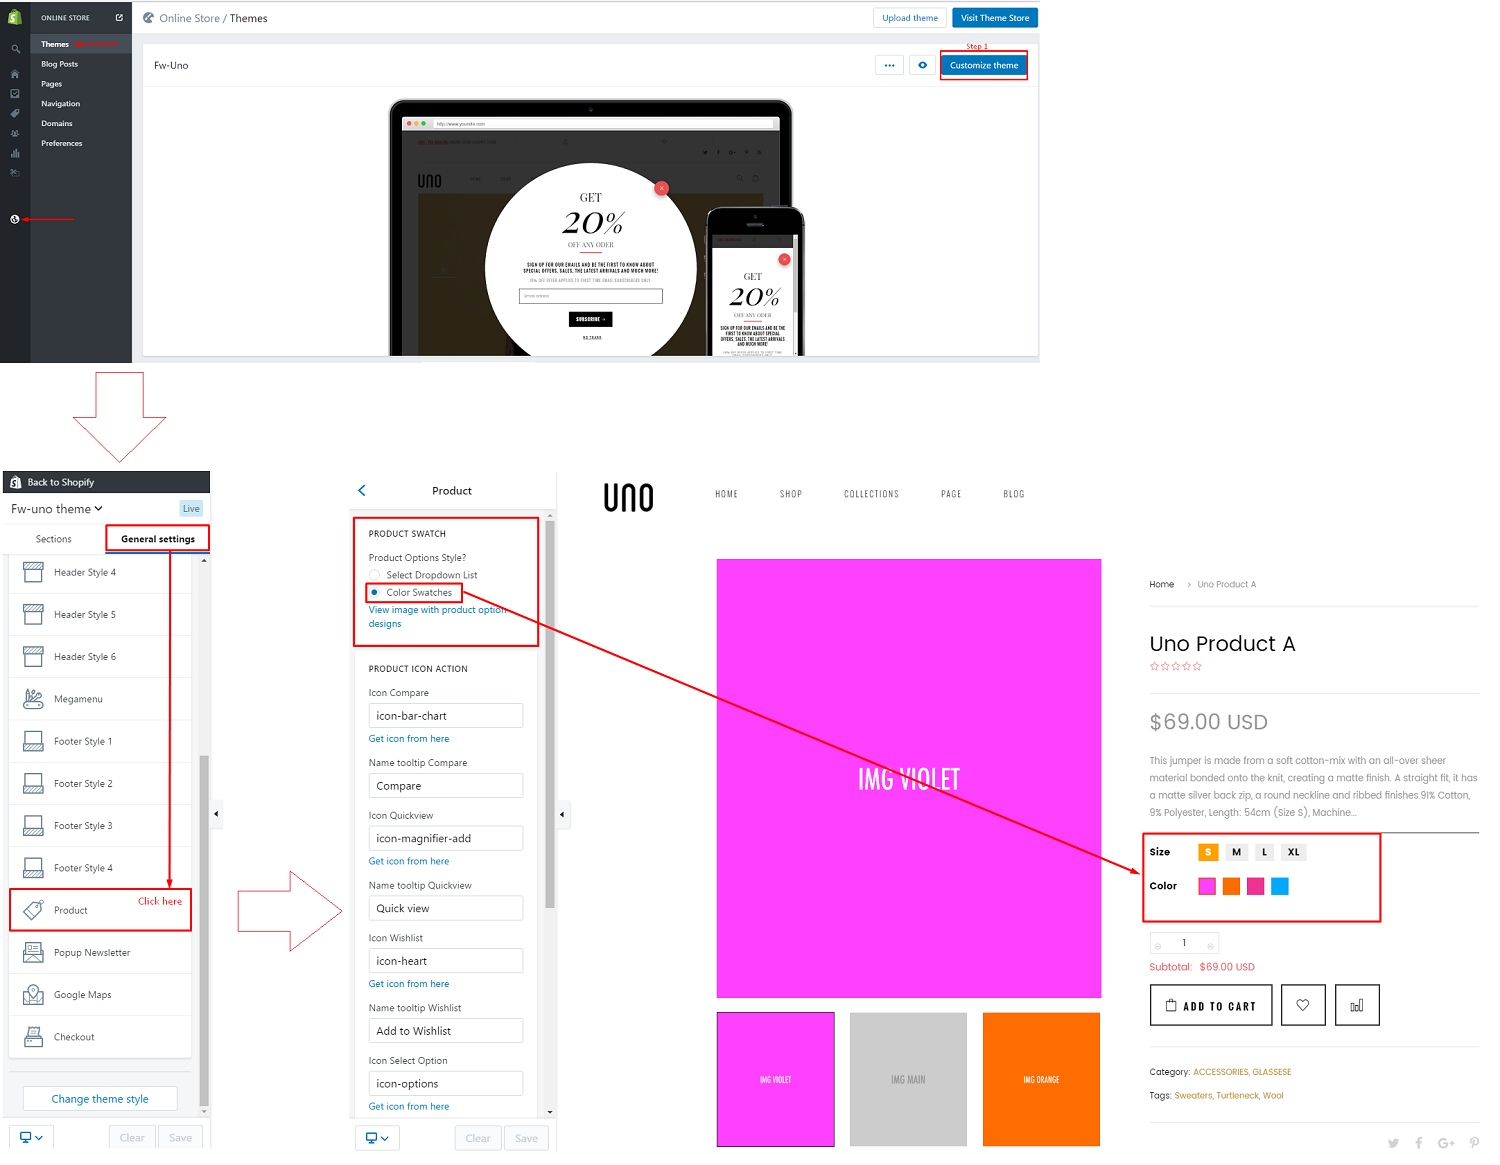
After that, to show color swatch icons, you can use one of two below methods:
Step 1: Login Store > Customize theme.
Step 2: Settings tab > Product: choose Color Swatches
1/ Use color name for the option.
Naming convention: No space and the name need to be existed in this table: http://www.w3schools.com/colors/colors_names.asp
For example: Red or Black, Green, Yellow.
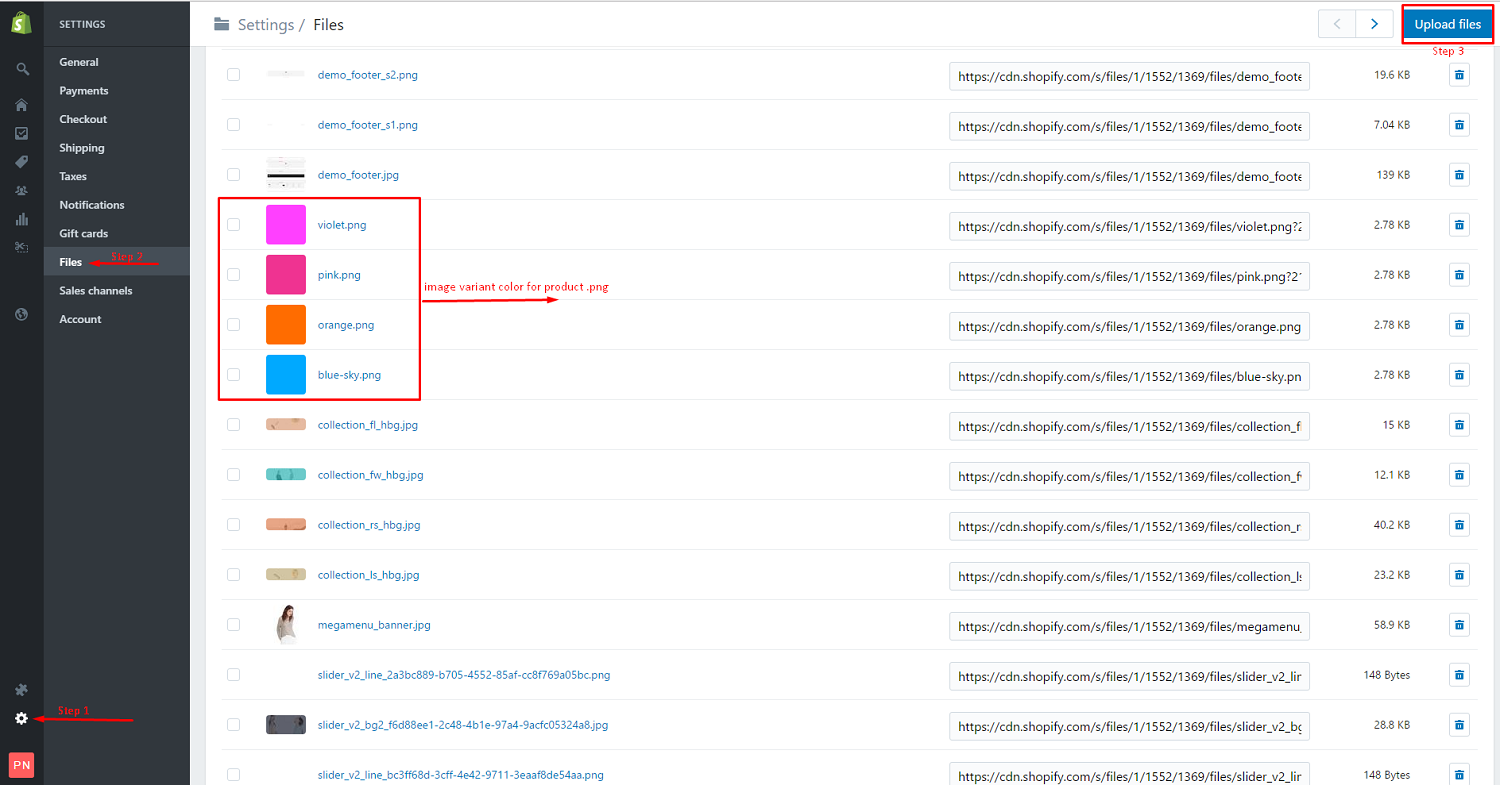
2/ Upload icon with the same name as the variant color name (please use PNG icon). You need to go to Settings --> Files upload images here.
Naming convention: lower cap and use "-" to replace white space.
For example: with the option color name "Green Sea" the icon name will be green-sea.png
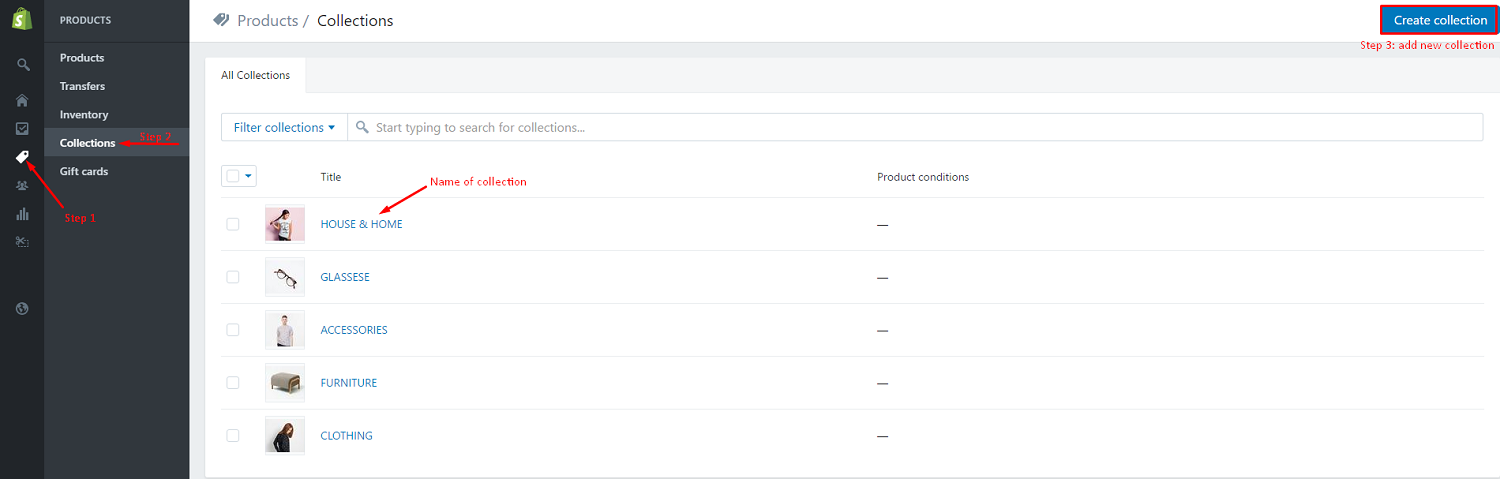
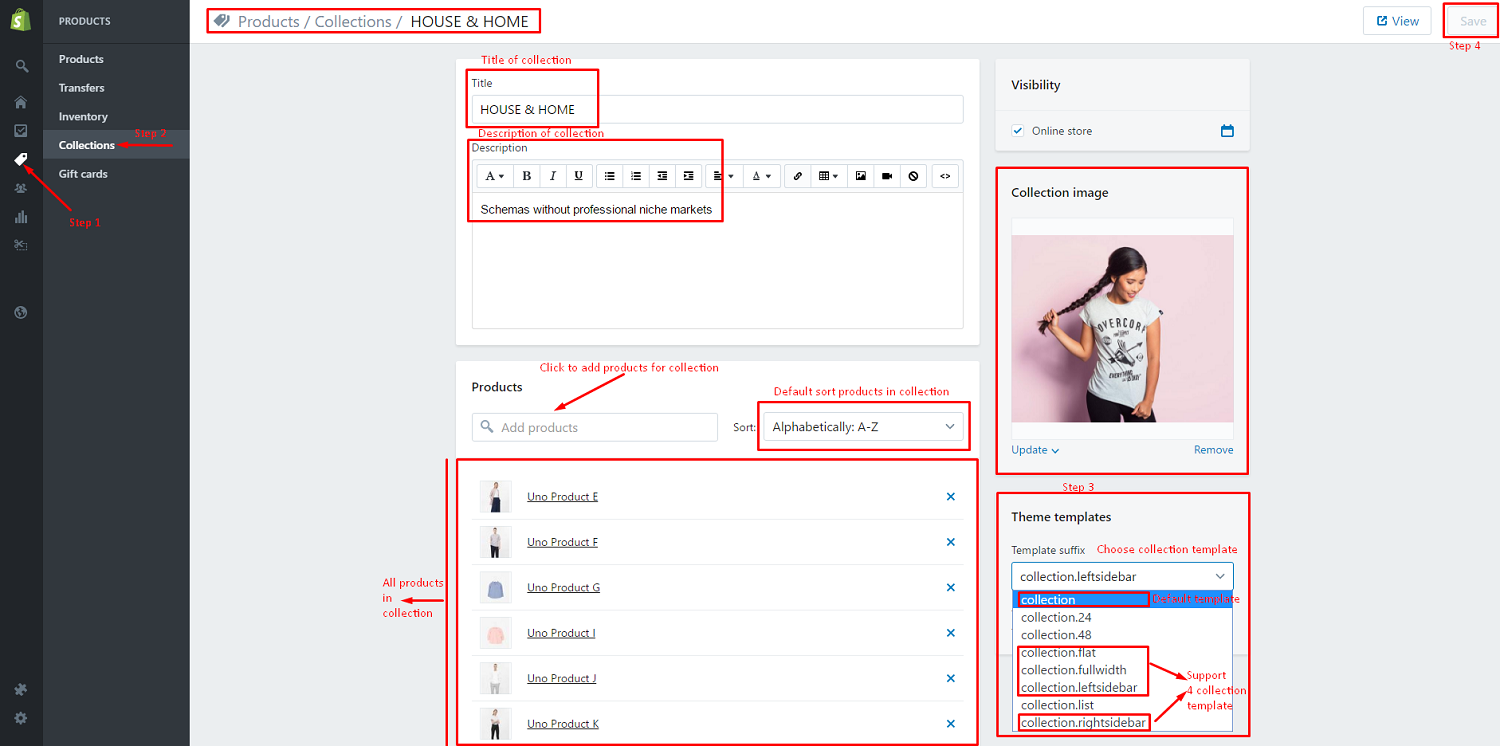
Create Content
Create Collections
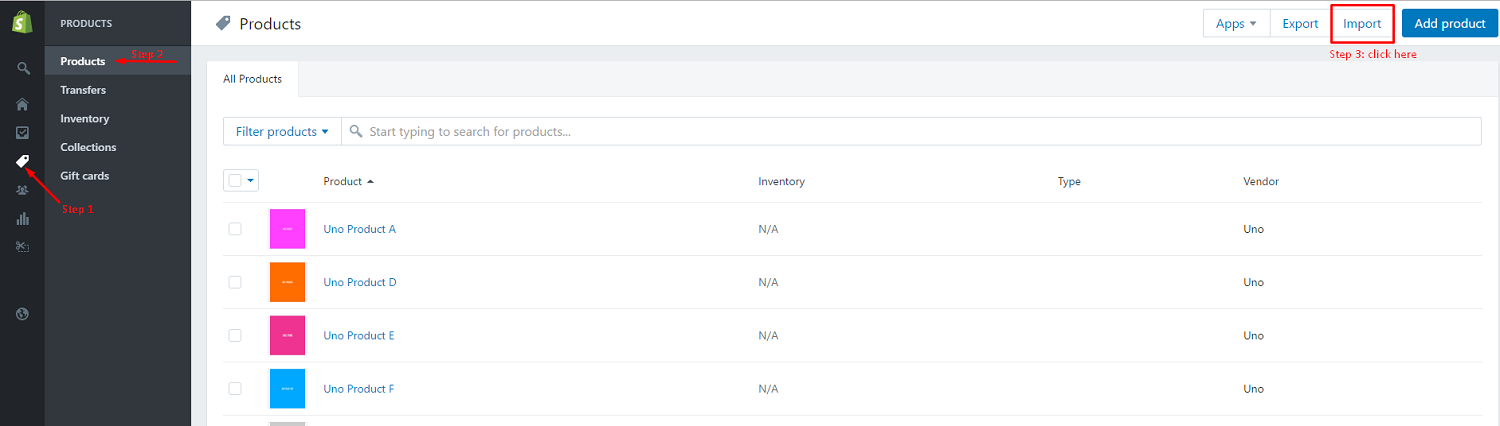
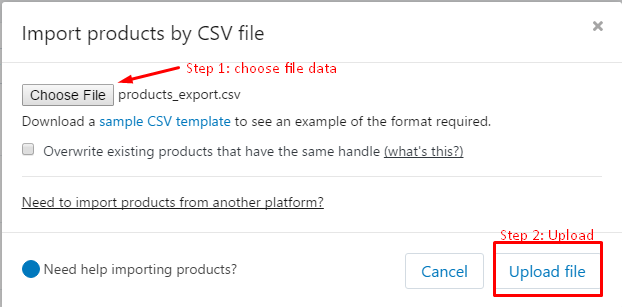
Create Products
1. Import Sample Products
2. Create New Products
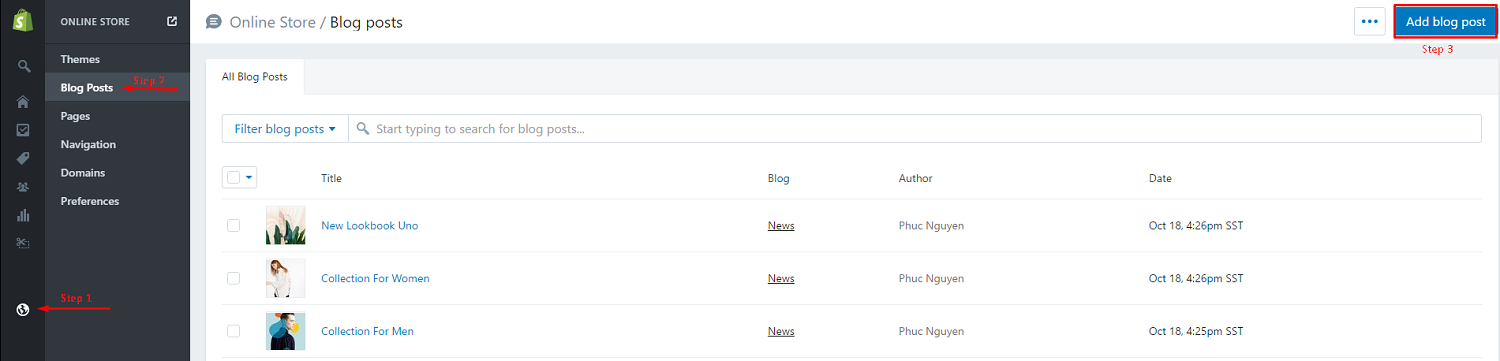
Create Posts
Turn on comment
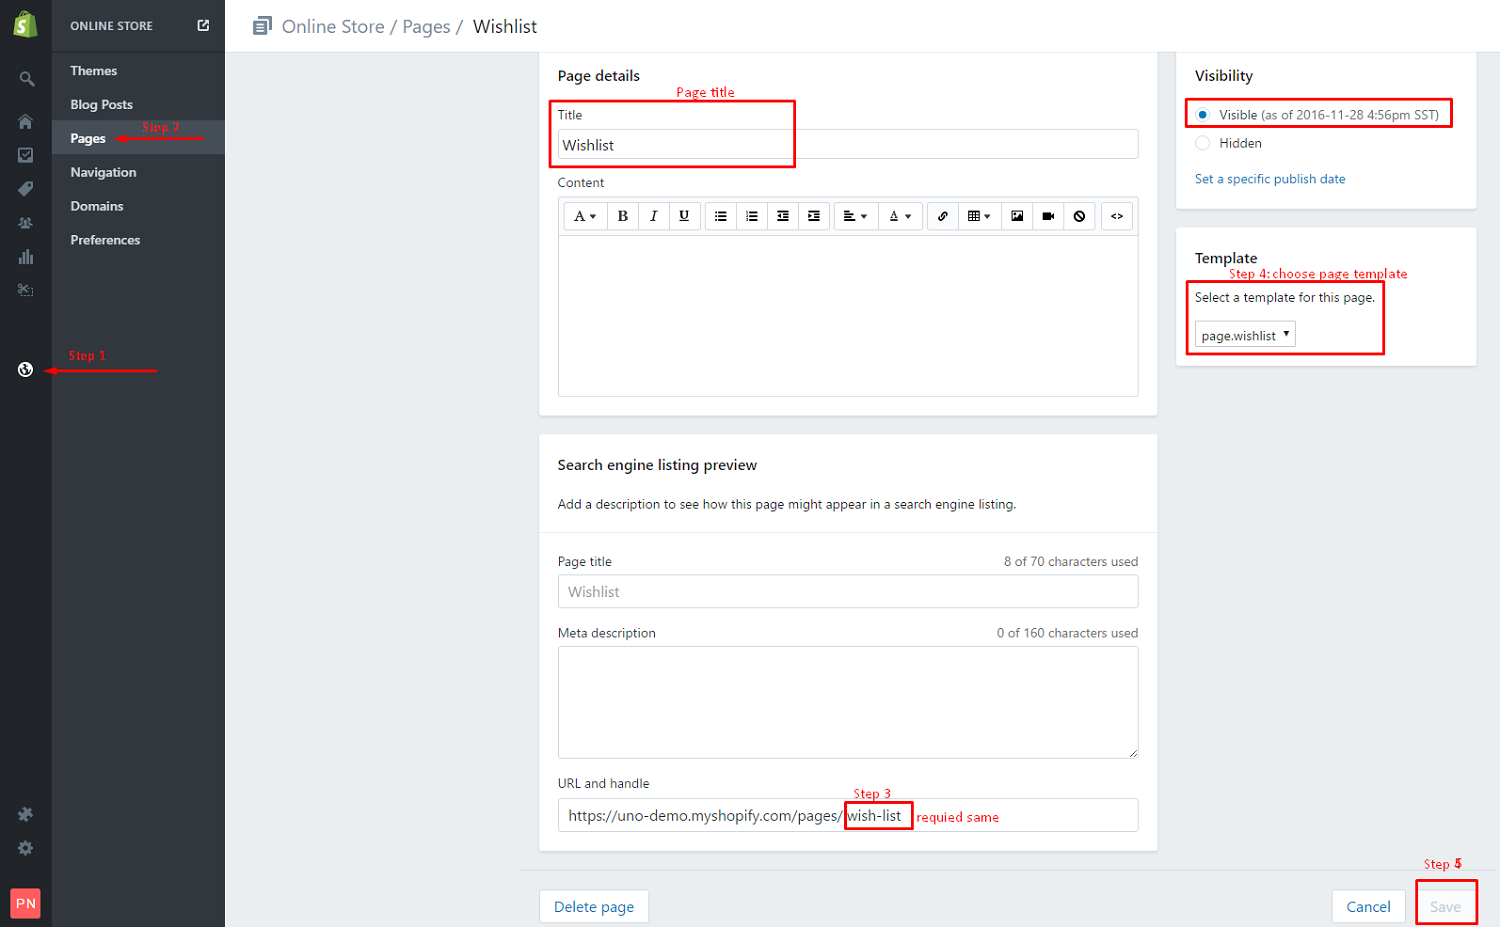
Create Wishlist Page
Create Lookbook page ver1
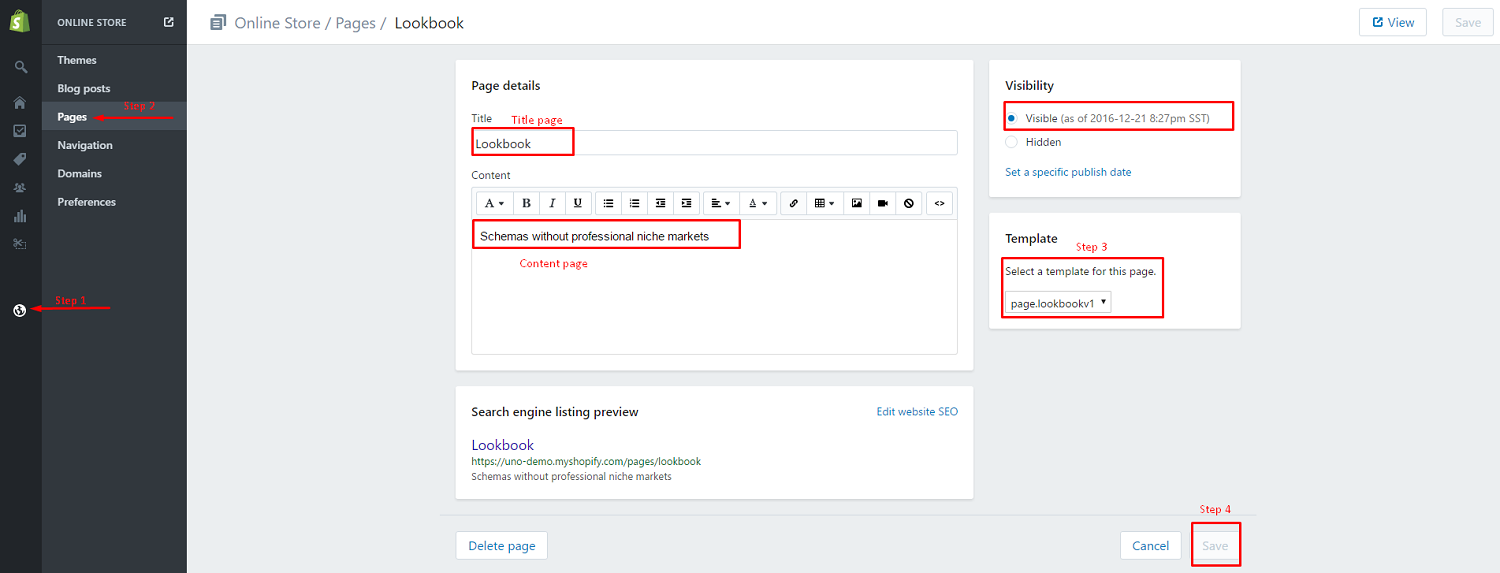
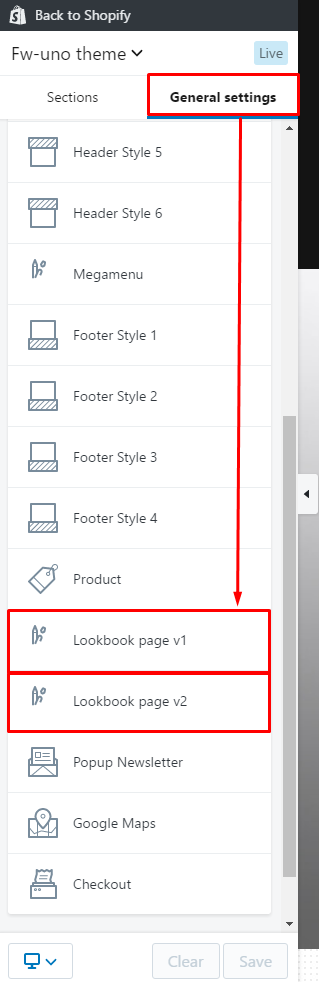
Create Lookbook page ver2

Header & Footer
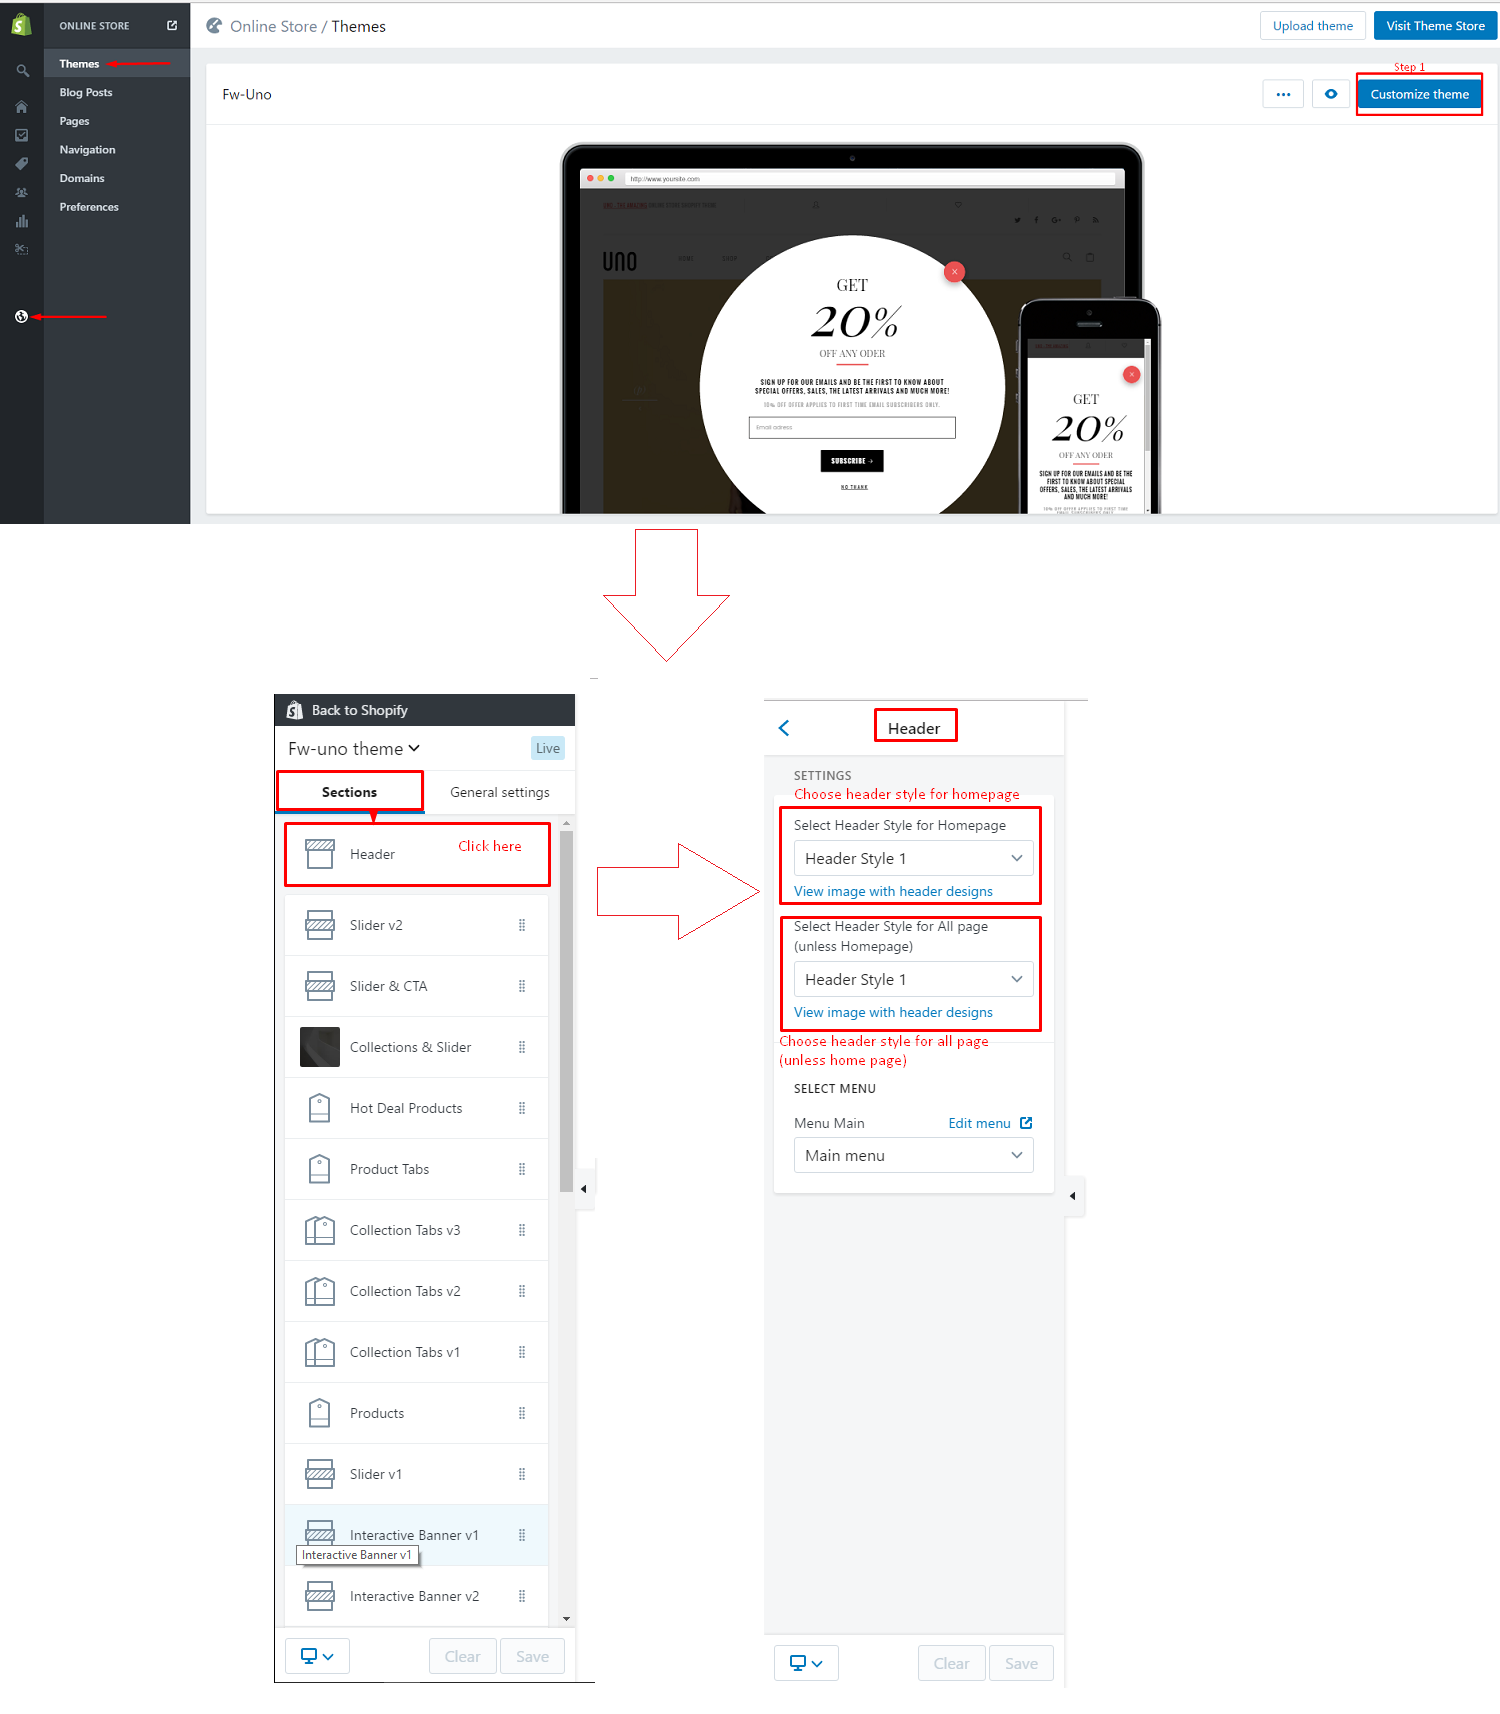
Header
In Uno theme, we support 6 designs Header
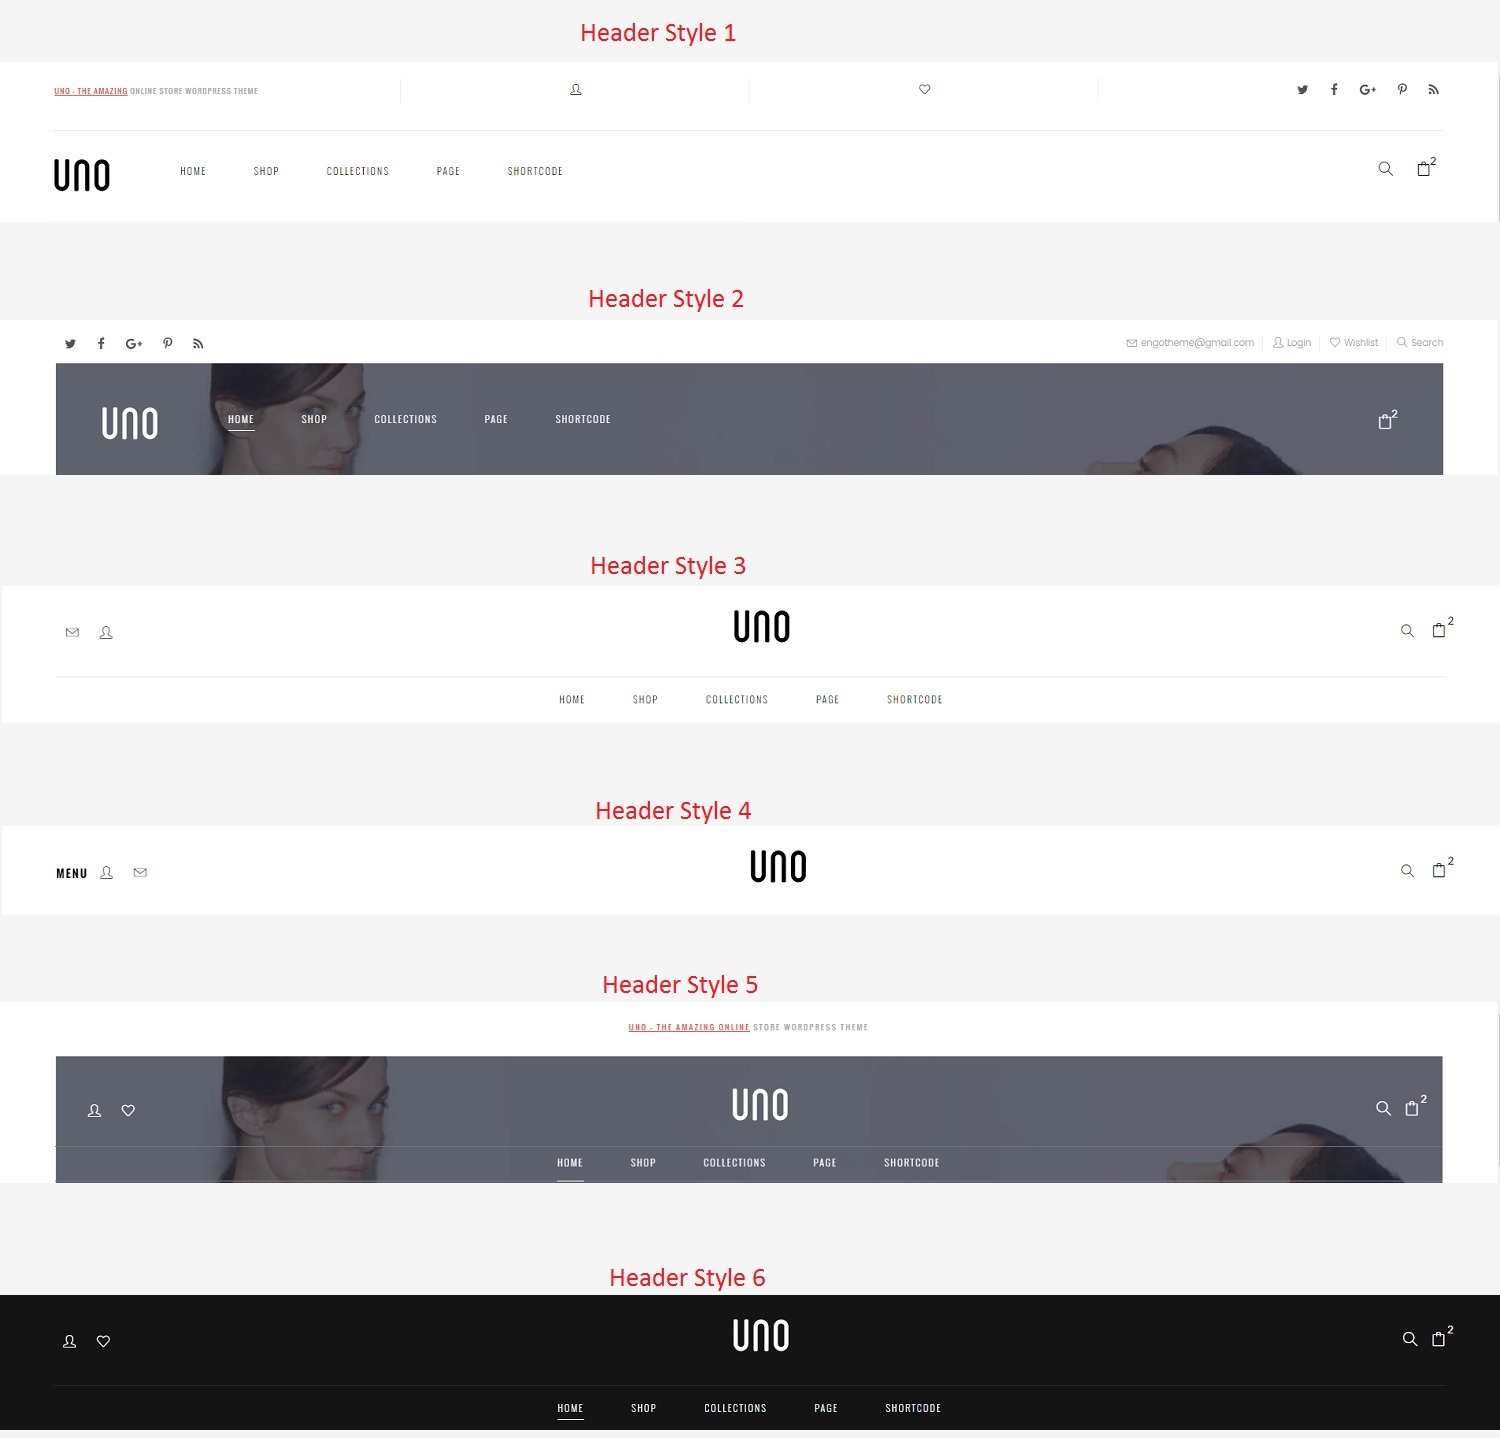
You can see choose Header style in Customize theme control panel.
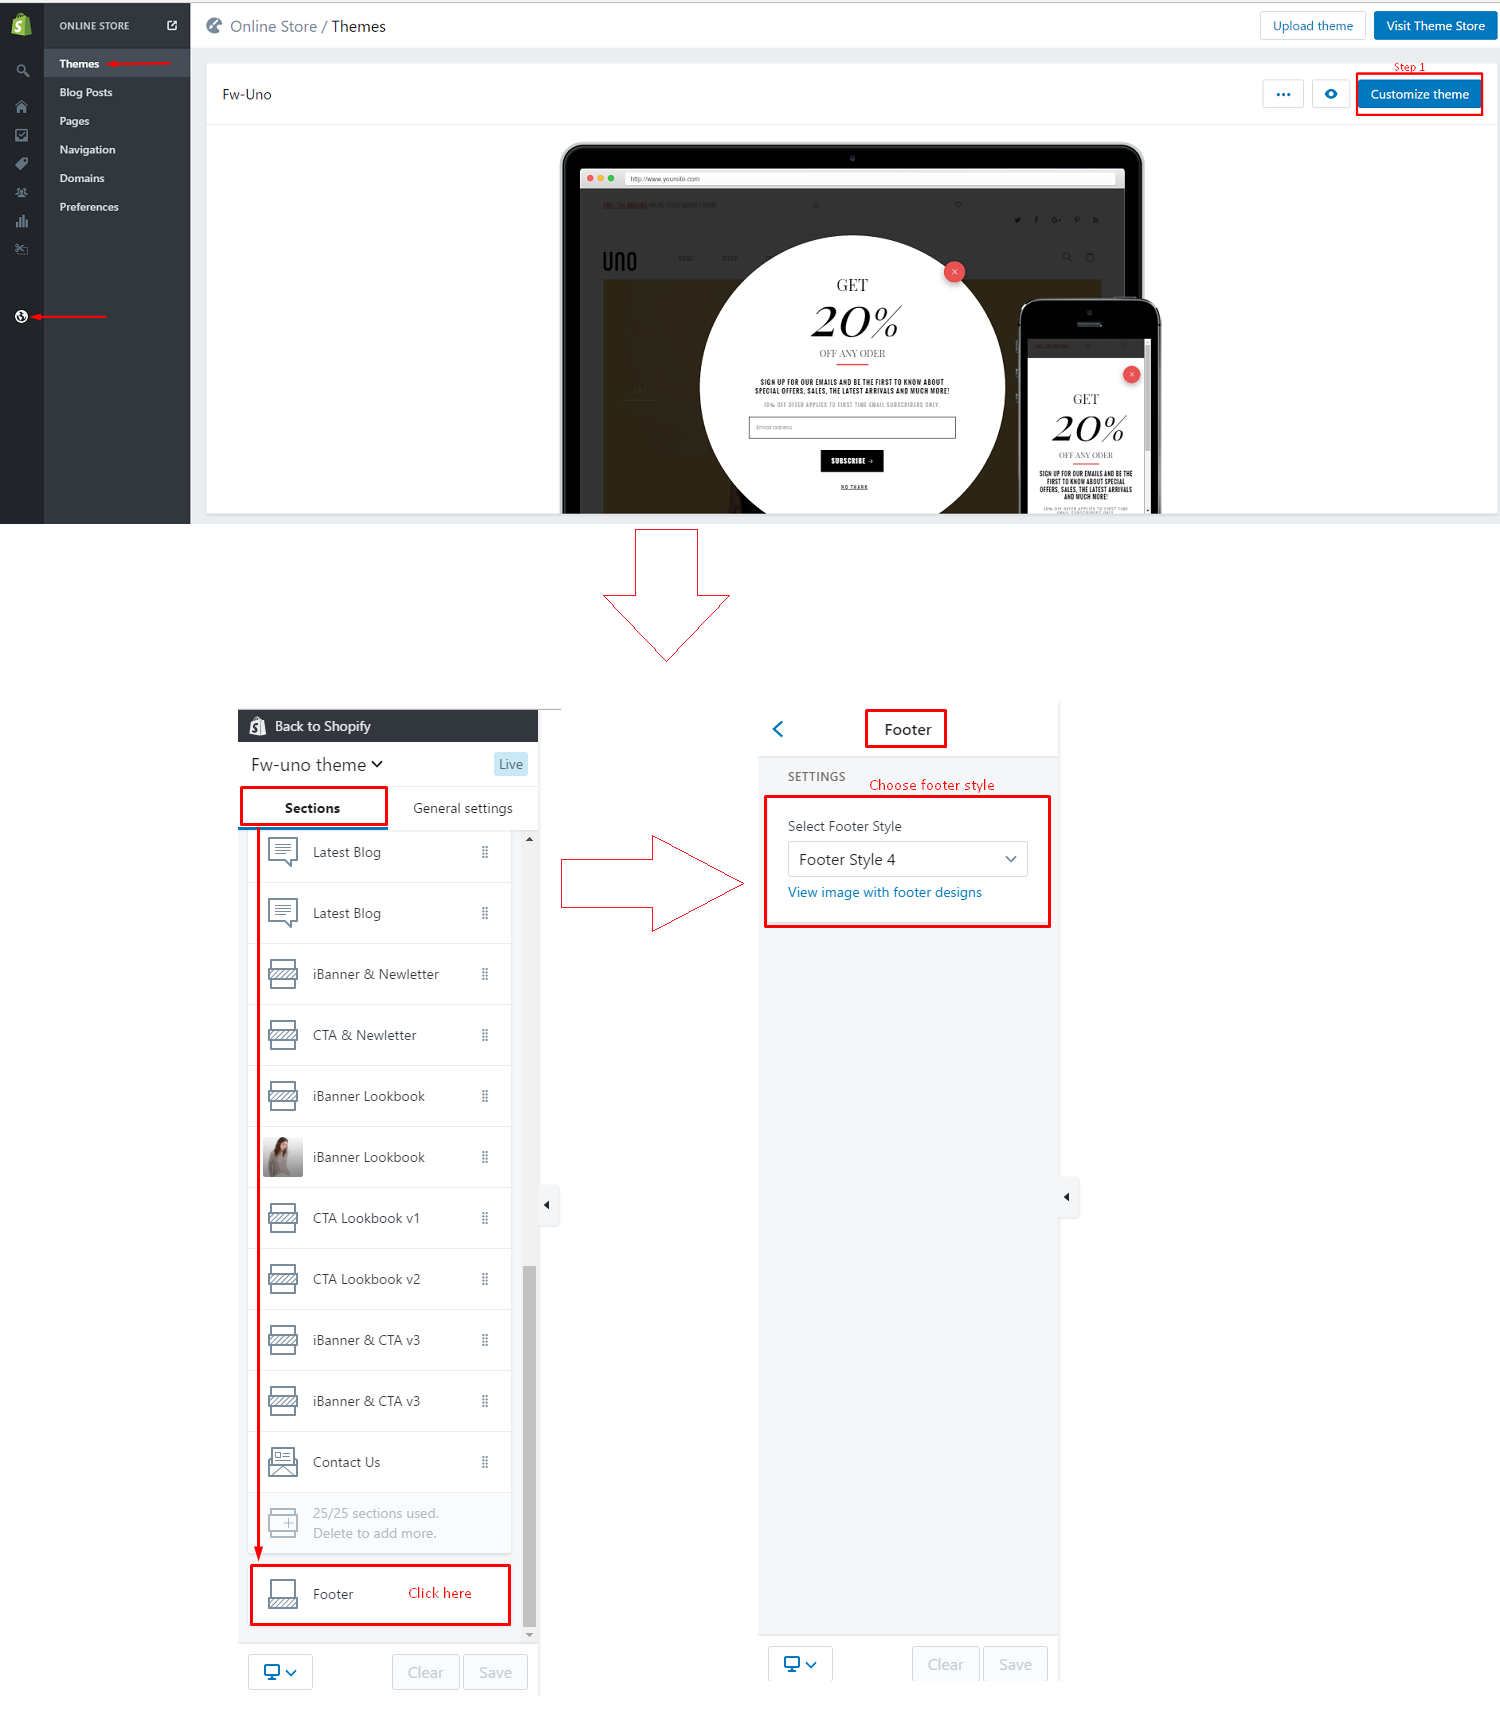
Footer
In Uno theme, we support 4 designs Footer
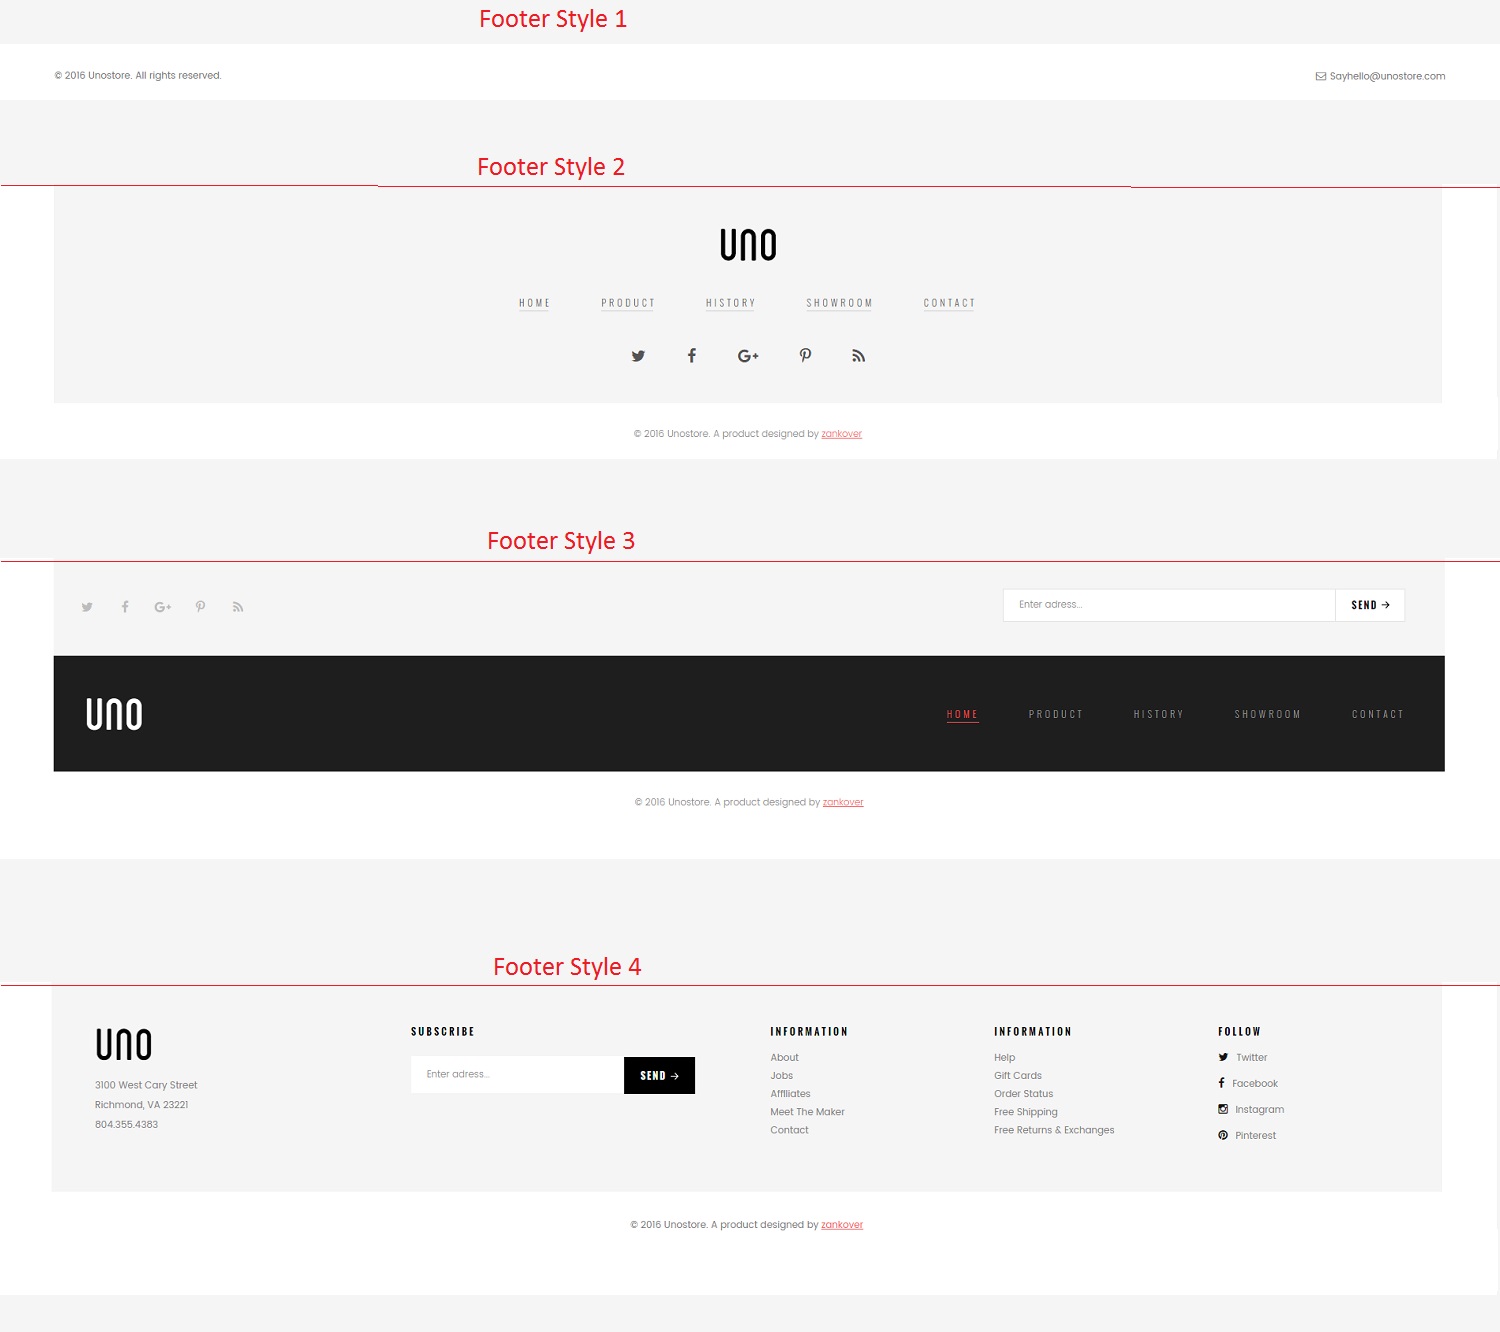
You can see choose Footer style in Customize theme control panel.
Sections in Home page
In Uno theme, we support 37 Sections for builder home page and other landing page.
You can see sections in customize control panel.
- s1Section Latest Blog
- s2Section About Us
- s3Section Brand
- s4.1Section Call To Action v1
- s4.2Section Call To Action v2
- s4.3Section Call To Action v3
- s5Section Contact Us
- s6.1Section CTA Lookbook v1
- s6.2Section CTA Lookbook v2
- s7.1Section iBanner & CTA v1
- s7.2Section iBanner & CTA v2
- s7.3Section iBanner & CTA v3
- s8Section iBanner Lookbook
- s9Section Instagram
- s10.1Section Interactive Banner v1
- s10.2Section Interactive Banner v2
- s11.1Section Service Box v1
- s11.2Section Service Box v2
- s12Section Testimonial
- s13Section Two iBanner
- s14.1Section Collection Tabs v1
- s14.2Section Collection Tabs v2
- s14.3Section Collection Tabs v3
- s15Section Collection & Slider
- s16Section Featured Products
- s17Section Hot Deal Products
- s18Section Product Tabs
- s19Section Products
- s20Section Slider Products
- s21Section Special Product
- s22.1Section Slider v1
- s22.2Section Slider v2
- s23Section Slider & CTA
- s24Section CTA & Newletter
- s25Section iBanner & Newletter
- s26.1Section Newletter v1
- s26.2Section Newletter v2
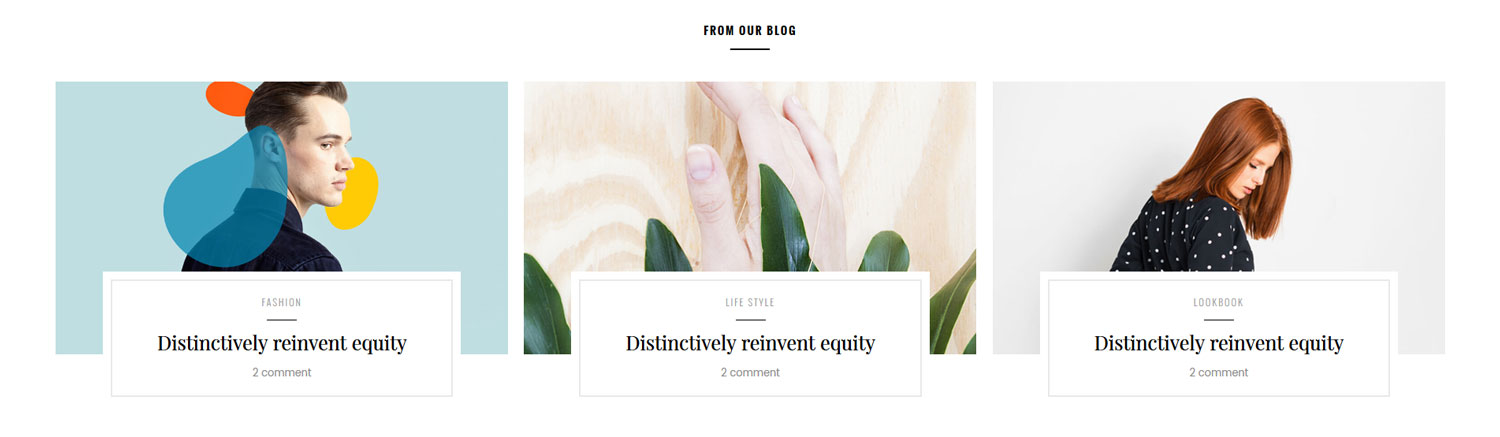
+ Section Latest Blog
In this section we added 6 sliders & each slider there 1 img icon, 4 text content for work and you need config values bellow for each slider:
- Choose Style
- Choose Style: choose style for section (Style 1 or Style 2)
- ONLY FOR STYLE 2
- CTA background: Upload or select image background
- CTA content x: Content x for CTA
- CTA button name: Name of button for CTA
- CTA button url: URL of button for CTA
- SETTINGS
- Title: Title for section
- Limit: Limit number blogs show
- Show number comment?: Enable/ Disable comment count
- Background: Upload or select image background
- Icon: Upload or select image icon
- Title: Title for section
- Button name: Name of button for section
- Button url: URL of button for section
- Brand: setting of brand x
- Image: Image of brand x for section
- URL: URL of brand x for section
- Block (setting for block left)
- CTA Background: Upload or select image background
- Background: Image background of collection x
- CTA content x: Content x for CTA
- CTA button name: Name of button for CTA
- CTA button url: URL of button for CTA
- Block (setting for block right)
- CTA Background: Upload or select image background
- Background: Image background of collection x
- CTA content x: Content x for CTA
- CTA button name: Name of button for CTA
- CTA button url: URL of button for CTA
- Block (setting for block left - 2 CTA)
- CTA x: All setting for CTA x
- Background: Upload or select image background for CTA x
- Content x: Content x for CTA x
- Button name: Name of button for CTA x
- Button url: URL of button for CTA x
- Block (setting for block right - 2 CTA)
- CTA x: All setting for CTA x
- Background: Upload or select image background for CTA x
- Content x: Content x for CTA x
- Button name: Name of button for CTA x
- Button url: URL of button for CTA x
- CTA Background: Upload or select image background for CTA x
- CTA Title x: Title x for CTA x
- CTA Description x: Description x for CTA x
- CTA Content x: Content x for CTA x
- CTA Button name: Name of button for CTA x
- CTA Button url: URL of button for CTA x
- FORM CONTACT
- Icon: Icon for form contact
- Title: Title for form contact
- Text palaceholder x: Text placeholder for input x
- Button name:Name of button for form contact
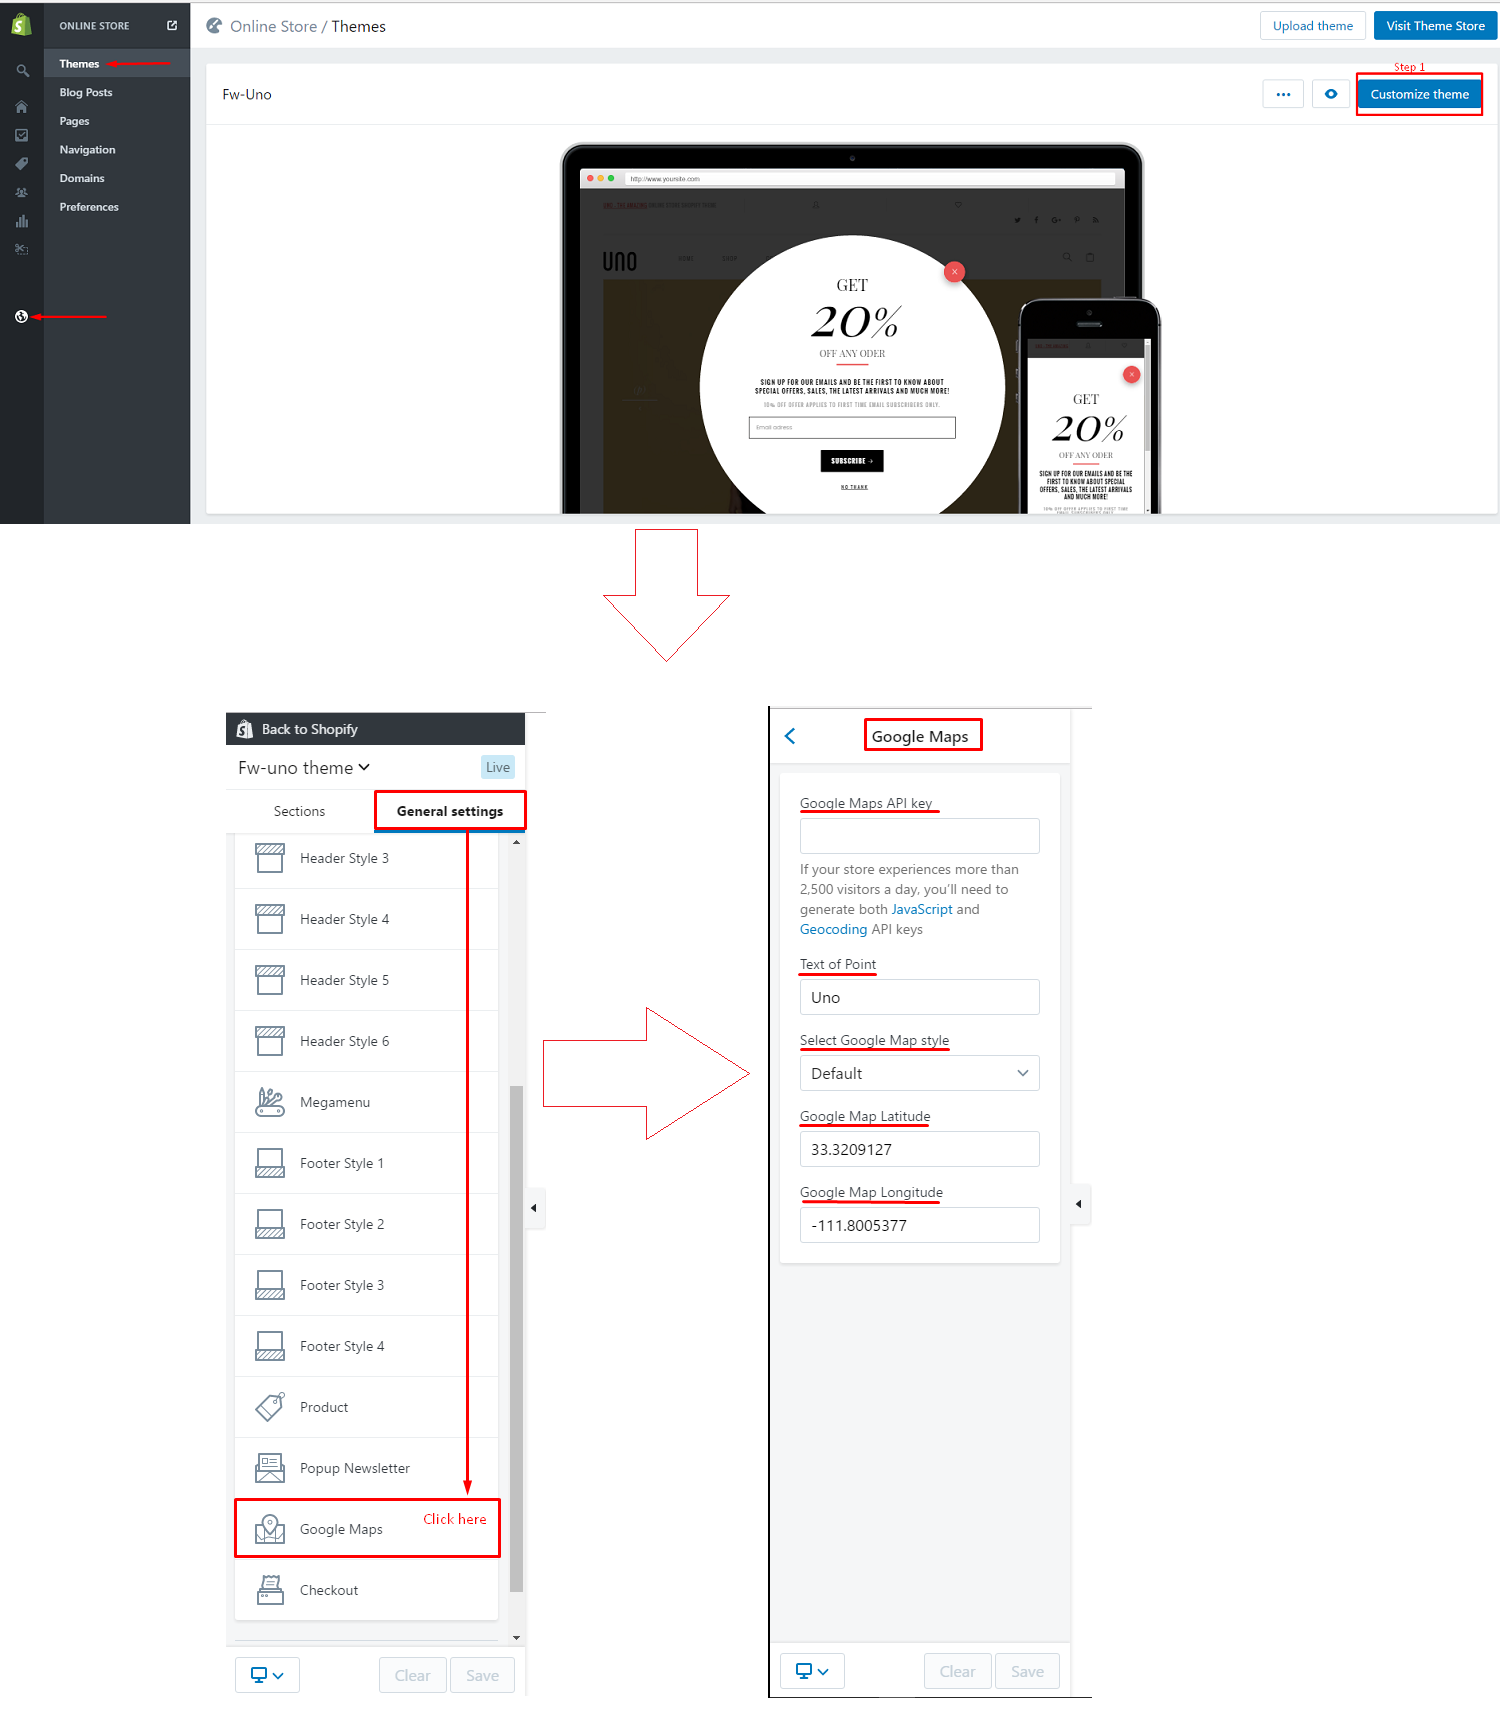
- GOOGLE MAPS
- Google map: Setting in Login Store > Customize theme > General Settings tab > Google Maps
- Google Maps API key: API key for Google Maps in site
- Text of point: Text of point for location
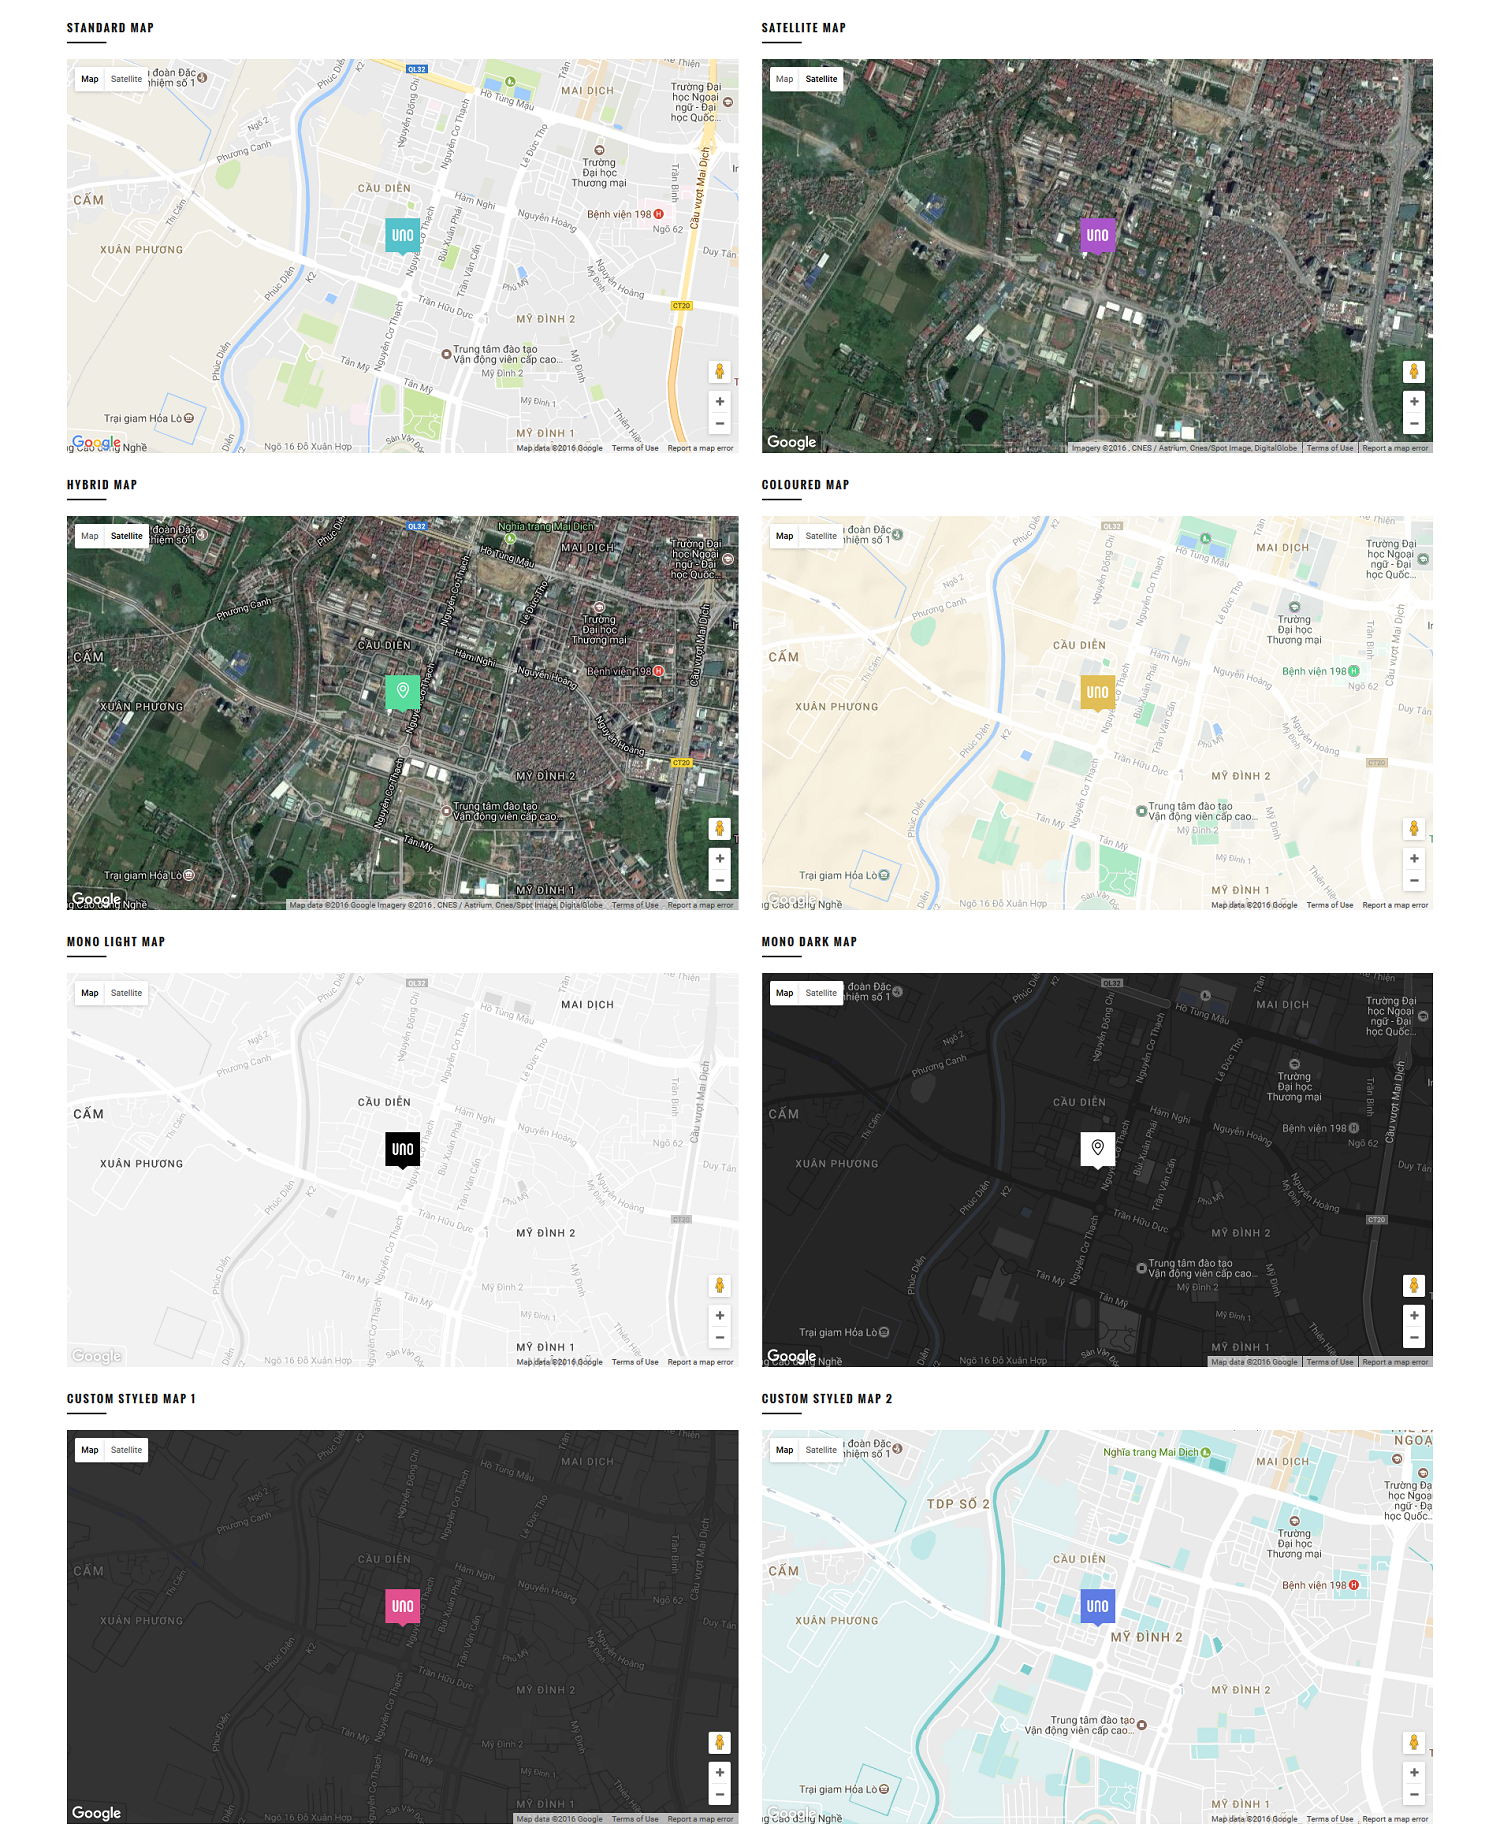
- Select Google Map style: 9 styles
- Google Map Latitude: Latitude of location in the Google Maps
- Google Map Longitude: Longitude of location in the Google Maps
- Image: Upload or select image background for section
- Button name: Name of button for section
- Button url: URL of button for section
- Image: Upload or select image background for section
- Icon: Icon for section
- Content: Content for section
- Button name: Name of button for section
- Button url: URL of button for section
- Banner x Image: Upload or select image background banner x
- Banner x URL: URL for banner x
- CTA Background: Upload or select image background for CTA
- CTA content x: Content x for CTA
- CTA button name: Name of button for CTA
- CTA button url: URL of button for CTA
- BANNER
- Banner x Image: Upload or select image background banner x
- Banner x URL: URL for banner x
- Banner x icon: Icon for banner x
- Banner y Image: Upload or select image background banner y
- Banner y URL: URL for banner y
- CALL TO ACTION
- CTA Background: Upload or select image background for CTA
- CTA content x: Content x for CTA
- CTA button name: Name of button for CTA
- CTA button url: URL of button for CTA
- SETTINGS
- Choose Style: 2 styles (CTA big Left or CTA big Right)
- CTA BIG
- Background Image: Upload or select image background for CTA
- Label: Label for CTA
- Title: Title for CTA
- Description: Description for CTA
- CTA button name: Name of button for CTA
- CTA button url: URL of button for CTA
- CTA SMALL
- Background Image: Upload or select image background for CTA
- Title: Title for CTA
- Description: Description for CTA
- CTA button name: Name of button for CTA
- CTA button url: URL of button for CTA
- BANNER TEXT
- Text Background: Text of background for banner
- Content: Content for banner
- BANNER IMAGE
- Background Image: Upload or select image background for banner
- Icon Image: Upload or select image icon for banner
- Content 1: Content 1 for banner
- Content 2: Content 2 for banner
- URL for Content2: URL of content 2 for banner
- Image: Upload or select image background for banner
- Title: Title of banner for section
- Content: Content of banner for section
- URL: URL of banner for section
- User ID Instagram: User ID Instagram
- Access Token Instagram: Access Token Instagram
- Limit Image: Limit image instagram for section
- Icon: Icon instagram for section
- Title: Title for section.
- Content: Content for section.
- Background: Upload or select image background for banner
- Content x: Content x of banner for section
- URL: URL of banner for section
- Background: Upload or select image background for banner
- Content x: Content x of banner for section
- URL: URL of banner for section
- Choose style: 2 style (White or Black)
- BOX
- Title: Title for box
- Icon: Icon for box
- Use Image Icon?: Use icon image
- Image icon: Upload or select image of icon for box
- Background: Upload or select image background for section
- BOX
- Title: Title for box
- Content: Content for box
- Icon: Icon for box
- Use Image Icon?: Use icon image
- Image icon: Upload or select image of icon for box
- Background Section: Upload or select background image for section
- TESTIMONIAL
- Title: Title of testimonial
- Content: Content of testimonial
- Choose stars rating: 5 options (1-5 stars)
- Customer image: Upload or select image of customer
- Customer Name: Name of customer
- BANNER LEFT
- Image: Upload or select image of banner
- Content x: Content x of banner
- URL: URL of banner
- BANNER RIGHT
- Image: Upload or select image of banner
- Icon: Upload or select icon of banner
- Content x: Content x of banner
- URL: URL of banner
- Title: Title of tab
- Choose collection: Choose collection products of tab
- Limit number of products: Limit number of products for tab
- Title: Title of tab
- Choose collection: Choose collection products of tab
- Limit number of products: Limit number of products for tab
- Title: Title of tab
- Choose collection: Choose collection products of tab
- Limit number of products: Limit number of products for tab
- COLLECTIONS
- Background image: Upload or select image background
- Select Collection x: Choose collection
- SLIDER
- Enable Slider x: Show slider x
- Title: Title of slider x
- Description: Description of slider x
- Content: Content of slider x
- Button Name: Name of button for slider x
- Button URL: URL of button for slider x
- Section Title: Title of section
- LAYOUT GRID
- Select collection: Choose collection products
- Limit number of products: Limit number of products
- LAYOUT SLIDER
- Select collection: Choose collection products
- Limit number of products: Limit number of products
- Title: Title of section
- Background image: Upload or select image background for section
- Time countdown: Format datatime: YYYY-MM-DD-hh-mm-ss
- Select collection: Choose collection products
- Limit number of products: Limit number of products
- Title: Title of section
- Choose collection: Select collection products
- Limit number of products: Limit number of products
- Button Name: Name of button for tab
- Button URL: URL of button for tab
- Title: Title of section
- Choose collection: Select collection products
- Limit number of products: Limit number of products
- SETTINGS
- Choose Style: 2 style (CTA Left or CTA Right)
- CTA
- CTA Background: Upload or select image background for CTA
- CTA content x: Content x for CTA
- CTA button name: Name of button for CTA
- CTA button url: URL of button for CTA
- PRODUCTS
- Select collection: Choose collection products
- Limit number of products: Limit number of products
- SETTINGS
- Section title: Title for section
- Choose special product: Choose special product
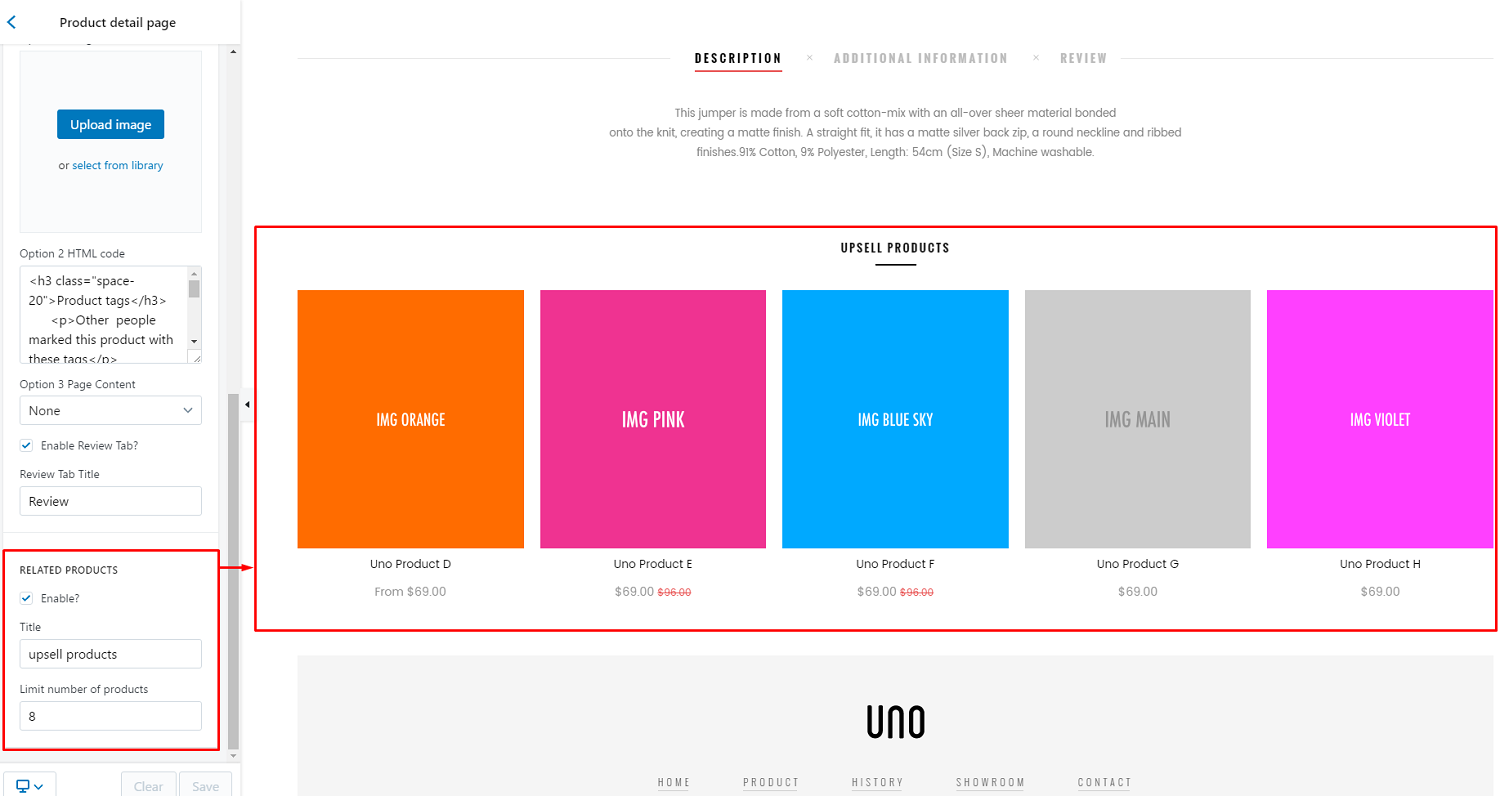
- RELATED PRODUCT
- Title: Title name
- Select collection: Choose collection products
- Limit number of products: Limit number of products
- MAIN SETTINGS
- Autoplay Slideshow with: choose 1-10 seconds
- Start width: width for slider
- Start height: height for slider
- IMAGE SLIDER
- Transition Effect: Choose transition effect
- Background slider: Upload or choose background image slider
- IMAGE
- Image slider: Upload or choose image slider
- Image - Effect: Choose effect image slider
- Image - Top position: Top position image slider
- Image - Left position: Left position image slider
- CONTENT 1
- Content 1.1: Content 1.1 for slider
- Content 1.2: Content 1.2 slider
- Content 1 - Top position: Top position of content 1
- Content 1 - Left position: Left position of content 1
- CONTENT 2
- Content 2: Content 2 for slider
- Content 2 - Text Effect: Choose effect of content 2
- Content 2 - Top position: Top position of content 2
- Content 2 - Left position: Left position of content 2
- Icon: Upload or choose icon image of content 2
- Icon - Effect: Effect of icon image of content 2
- Icon - Top position: Top position of icon
- Icon - Left position: Left position of icon
- CONTENT 3
- Content 3.1: Content 3.1 of content 3
- Content 3.2: Content 3.2 of content 3
- Content 3.3: Content 3.3 of content 3
- Content 3 - Text Effect: Choose effect of content 3
- Content 3 - Top position: Top position of content 3
- Content 3 - Left position: Left position of content 3
- BUTTON
- Button name: Name of button for slider
- Button url: URL of button for slider
- Button - Effect: Effect of button for slider
- Button - Top position: Top position of button
- Button - Left position: Left position of button
- VIDEO SLIDER
- Choose video: 2 option (Youtube or Vimeo)
- Video ID: ID of video
- CONTENT 1
- Content 1.1: Content 1.1 for slider
- Content 1.2: Content 1.2 slider
- Content 1 - Top position: Top position of content 1
- Content 1 - Left position: Left position of content 1
- CONTENT 2
- Content 2: Content 2 for slider
- Content 2 - Text Effect: Choose effect of content 2
- Content 2 - Top position: Top position of content 2
- Content 2 - Left position: Left position of content 2
- Icon: Upload or choose icon image of content 2
- Icon - Effect: Effect of icon image of content 2
- Icon - Top position: Top position of icon
- Icon - Left position: Left position of icon
- CONTENT 3
- Content 3.1: Content 3.1 of content 3
- Content 3.2: Content 3.2 of content 3
- Content 3.3: Content 3.3 of content 3
- Content 3 - Text Effect: Choose effect of content 3
- Content 3 - Top position: Top position of content 3
- Content 3 - Left position: Left position of content 3
- BUTTON
- Button name: Name of button for slider
- Button url: URL of button for slider
- Button - Effect: Effect of button for slider
- Button - Top position: Top position of button
- Button - Left position: Left position of button
- MAIN SETTINGS
- Autoplay Slideshow with: choose 1-10 seconds
- Start width: width for slider
- Start height: height for slider
- IMAGE SLIDER
- Transition Effect: Choose transition effect
- Background slider: Upload or choose background image slider
- CONTENT 1
- Content 1: Content 1 for slider
- Content 1 - Text Effect: Effect of content 1
- Content 1 - Top position: Top position of content 1
- Content 1 - Left position: Left position of content 1
- CONTENT 2
- Content 2: Content 2 for slider
- Content 2 - Text Effect: Choose effect of content 2
- Content 2 - Top position: Top position of content 2
- Content 2 - Left position: Left position of content 2
- Icon: Upload or choose icon image of content 2
- Icon - Effect: Effect of icon image of content 2
- Icon - Top position: Top position of icon
- Icon - Left position: Left position of icon
- BUTTON
- Button name: Name of button for slider
- Button url: URL of button for slider
- Button - Effect: Effect of button for slider
- Button - Top position: Top position of button
- Button - Left position: Left position of button
- VIDEO SLIDER
- Transition Effect: Choose transition effect
- Background slider: Upload or choose background image slider
- CONTENT 1
- Content 1: Content 1 for slider
- Content 1 - Text Effect: Effect of content 1
- Content 1 - Top position: Top position of content 1
- Content 1 - Left position: Left position of content 1
- CONTENT 2
- Content 2: Content 2 for slider
- Content 2 - Text Effect: Choose effect of content 2
- Content 2 - Top position: Top position of content 2
- Content 2 - Left position: Left position of content 2
- Icon: Upload or choose icon image of content 2
- Icon - Effect: Effect of icon image of content 2
- Icon - Top position: Top position of icon
- Icon - Left position: Left position of icon
- BUTTON
- Button name: Name of button for slider
- Button url: URL of button for slider
- Button - Effect: Effect of button for slider
- Button - Top position: Top position of button
- Button - Left position: Left position of button
- SLIDER
- Enable Slider x: Show slider x
- Background: Upload or select image background for slider x
- Title: Title of slider x
- Icon: Upload or select image icon for slider x
- Content: Content of slider x
- Button Name: Name of button for slider x
- Button URL: URL of button for slider x
- CTA (Call To Action)
- Background CTA x: Upload or select image background for CTA x
- Title CTA x: Title of CTA x
- Content CTA x: Content of CTA x
- Button name CTA x: Name of button for CTA x
- Button url CTA x: URL of button for CTA x
- CTA
- CTA content x: Content of CTA 1
- CTA button name: Name of button for CTA 1
- CTA button URL: URL of button for CTA 1
- Icon for CTA block 2: Icon for CTA 2
- NEWLETTER
- Background Section: Upload or select image background
- Icon: Icon of newletter
- Title: Title of newletter
- Description: Description of newletter
- Input placeholder: Input placeholder of newletter
- Button name: Name of button for newletter
- BANNER LEFT
- Background: Upload or select background image banner
- Content x: Content x for banner
- URL: URL for banner
- NEWLETTER
- Background Newletter: Upload or select image background
- Icon: Icon of newletter
- Title: Title of newletter
- Description: Description of newletter
- Input placeholder: Input placeholder of newletter
- Button name: Name of button for newletter
- BANNER RIGHT
- Background: Upload or select background image banner
- Content x: Content x for banner
- URL: URL for banner
- Icon: Icon of newletter
- Title: Title of newletter
- Description: Description of newletter
- Input placeholder: Input placeholder of newletter
- Button name: Name of button for newletter
- Choose Style: 2 styles (Full Width or Full Screen)
- Background Section: Upload or select image background
- Icon: Icon of newletter
- Title: Title of newletter
- Description: Description of newletter
- Input placeholder: Input placeholder of newletter
- Button name: Name of button for newletter
After configuration, this section (style 1) will be showing like this:
After configuration, this section (style 2) will be showing like this:
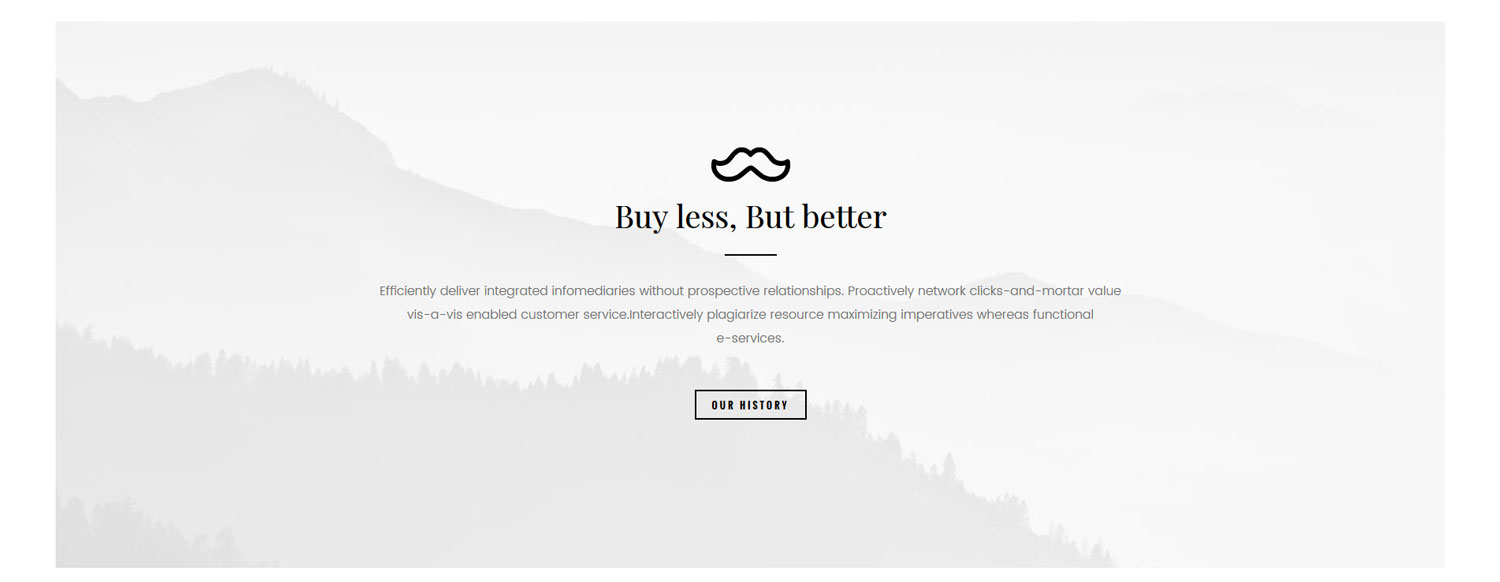
+ Section About Us
You need config values bellow for each this section:
After configuration, this section will be showing like this:
+ Section Brand
In this section we added 6 block brand for work and you need config values bellow for this section:
After configuration, this section will be showing like this:

+ Section Call To Action v1
In this section we added 2 block for work and you need config values bellow for this section:
After configuration, this section will be showing like this:
+ Section Call To Action v2
In this section we added 2 block for work and you need config values bellow for this section:
After configuration, this section will be showing like this:
+ Section Call To Action v3
In this section we added 3 block for work and you need config values bellow for this section:
After configuration, this section will be showing like this:
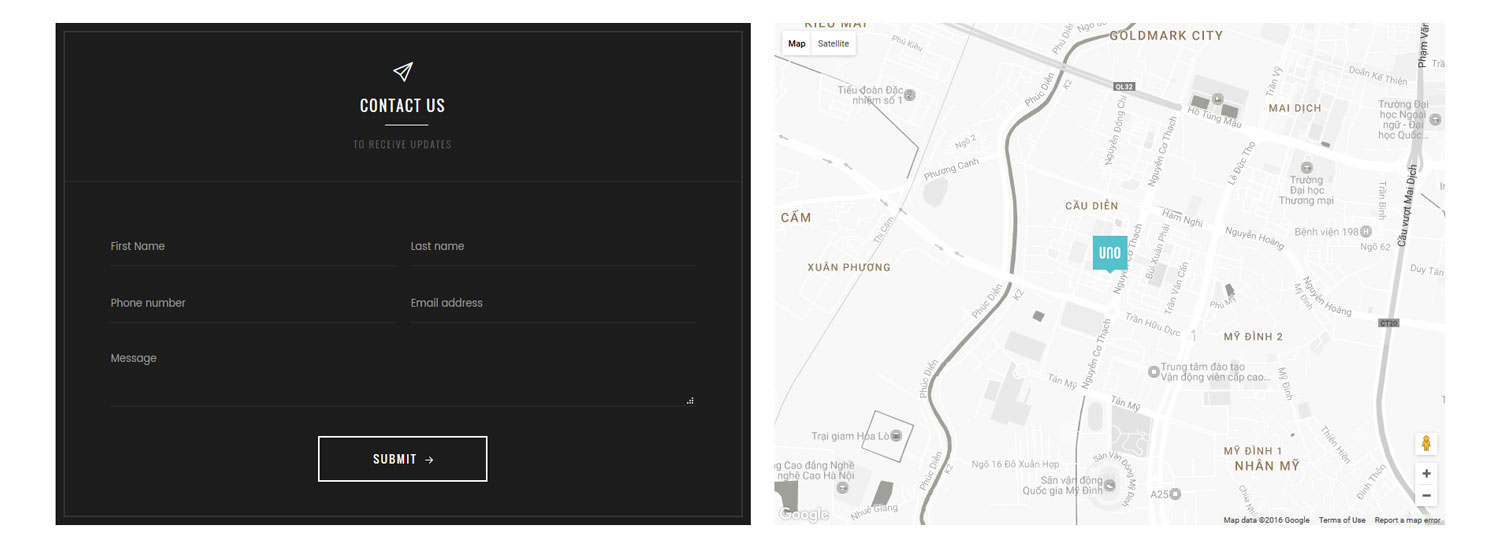
+ Section Contact Us
You need config values bellow for each section:
Settings google map on site:
All style of google map on site:
After configuration, this section will be showing like this:
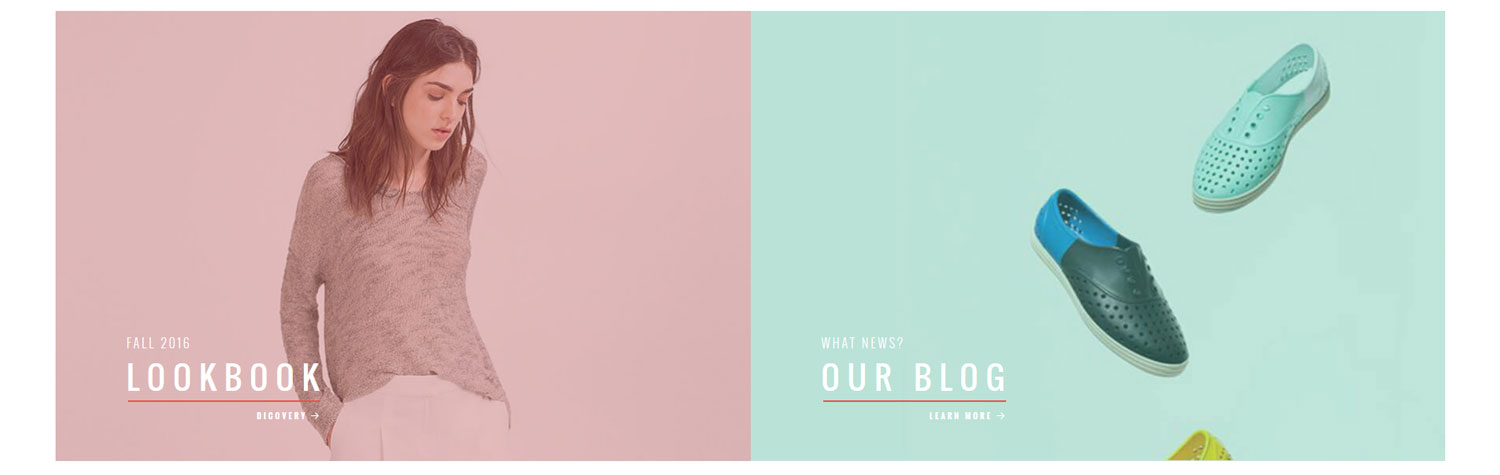
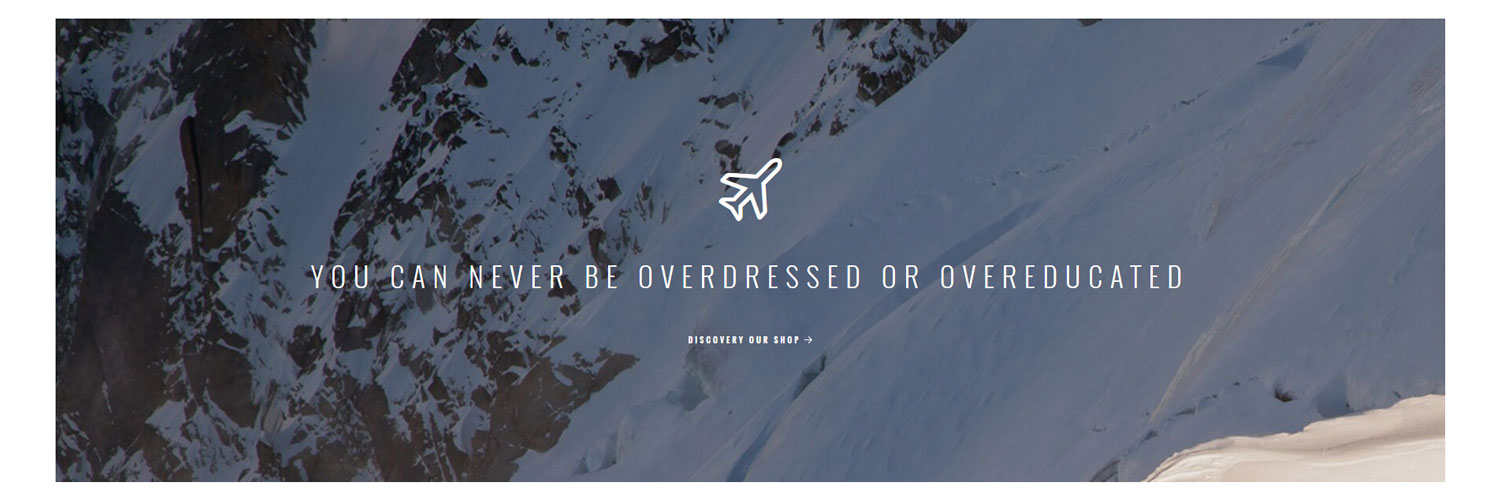
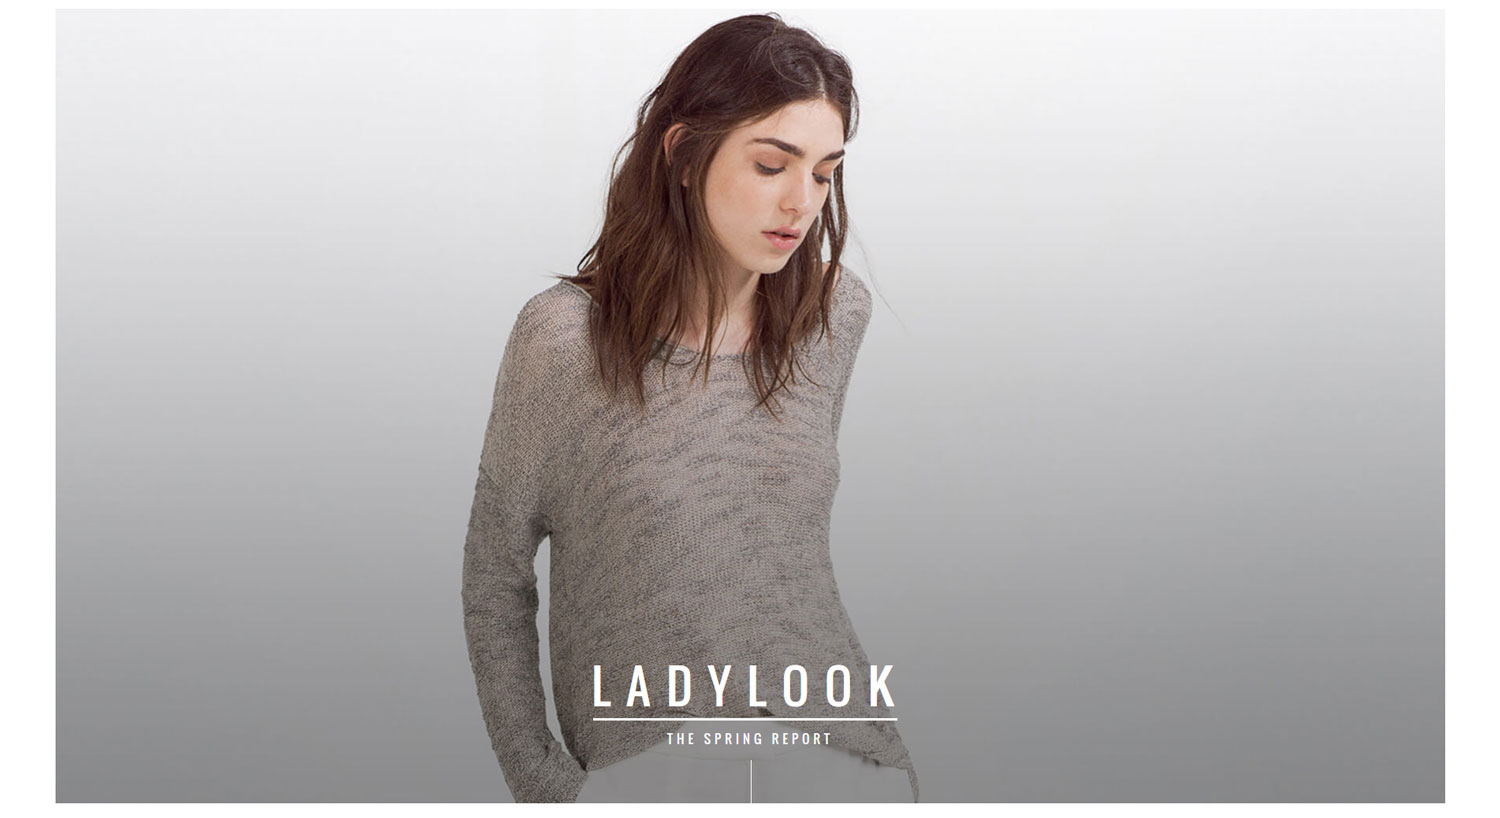
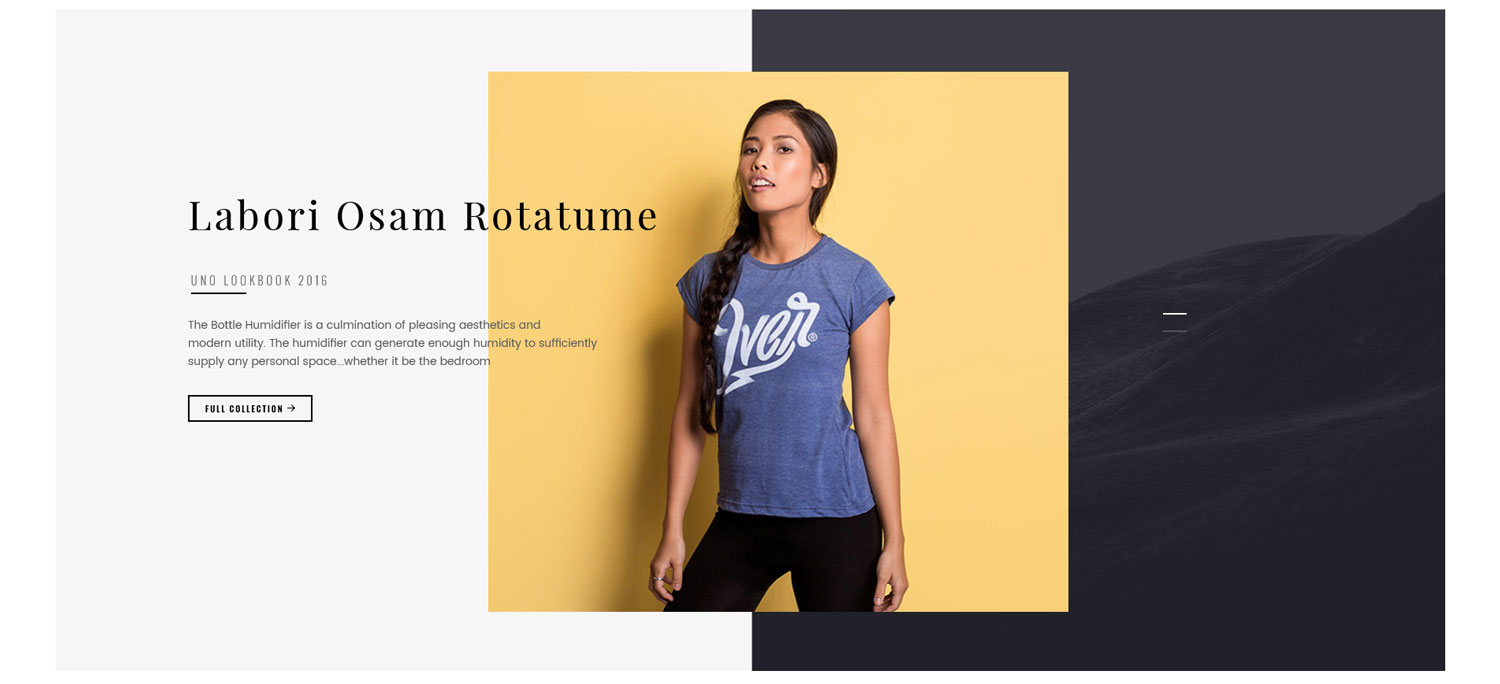
+ Section CTA Lookbook v1
You need config values bellow for each section:
After configuration, this section will be showing like this:
+ Section CTA Lookbook v2
You need config values bellow for each section:
After configuration, this section will be showing like this:
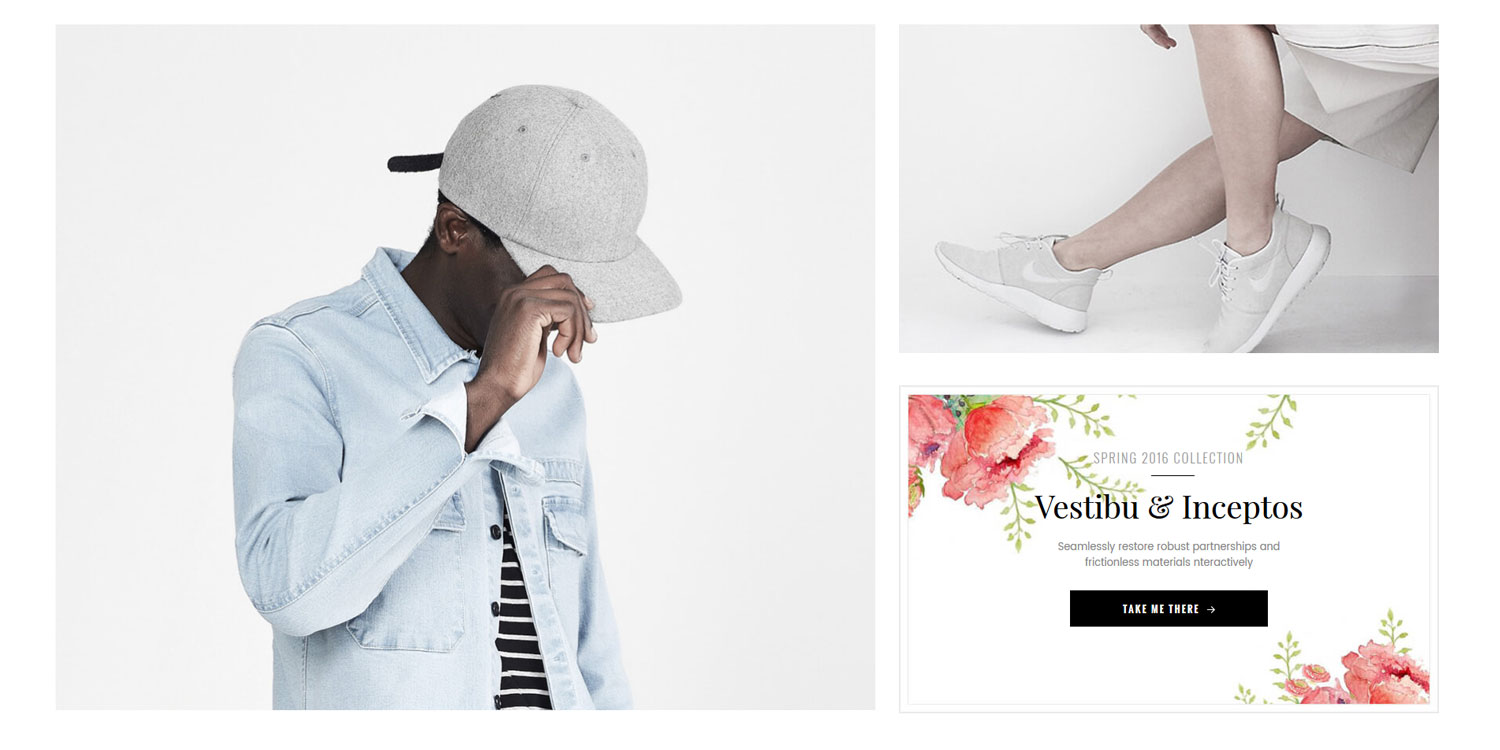
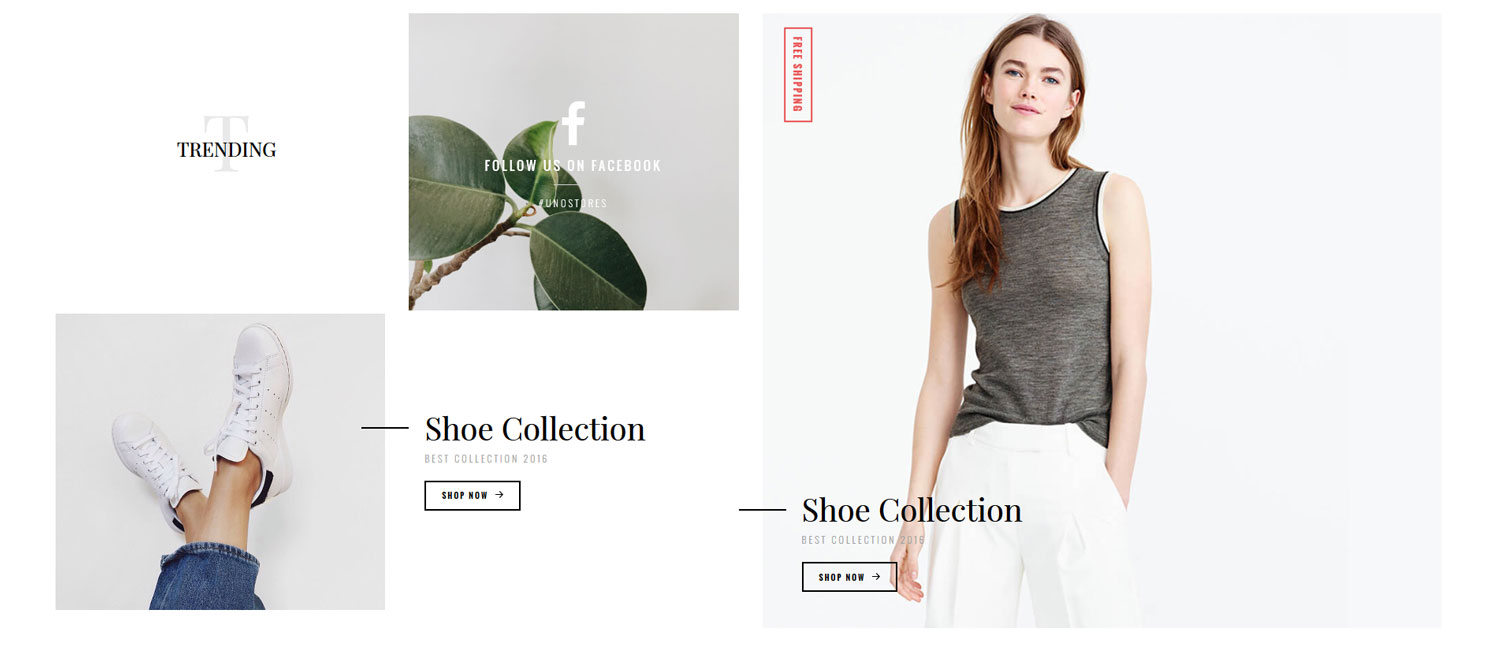
+ Section iBanner & CTA v1
You need config values bellow for each section:
After configuration, this section will be showing like this:
+ Section iBanner & CTA v2
You need config values bellow for each section:
After configuration, this section will be showing like this:
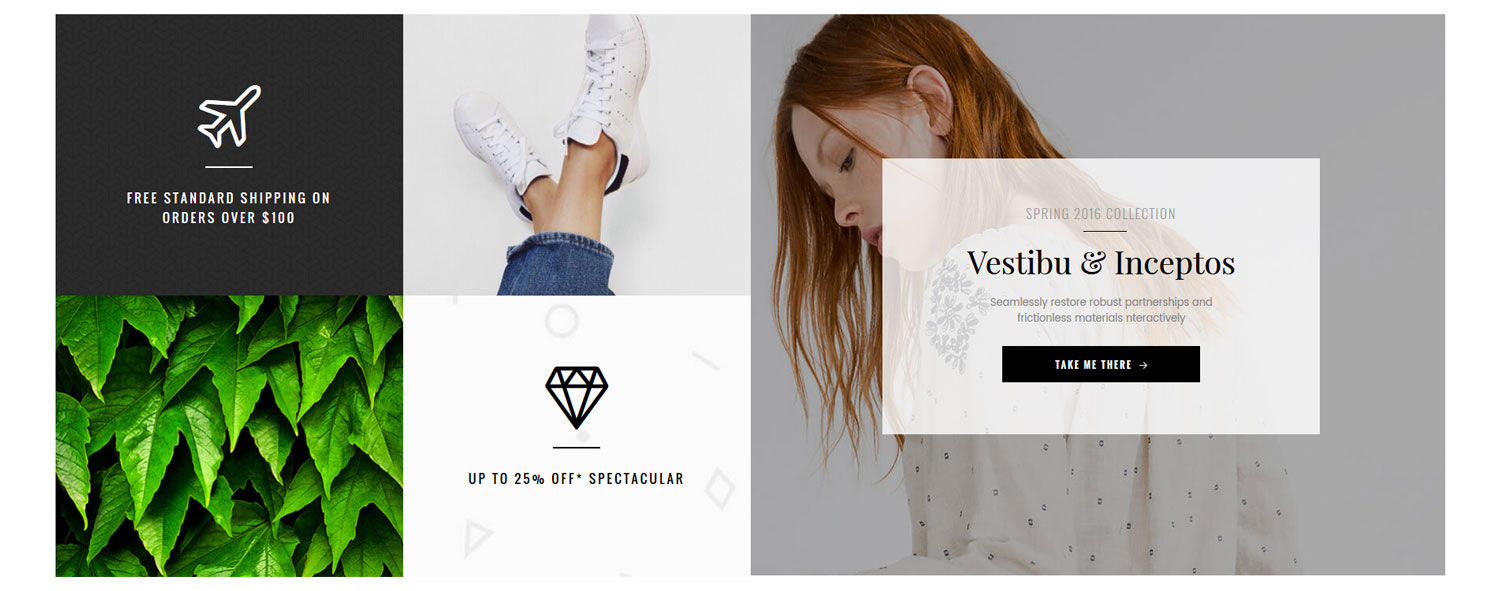
+ Section iBanner & CTA v3
You need config values bellow for each section:
After configuration, this section style big Left will be showing like this:
After configuration, this section style big Right will be showing like this:
+ Section iBanner Lookbook
You need config values bellow for each section:
After configuration, this section will be showing like this:

+ Section Instagram
You need config values bellow for each section:
After configuration, this section will be showing like this:

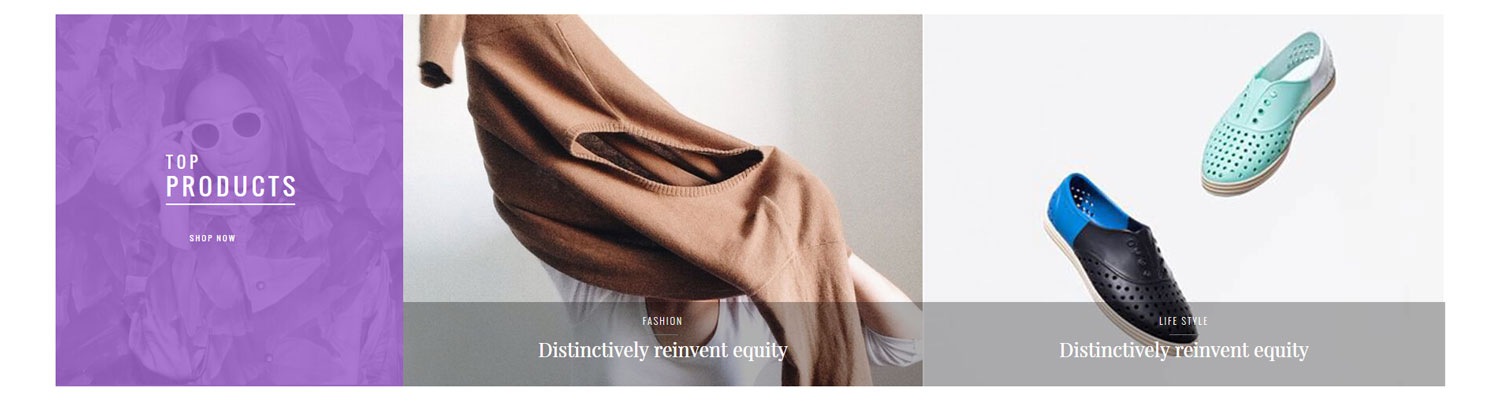
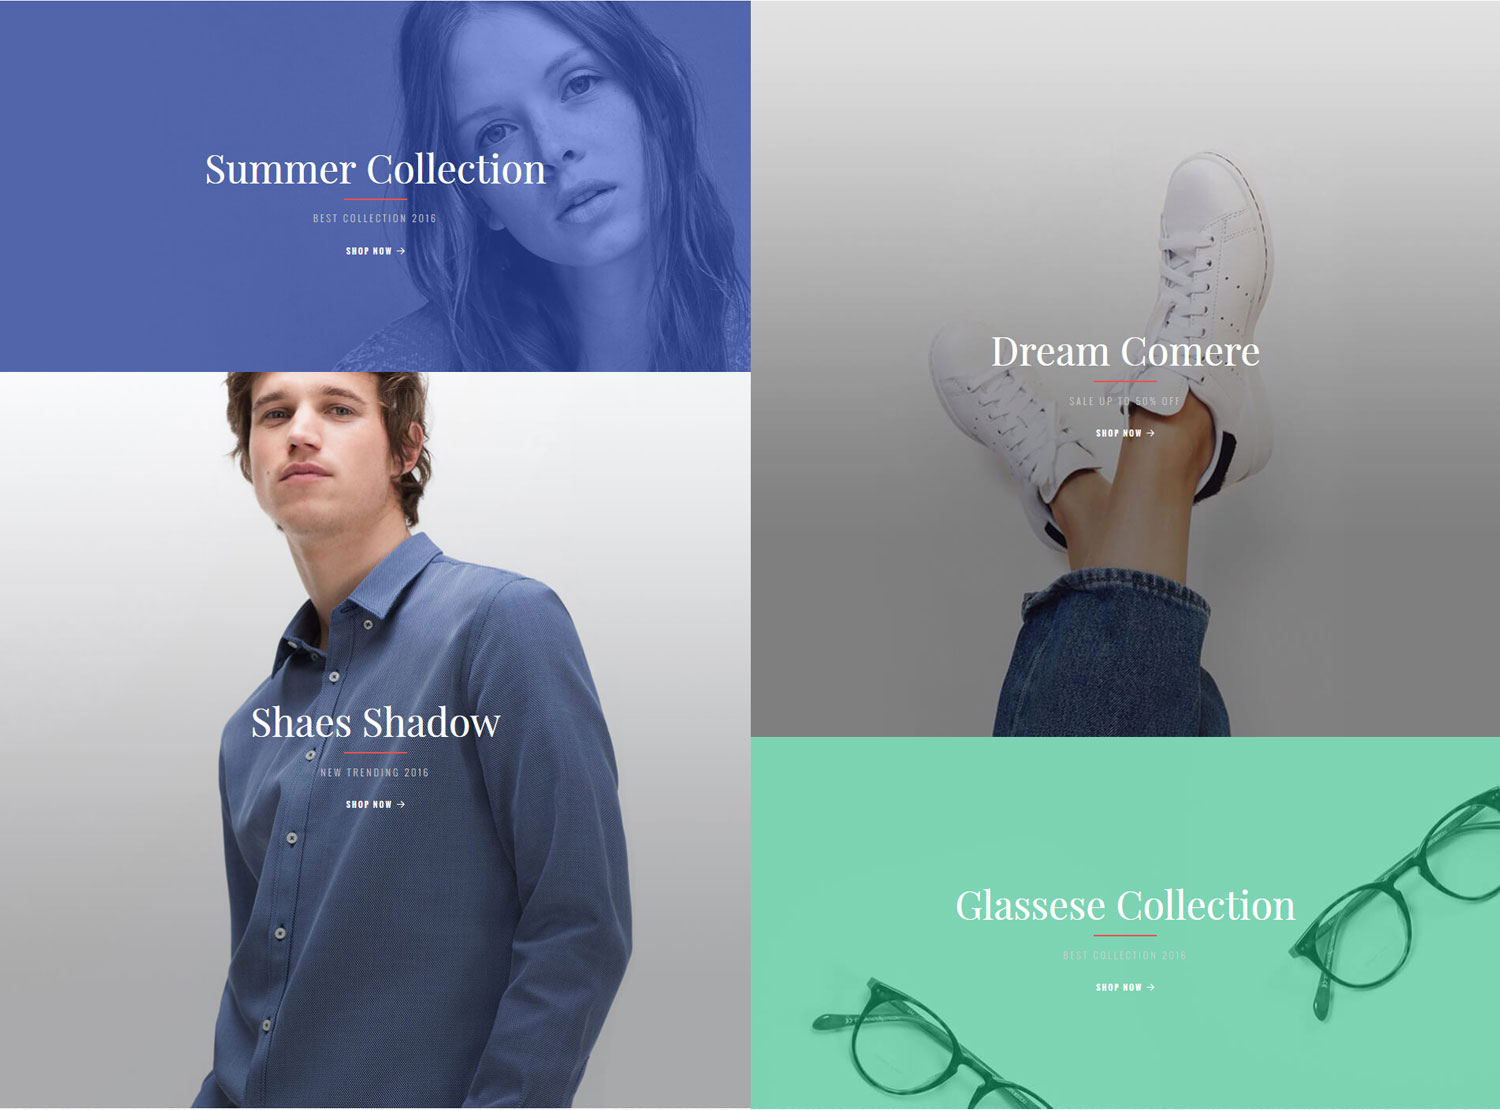
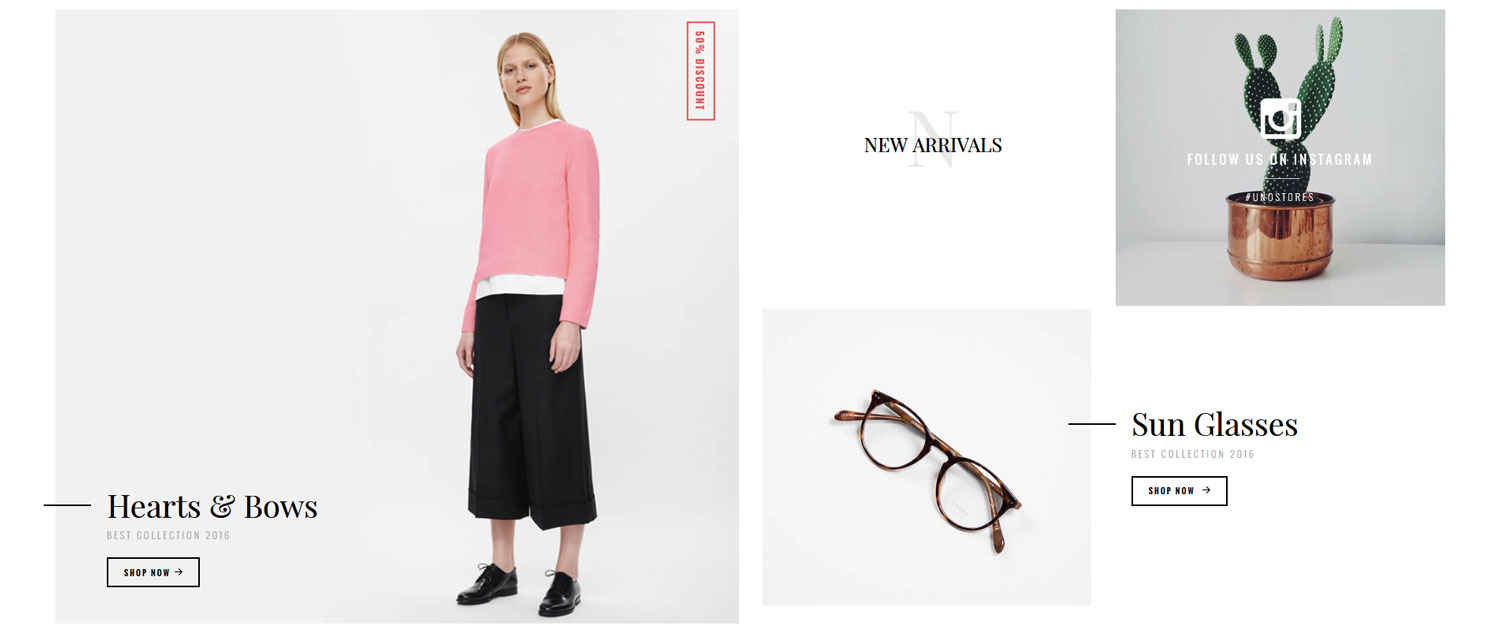
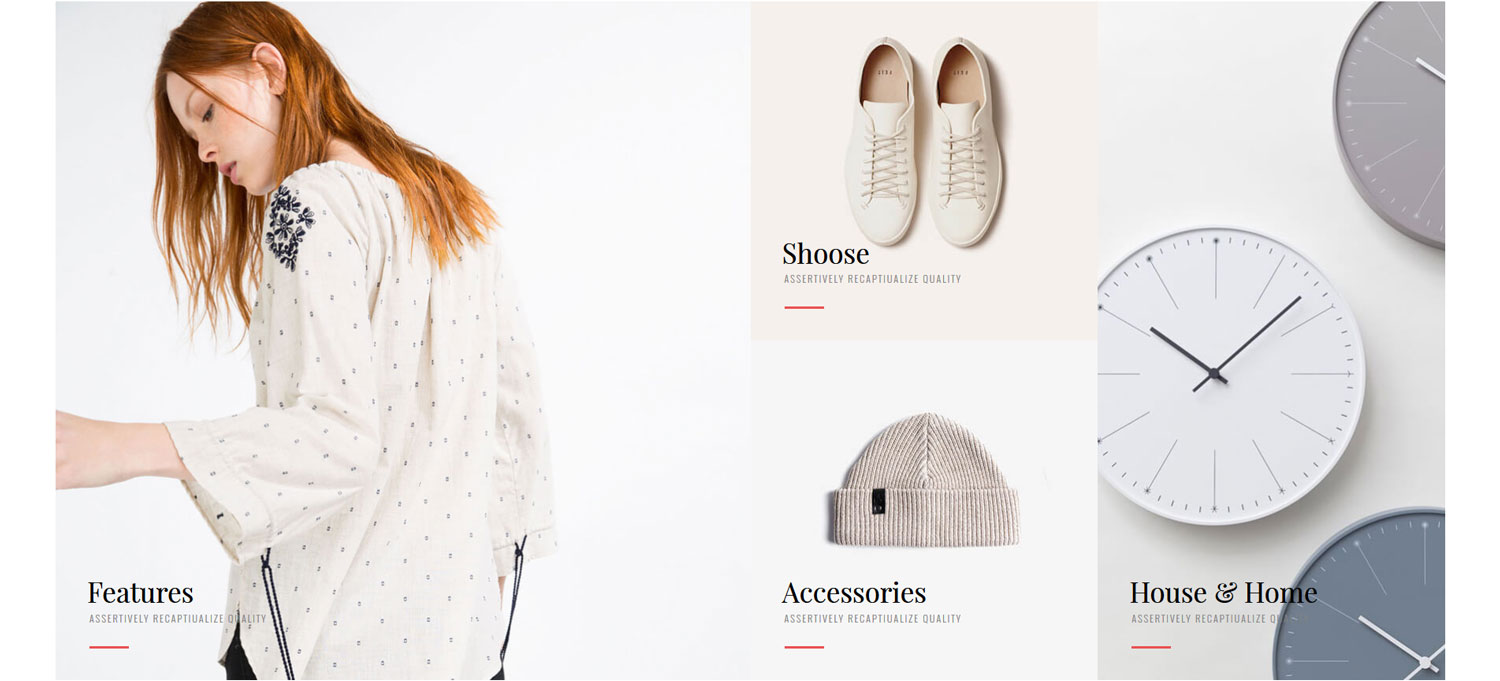
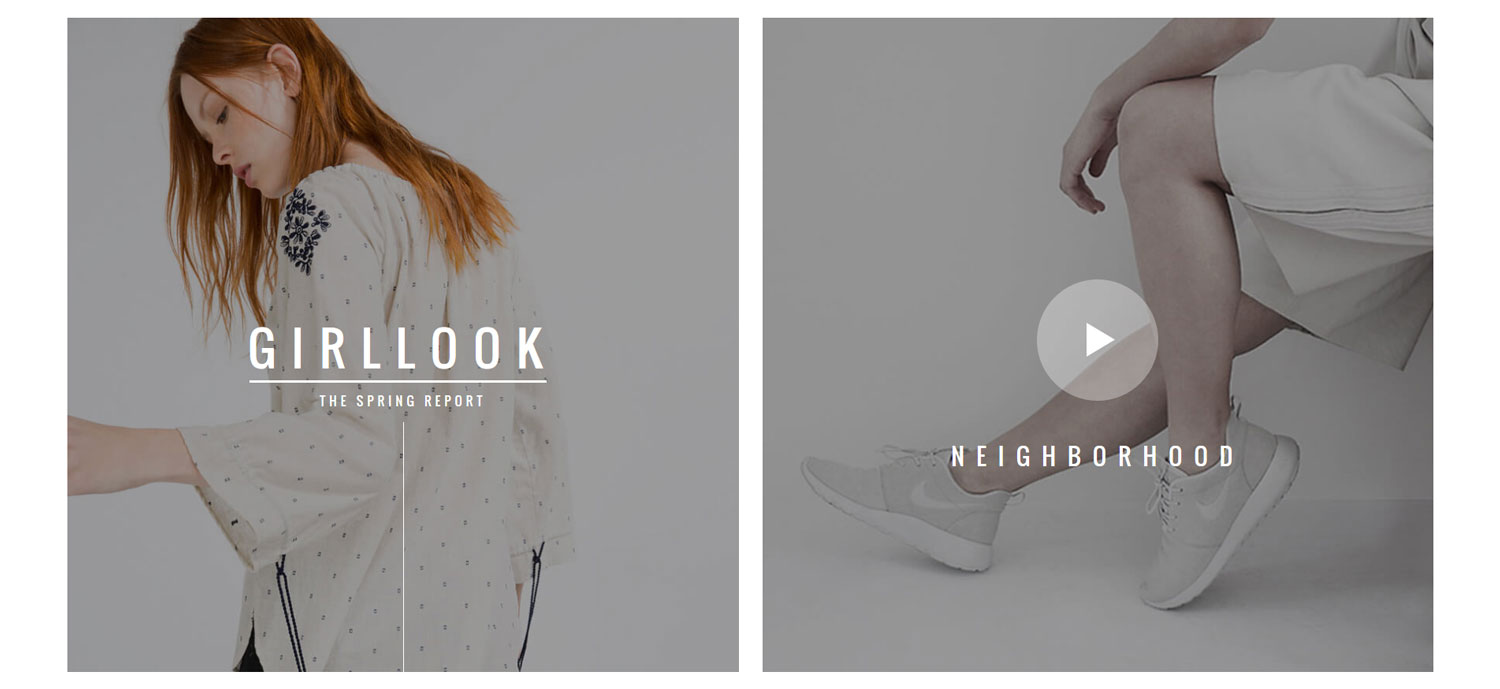
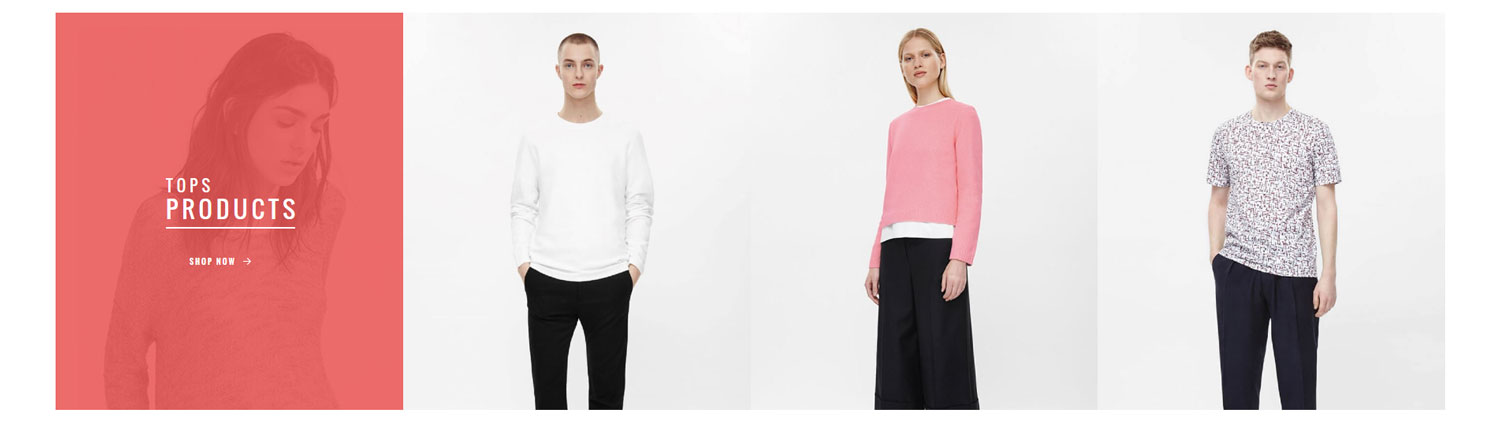
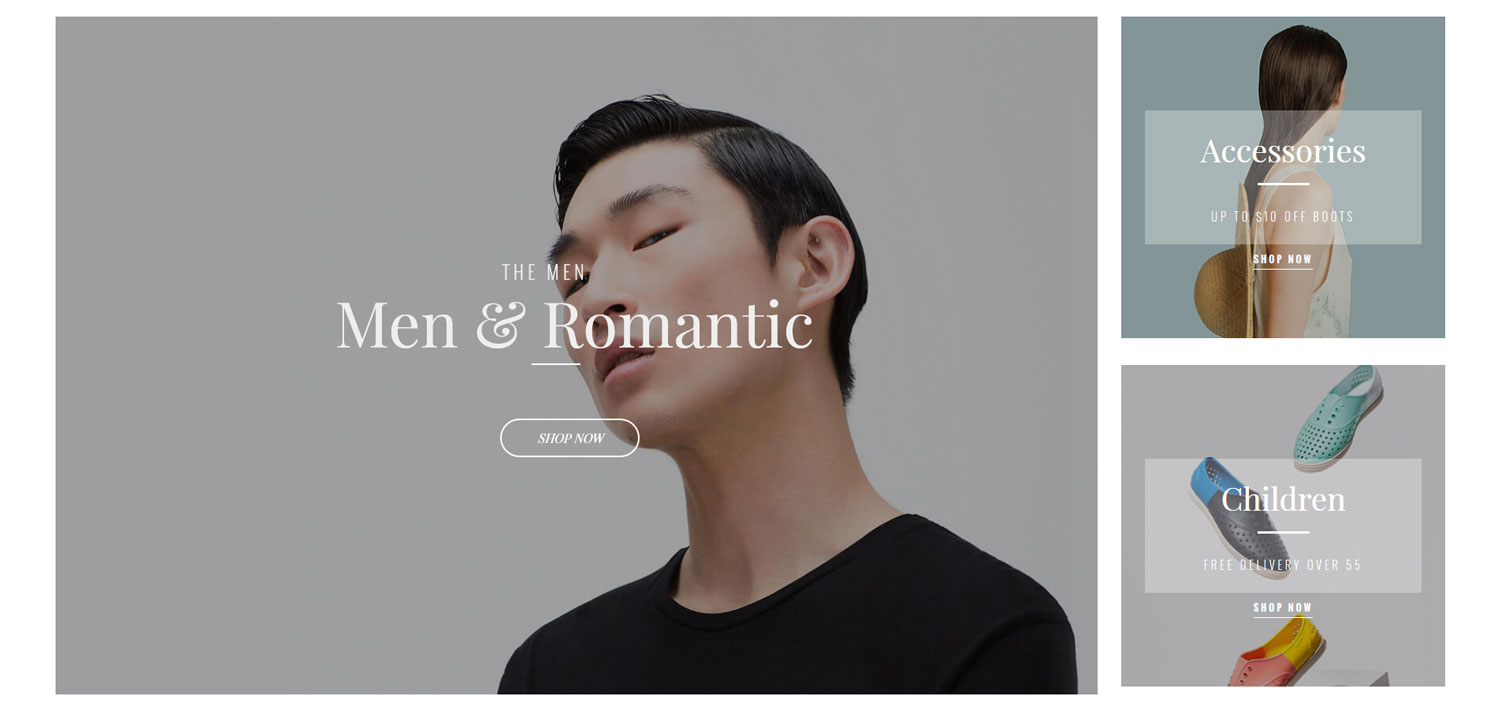
+ Section Interactive Banner v1
In this section we added 4 Banner for work. You need config values bellow for each section:
After configuration, this section will be showing like this:
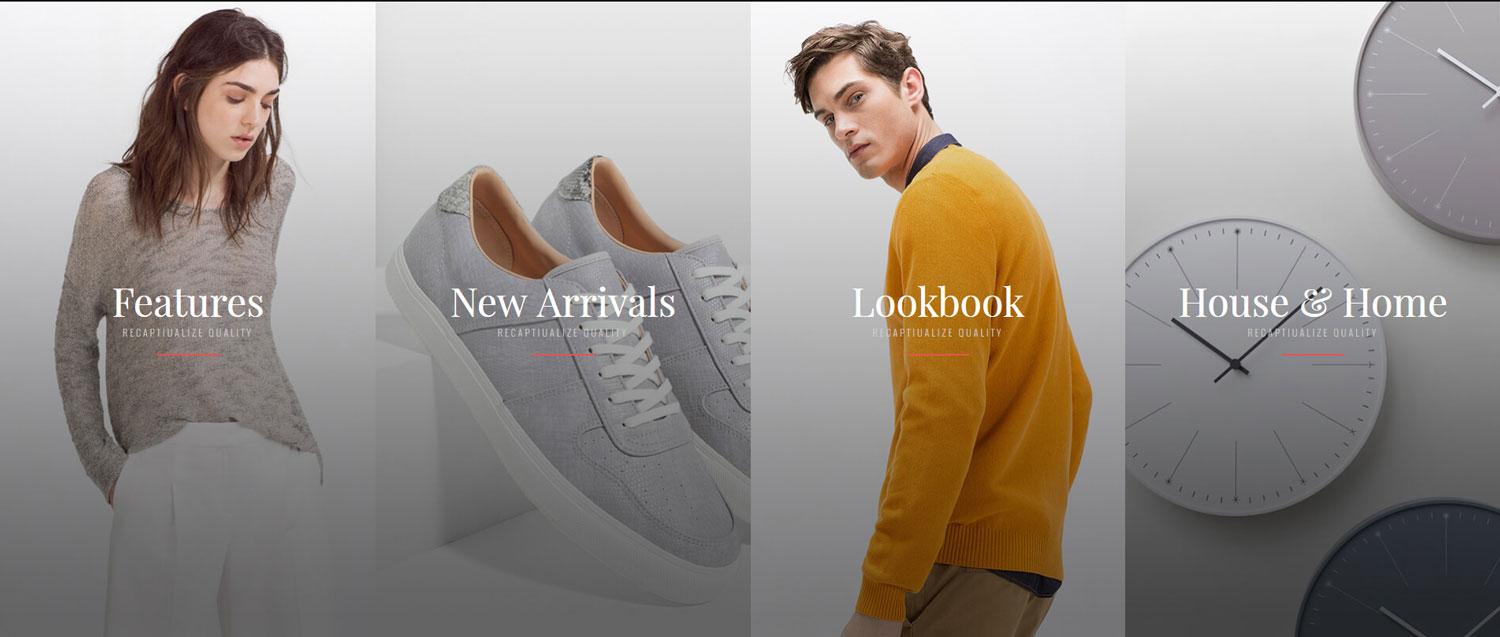
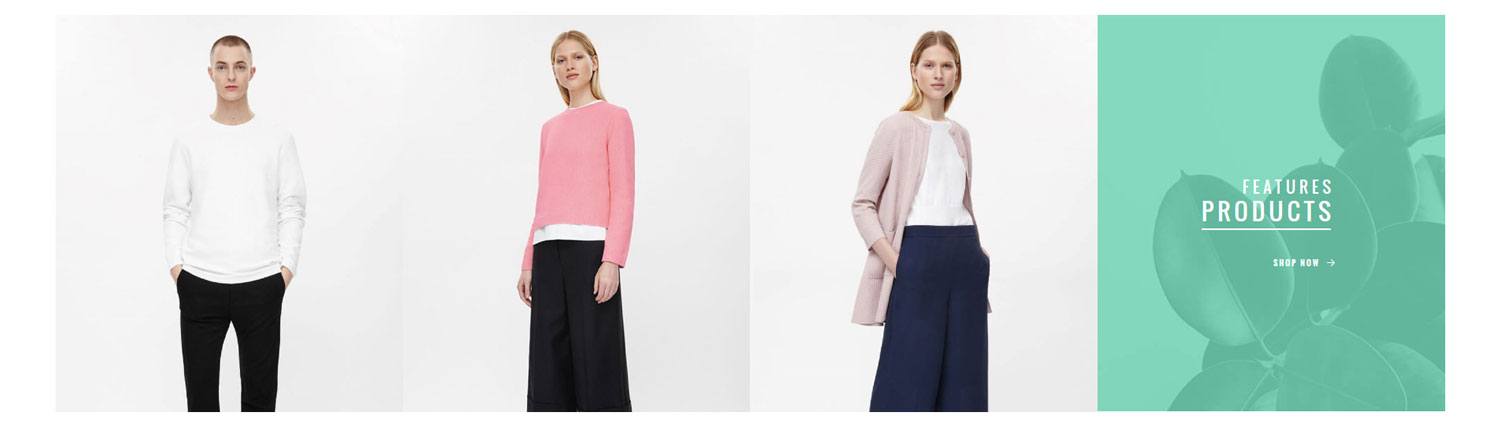
+ Section Interactive Banner v2
In this section we added 4 Banner for work. You need config values bellow for each section:
After configuration, this section will be showing like this:
+ Section Service Box v1
In this section we added 3 Box for work and you need config values bellow for each section:
After configuration, this section style White will be showing like this:

After configuration, this section style Black will be showing like this:

+ Section Service Box v2
In this section we added 4 Box for work and you need config values bellow for each section:
After configuration, this section will be showing like this:

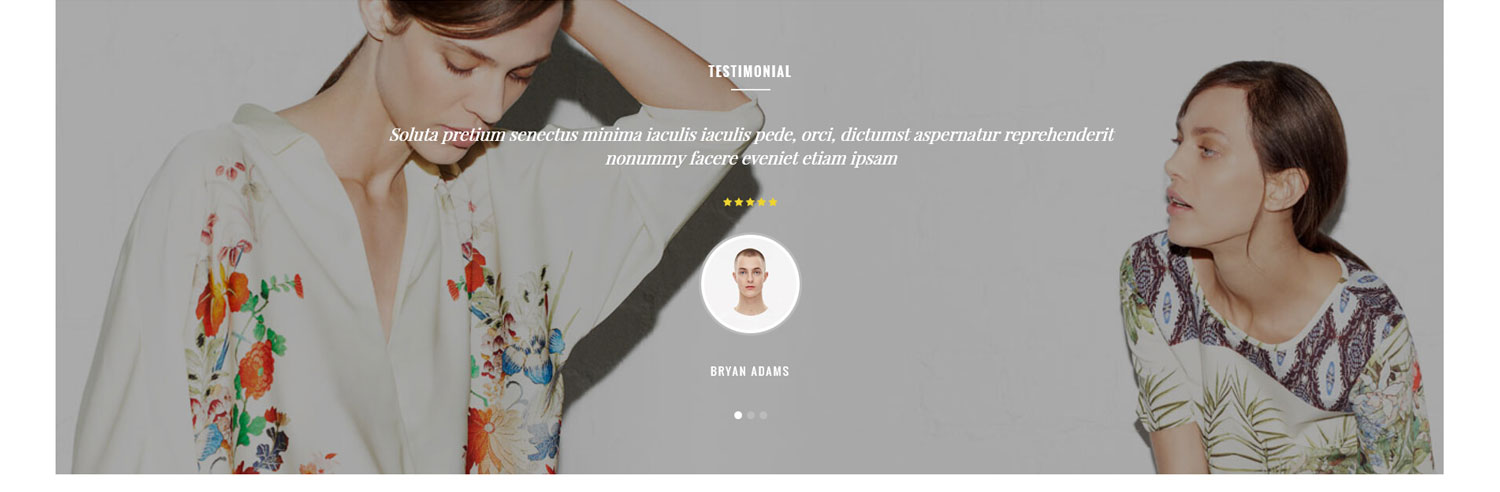
+ Section Testimonial
In this section we added 3 Testimonial for work and you need config values bellow for each section:
After configuration, this section will be showing like this:
+ Section Two iBanner
You need config values bellow for each section:
After configuration, this section will be showing like this:
+ Section Collection Tabs v1
In this section we added 3 Tabs product for work and you need config values bellow for each section:
After configuration, this section will be showing like this:
+ Section Collection Tabs v2
In this section we added 3 Tabs product for work and you need config values bellow for each section:
After configuration, this section will be showing like this:
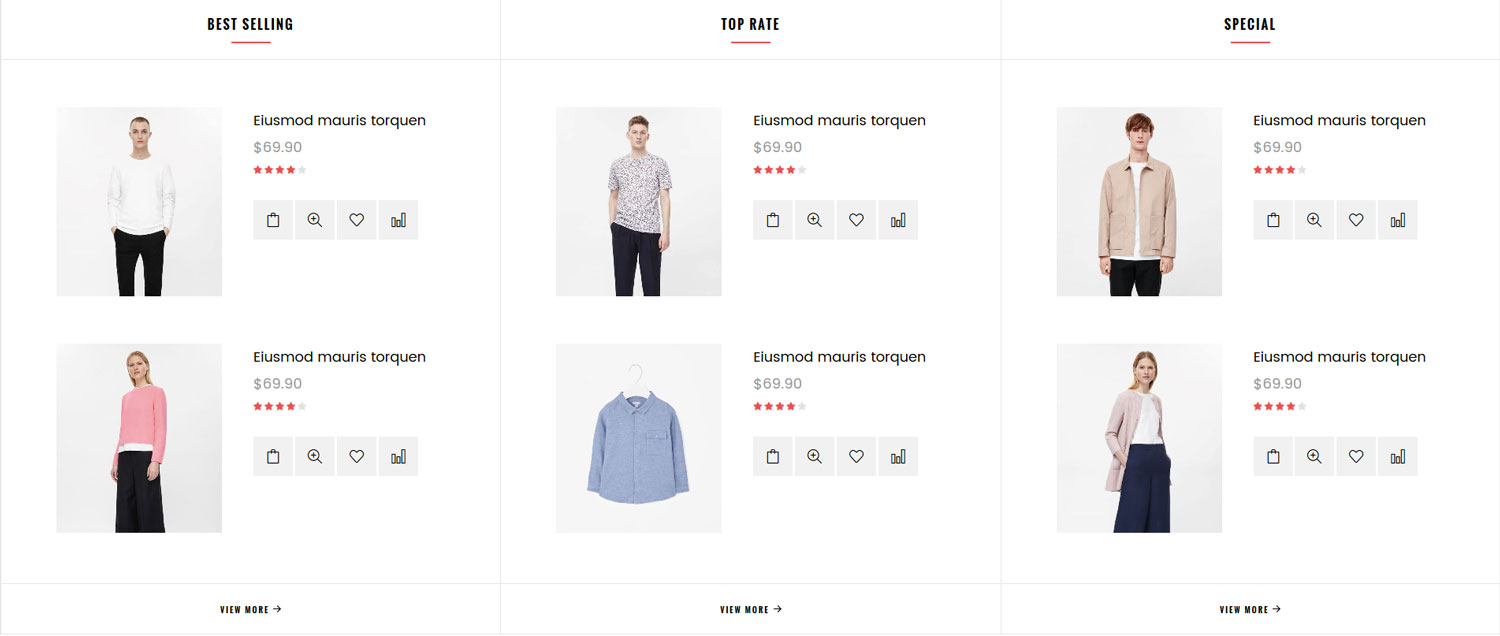
+ Section Collection Tabs v3
In this section we added 3 Tabs product for work and you need config values bellow for each section:
After configuration, this section will be showing like this:
+ Section Collection & Slider
You need config values bellow for each section:
After configuration, this section will be showing like this:
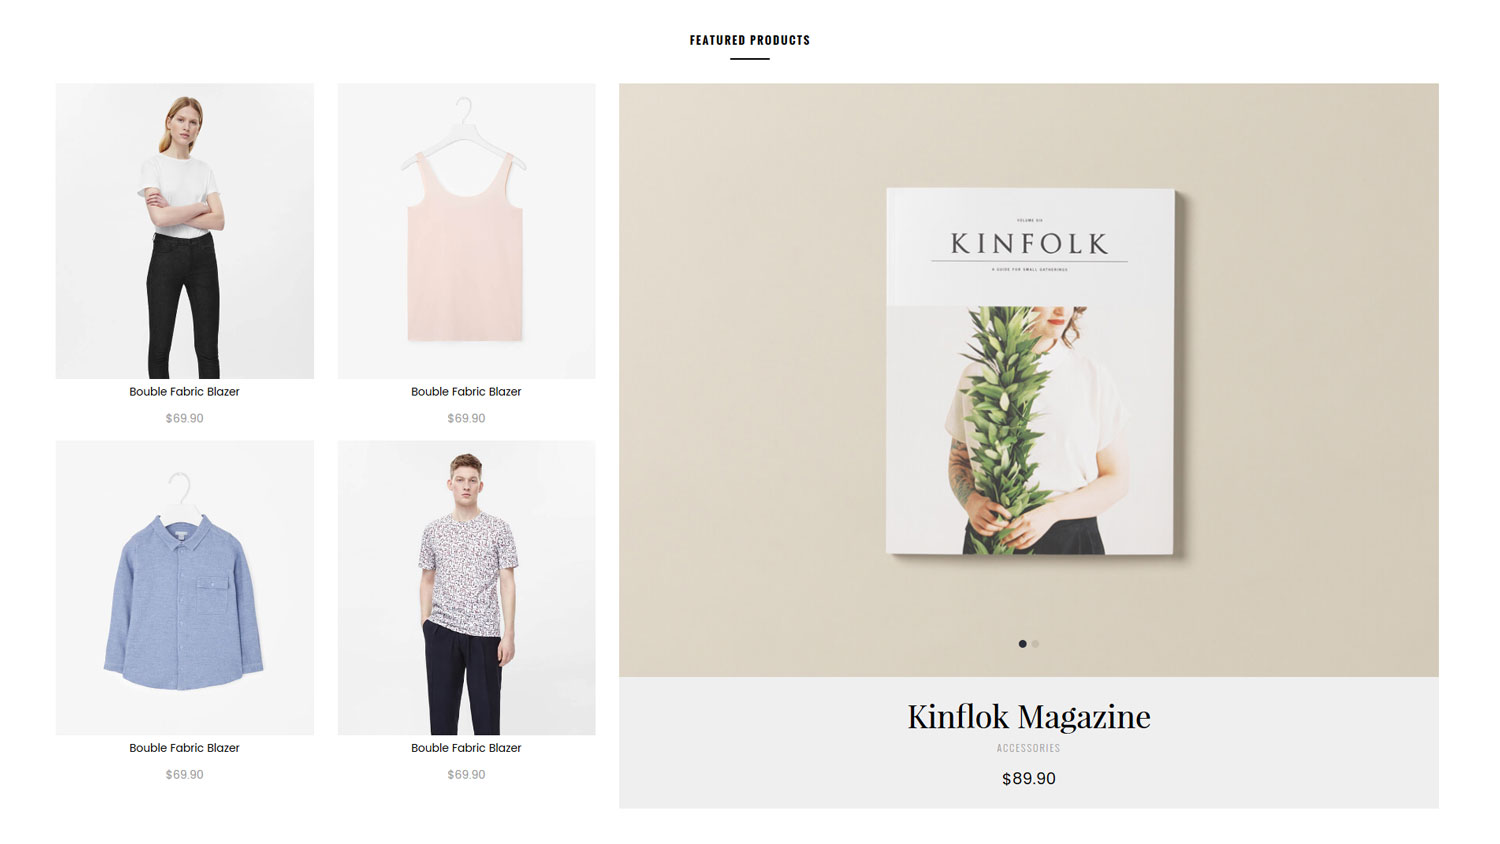
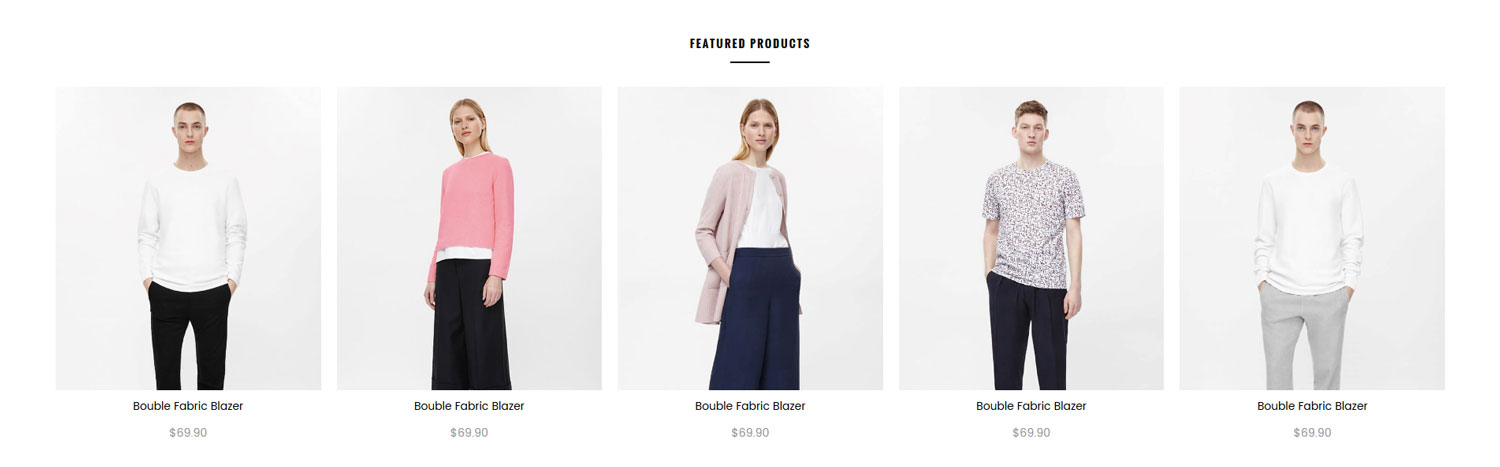
+ Section Featured Products
You need config values bellow for each section:
After configuration, this section will be showing like this:
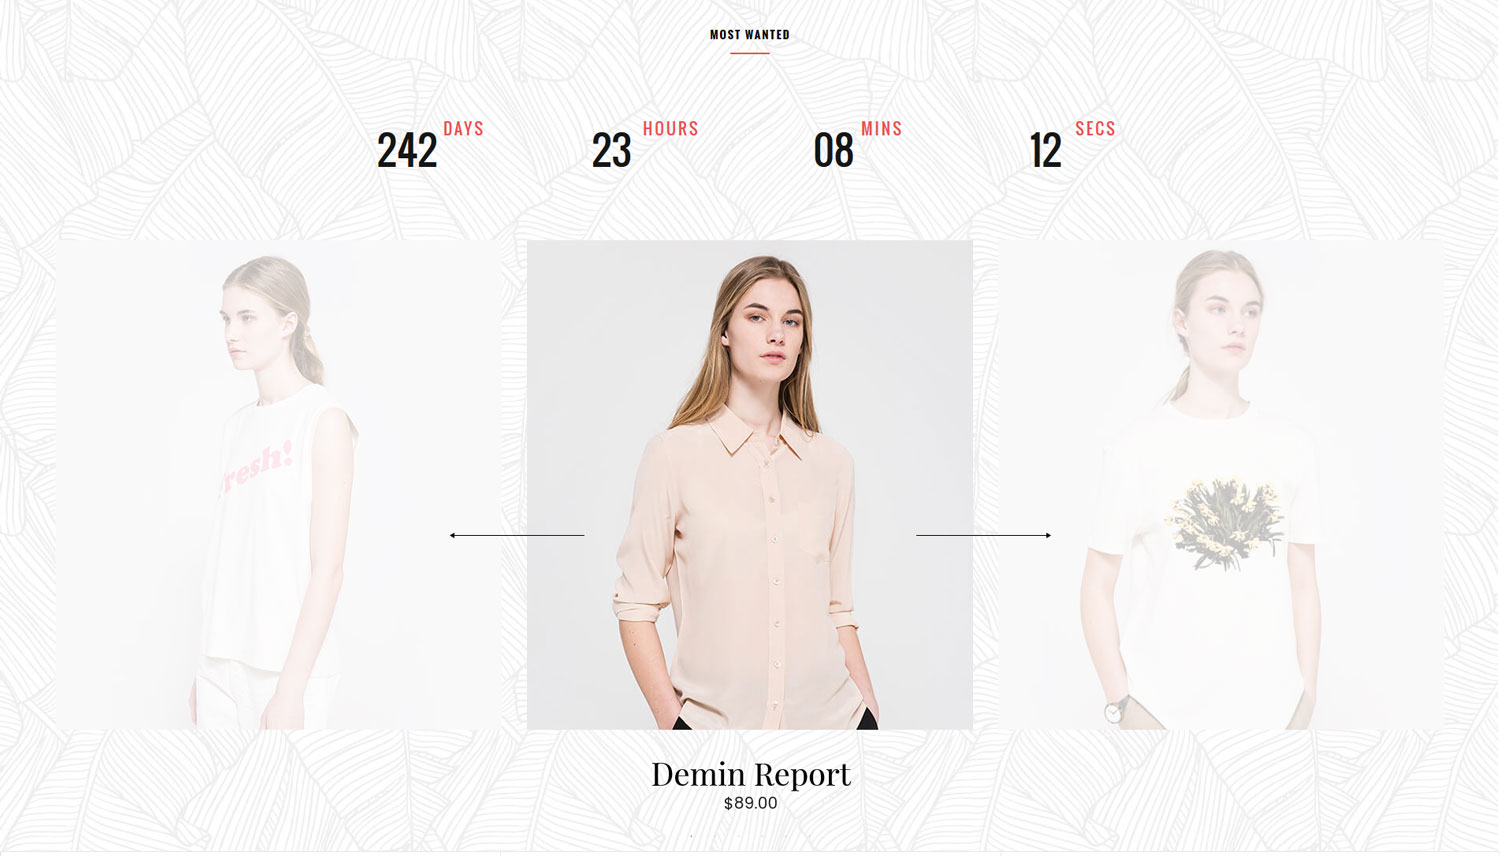
+ Section Hot Deal Products
You need config values bellow for each section:
After configuration, this section will be showing like this:
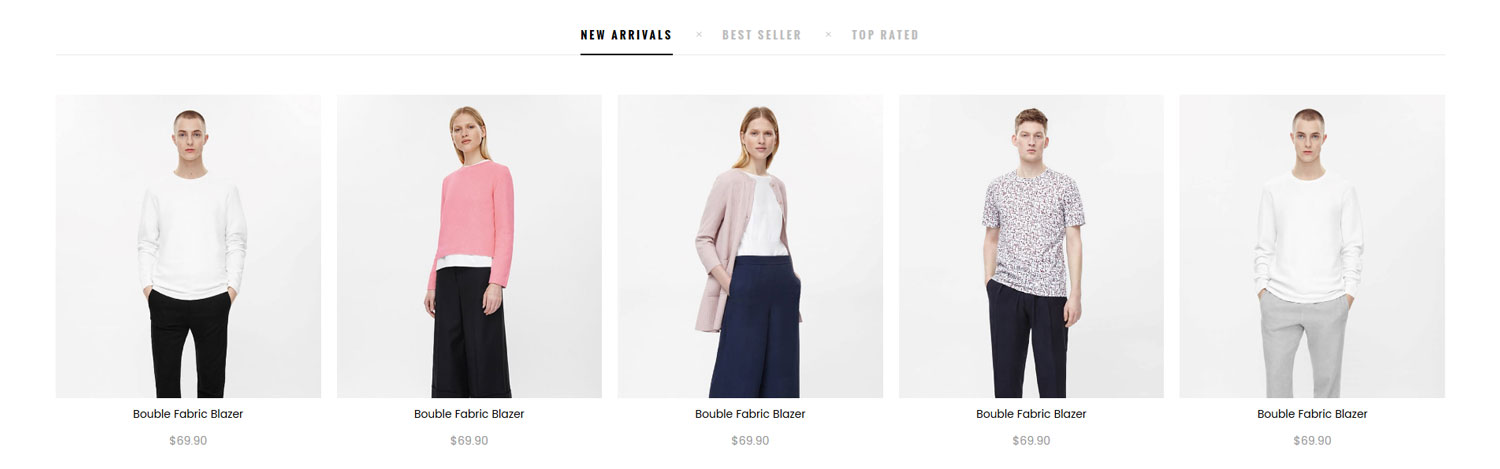
+ Section Product Tabs
In this section we added 3 Tabs product for work and you need config values bellow for each section:
After configuration, this section will be showing like this:
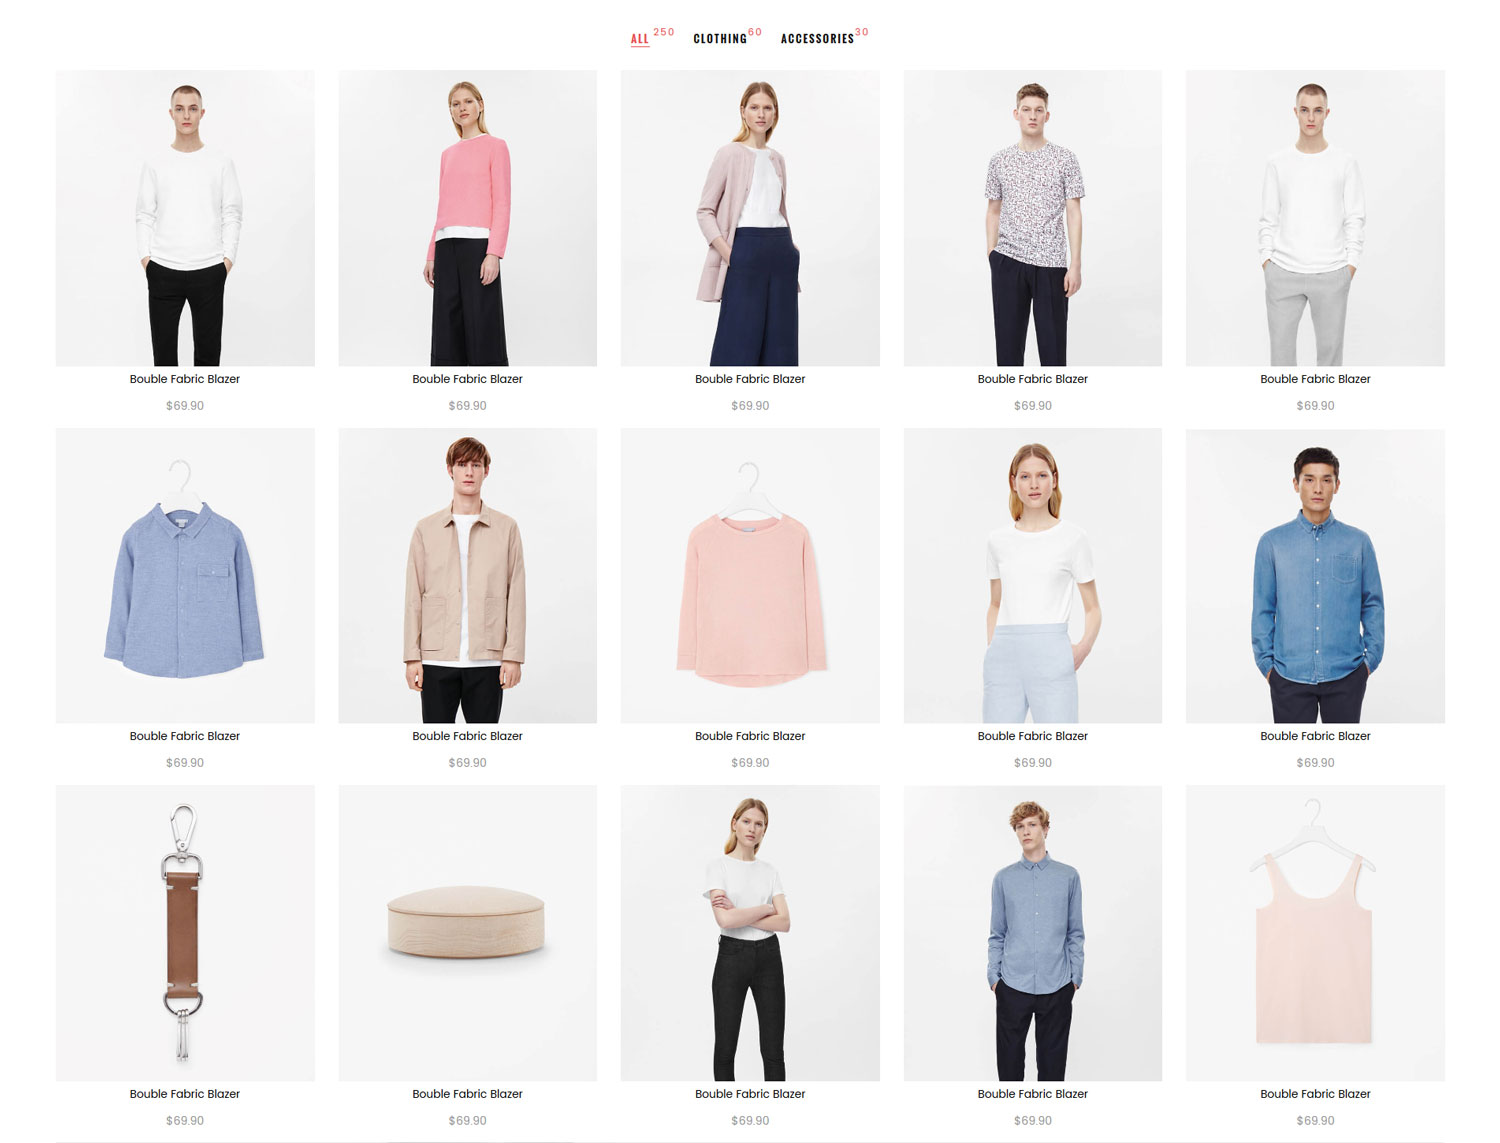
+ Section Products
You need config values bellow for each section:
After configuration, this section will be showing like this:
+ Section Slider Products
You need config values bellow for each section:
After configuration, this section style CTA Left will be showing like this:
After configuration, this section style CTA Right will be showing like this:
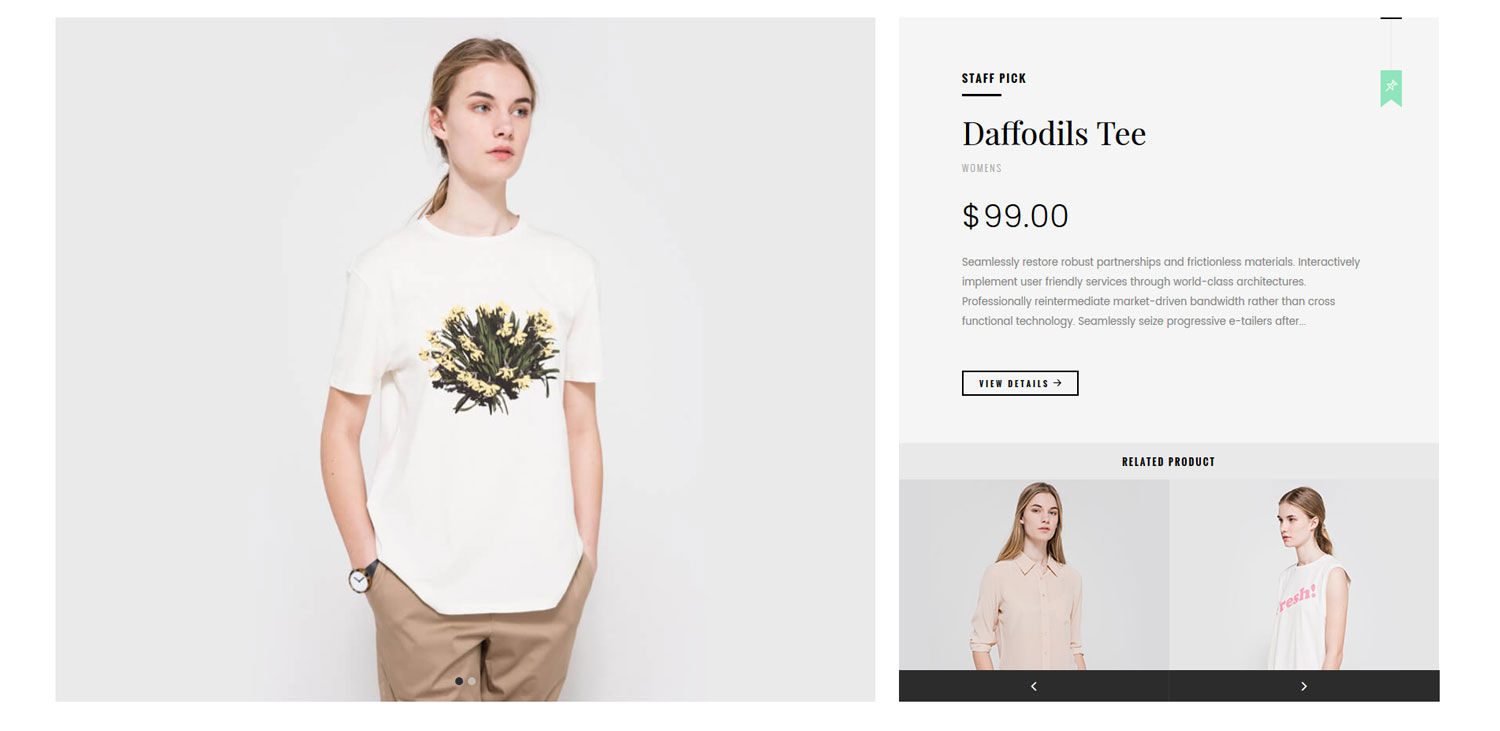
+ Section Special Product
You need config values bellow for each section:
After configuration, this section will be showing like this:
+ Section Slider v1
You need config values bellow for each section:
After configuration, this section will be showing like this:
+ Section Slider v2
You need config values bellow for each section:
After configuration, this section will be showing like this:

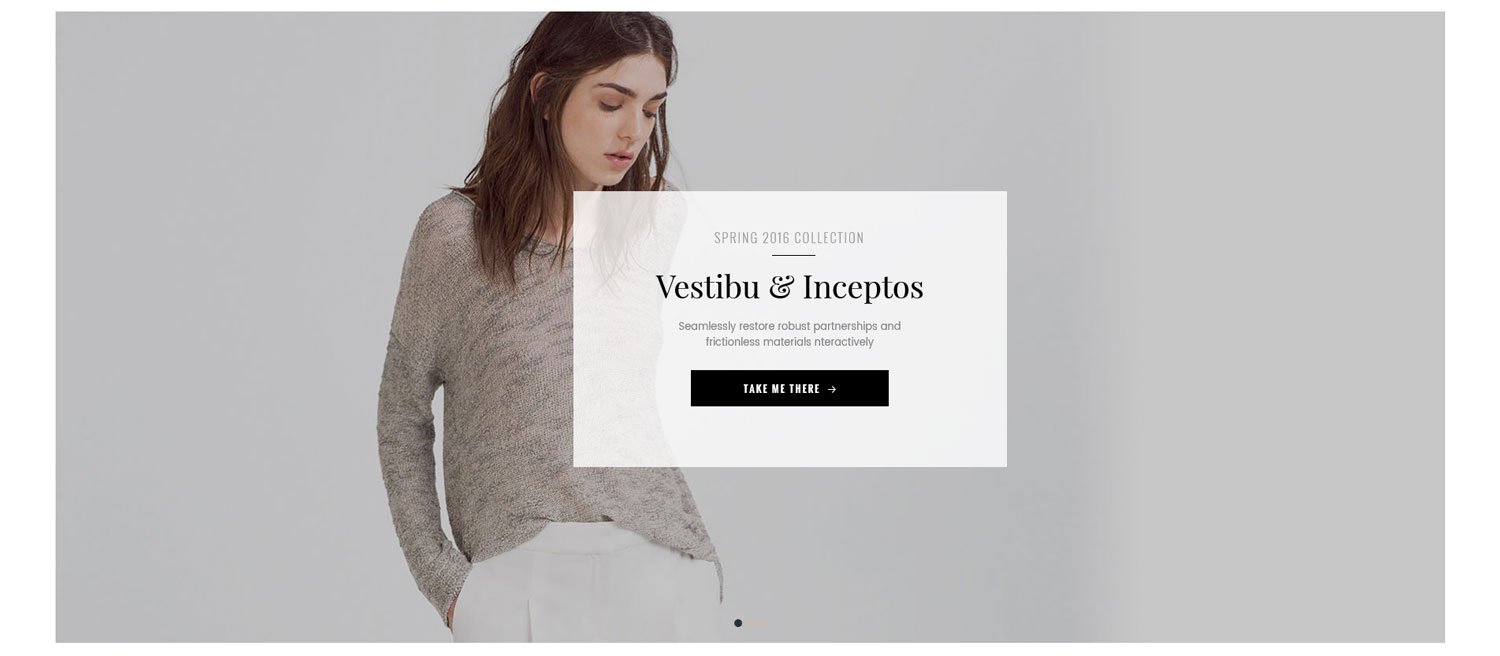
+ Section Slider & CTA
You need config values bellow for each section:
After configuration, this section will be showing like this:
+ Section CTA & Newletter
You need config values bellow for each section:
After configuration, this section will be showing like this:

+ Section iBanner & Newletter
You need config values bellow for each section:
After configuration, this section will be showing like this:

+ Section Newletter v1
You need config values bellow for each section:
After configuration, this section will be showing like this:

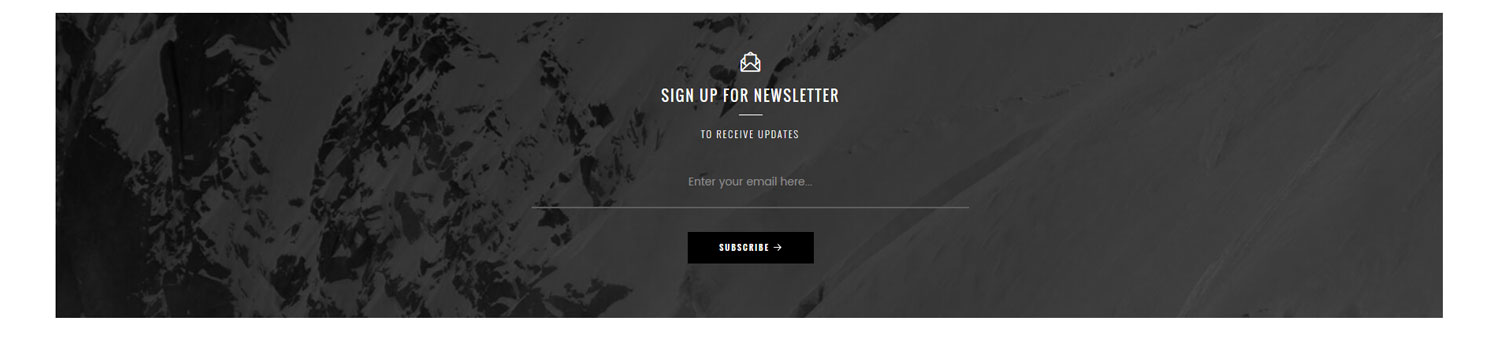
+ Section Newletter v2
You need config values bellow for each section:
After configuration, this section style Full Width will be showing like this:
After configuration, this section style Full Screen will be showing like this:

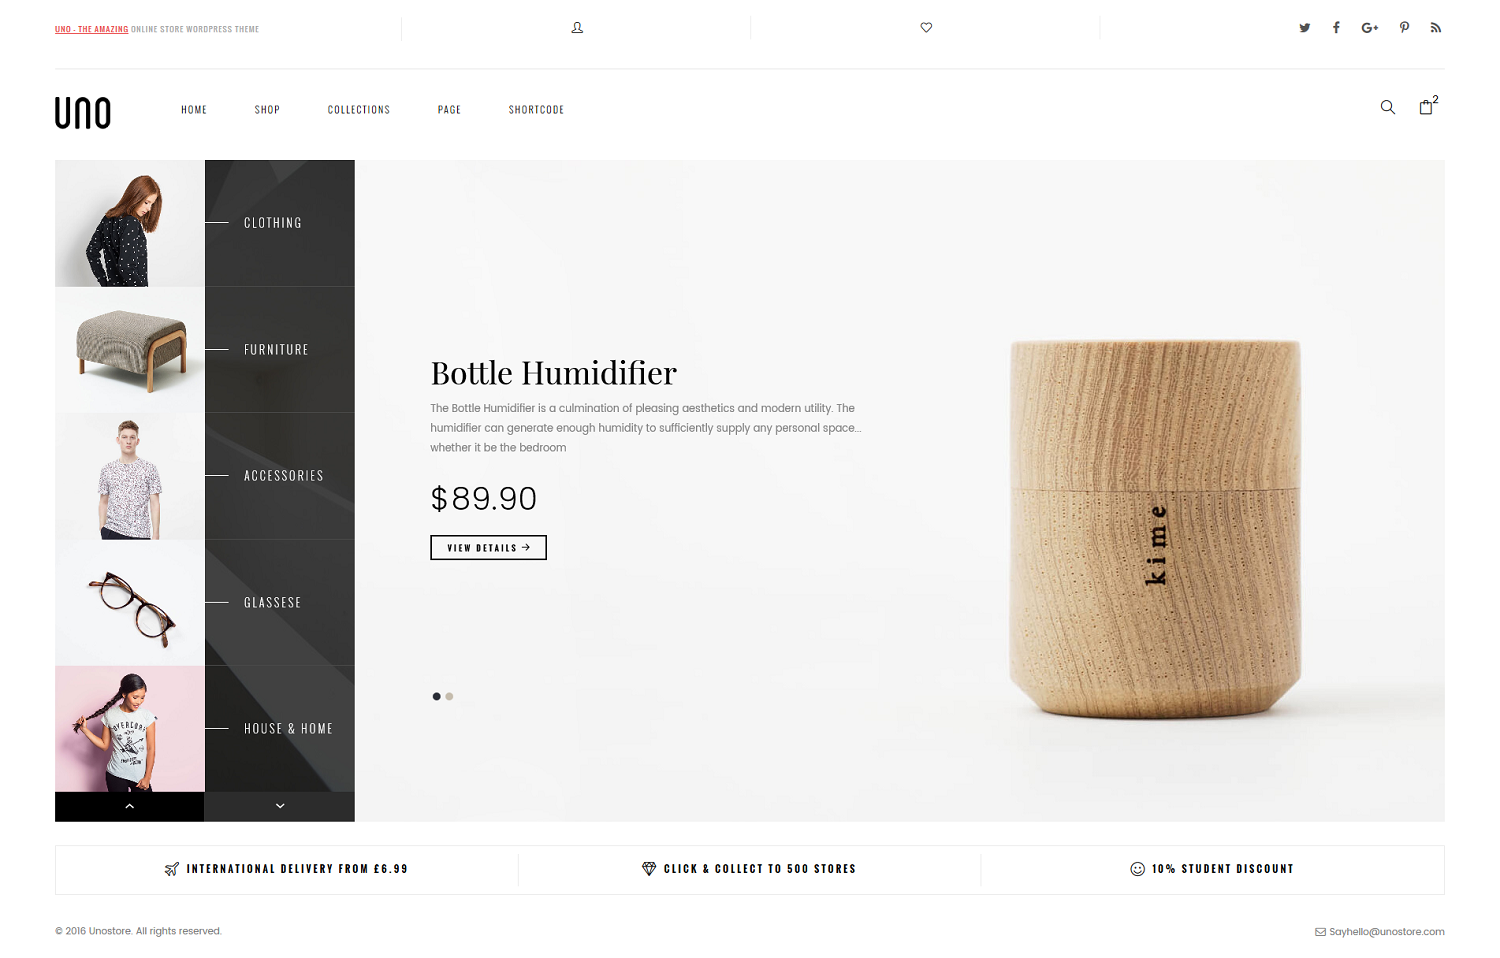
Home page 1
In Home page 1, we used sections bellow:
- s22.1Section Slider v1
- s11.1Section Service Box v1
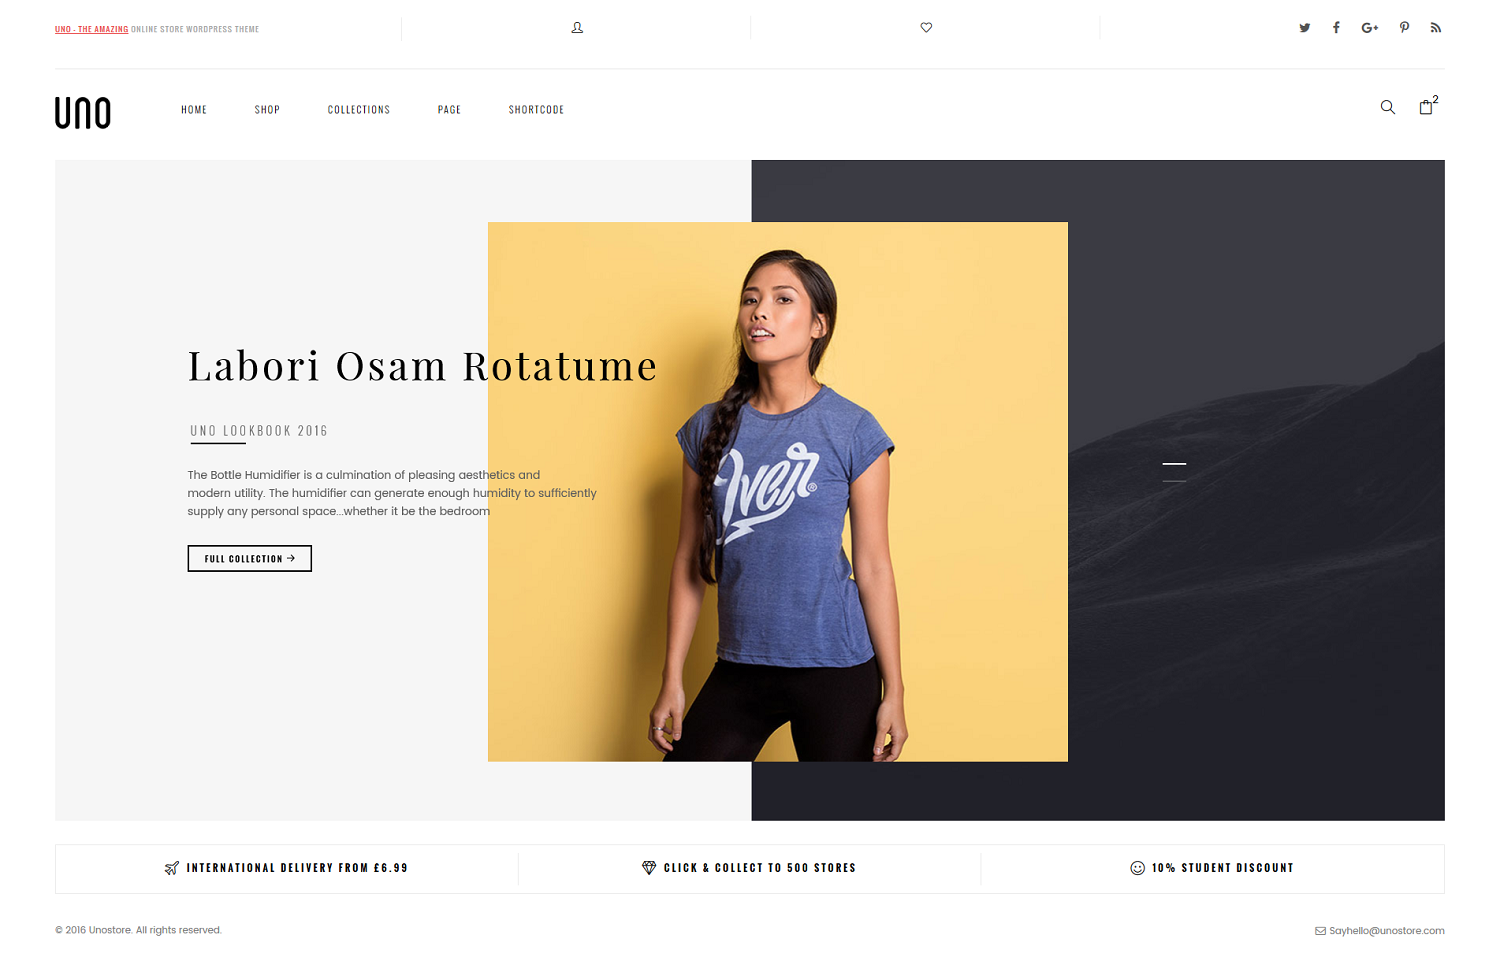
Header Style 1:

Footer Style 1:

Config position for each section in home 1, see photo bellow:
Choose and Add section in Homepage
Choose a section in Homepage (drag and drop then add section)

Home page 2
In Home page 2, we used sections bellow:
- s22.2Section Slider v2
- s11.1Section Service Box v1
- s14.1Section Collection Tabs v1
- s21Section Special Product
- s16Section Featured Products
- s24Section CTA & Newletter
- s7.1Section iBanner & CTA v1
- s1Section Latest Blog
- s5Section Contact Us
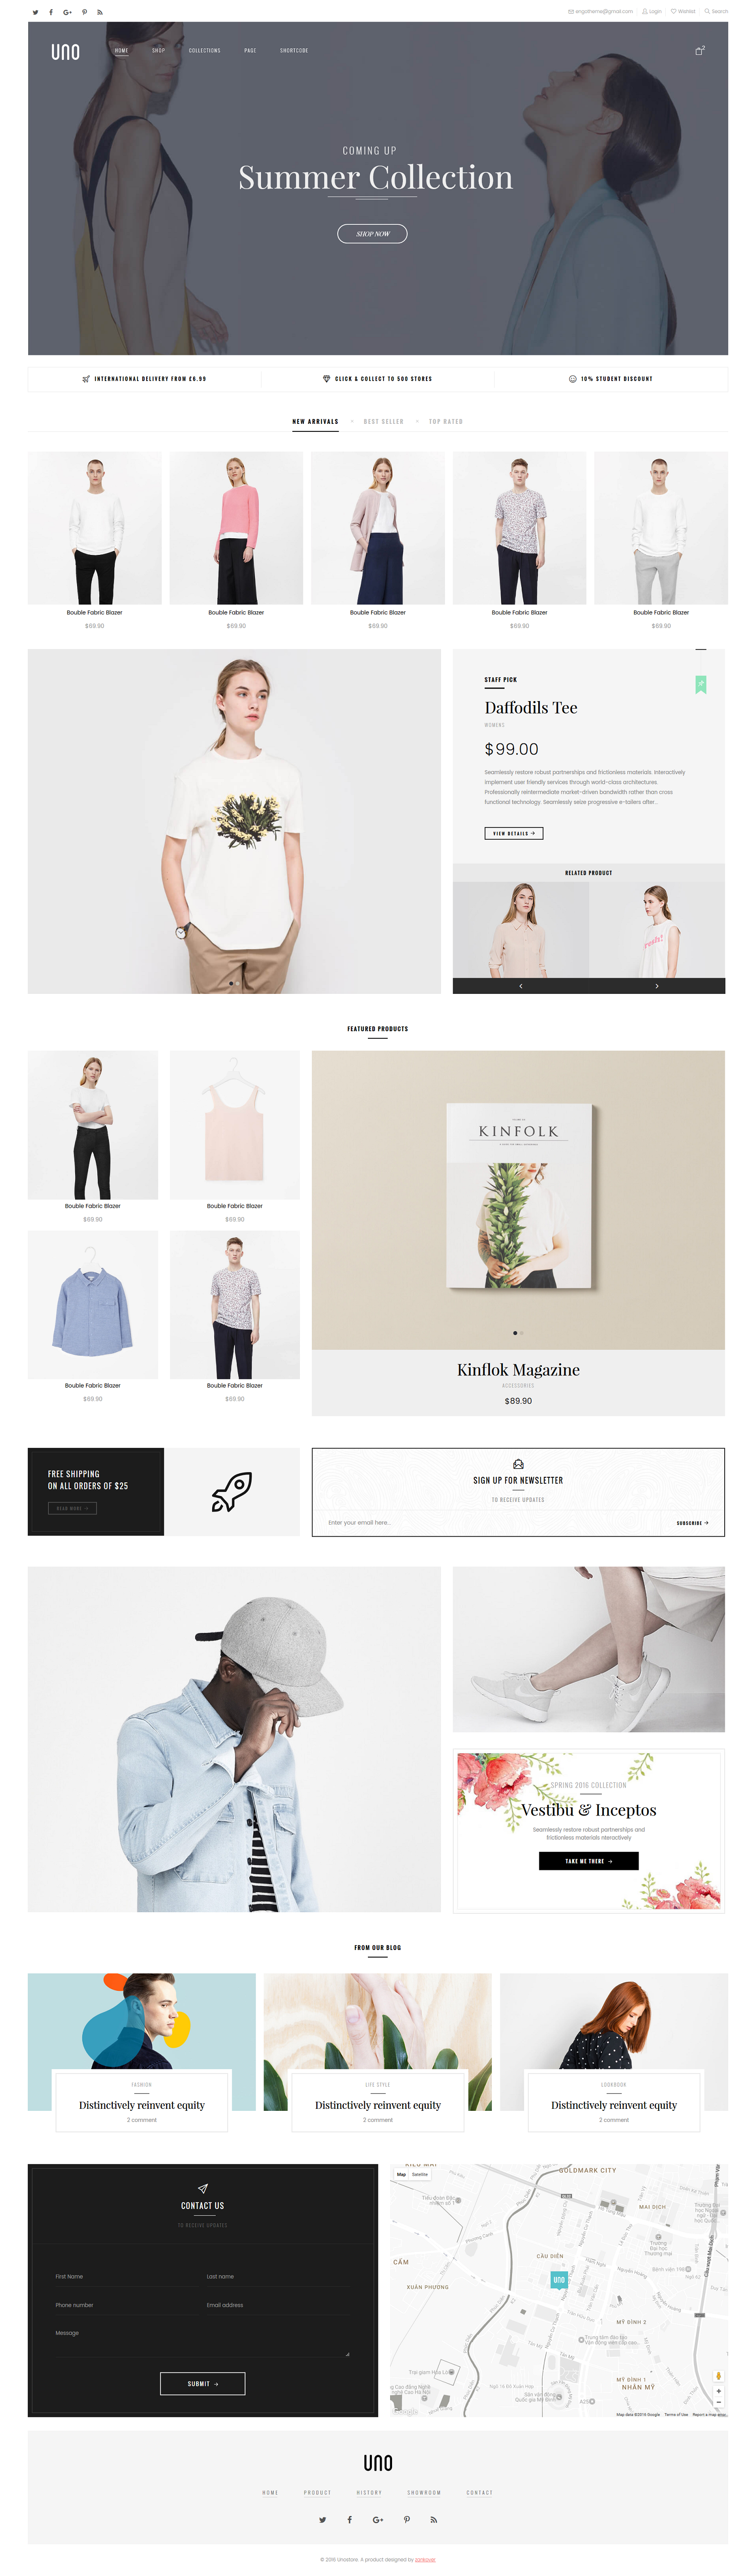
Header Style 2:

Footer Style 2:

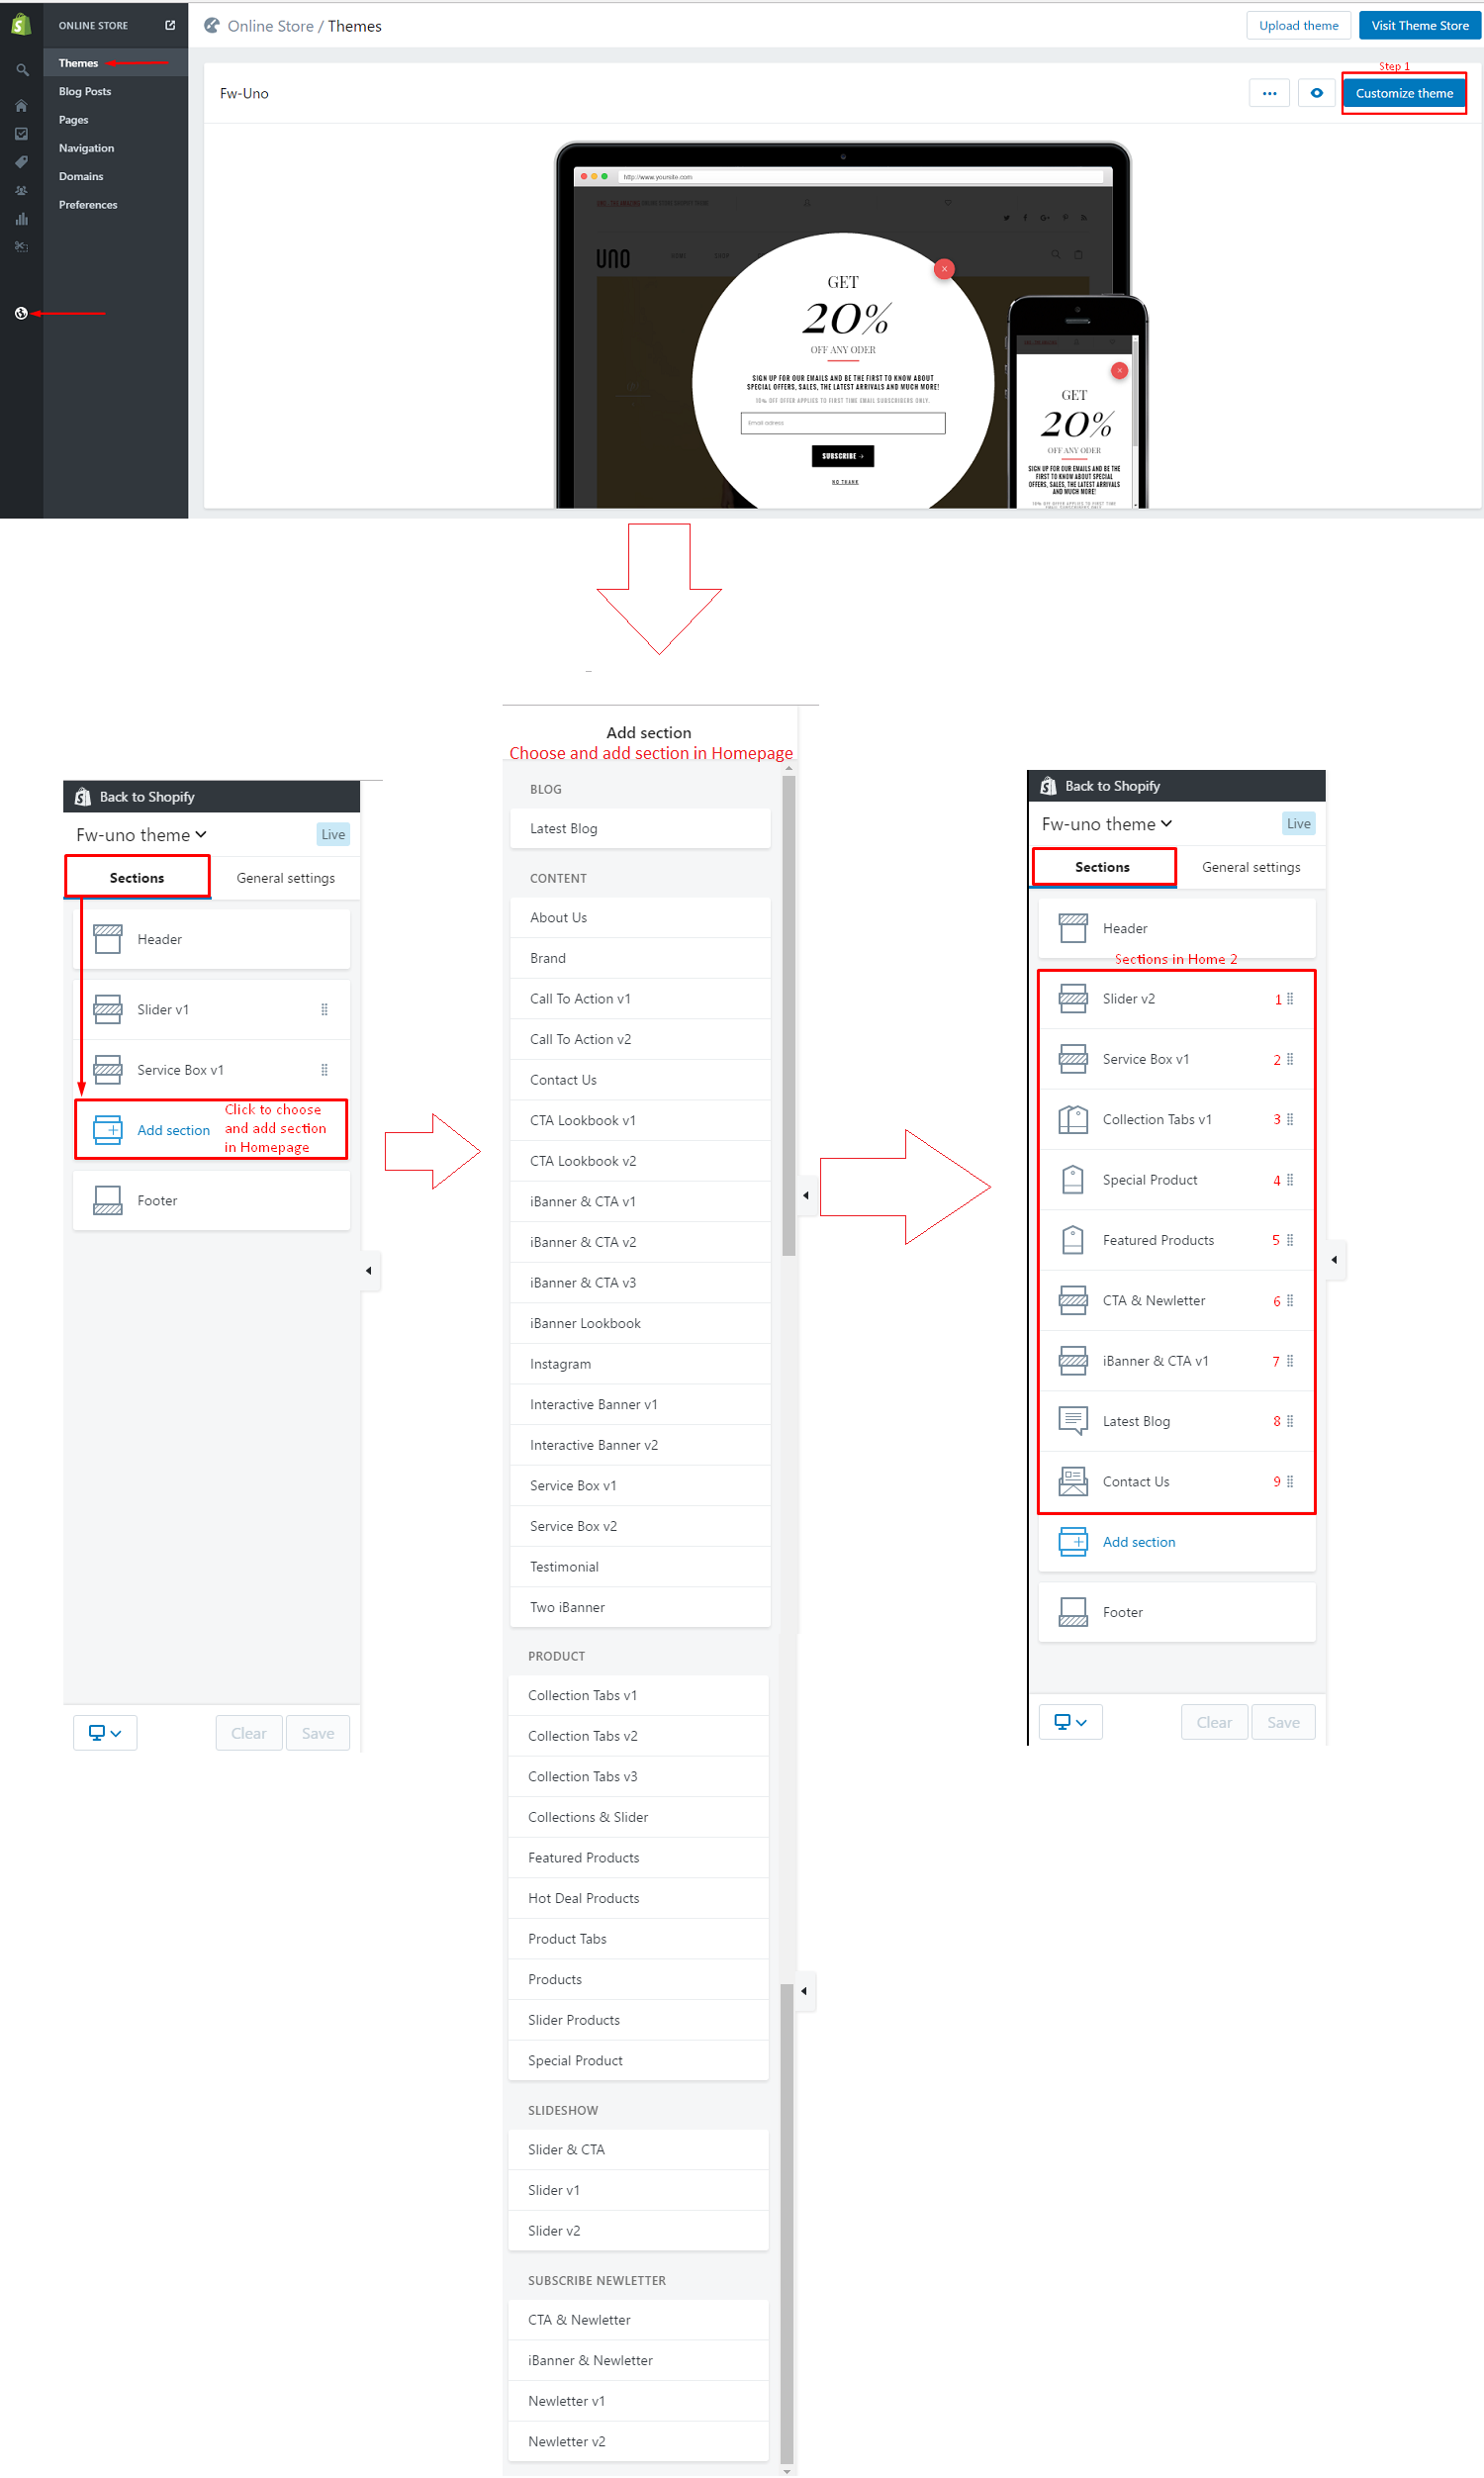
Config position for each section in home 2, see photo bellow:
Choose and Add section in Homepage
Choose a section in Homepage (drag and drop then add section)
Home page 3
In Home page 3, we used sections bellow:
- s11.1Section Service Box v1
- s23Section Slider & CTA
- s26.1Section Newletter v1
- s7.3Section iBanner & CTA v3
- s7.3Section iBanner & CTA v3
- s19Section Products
- s4.3Section Call To Action v3
- s11.2Section Service Box v2
Header Style 3:

Footer Style 2:
Config position for each section in home 4, see photo bellow:
Choose and Add section in Homepage
Choose a section in Homepage (drag and drop then add section)

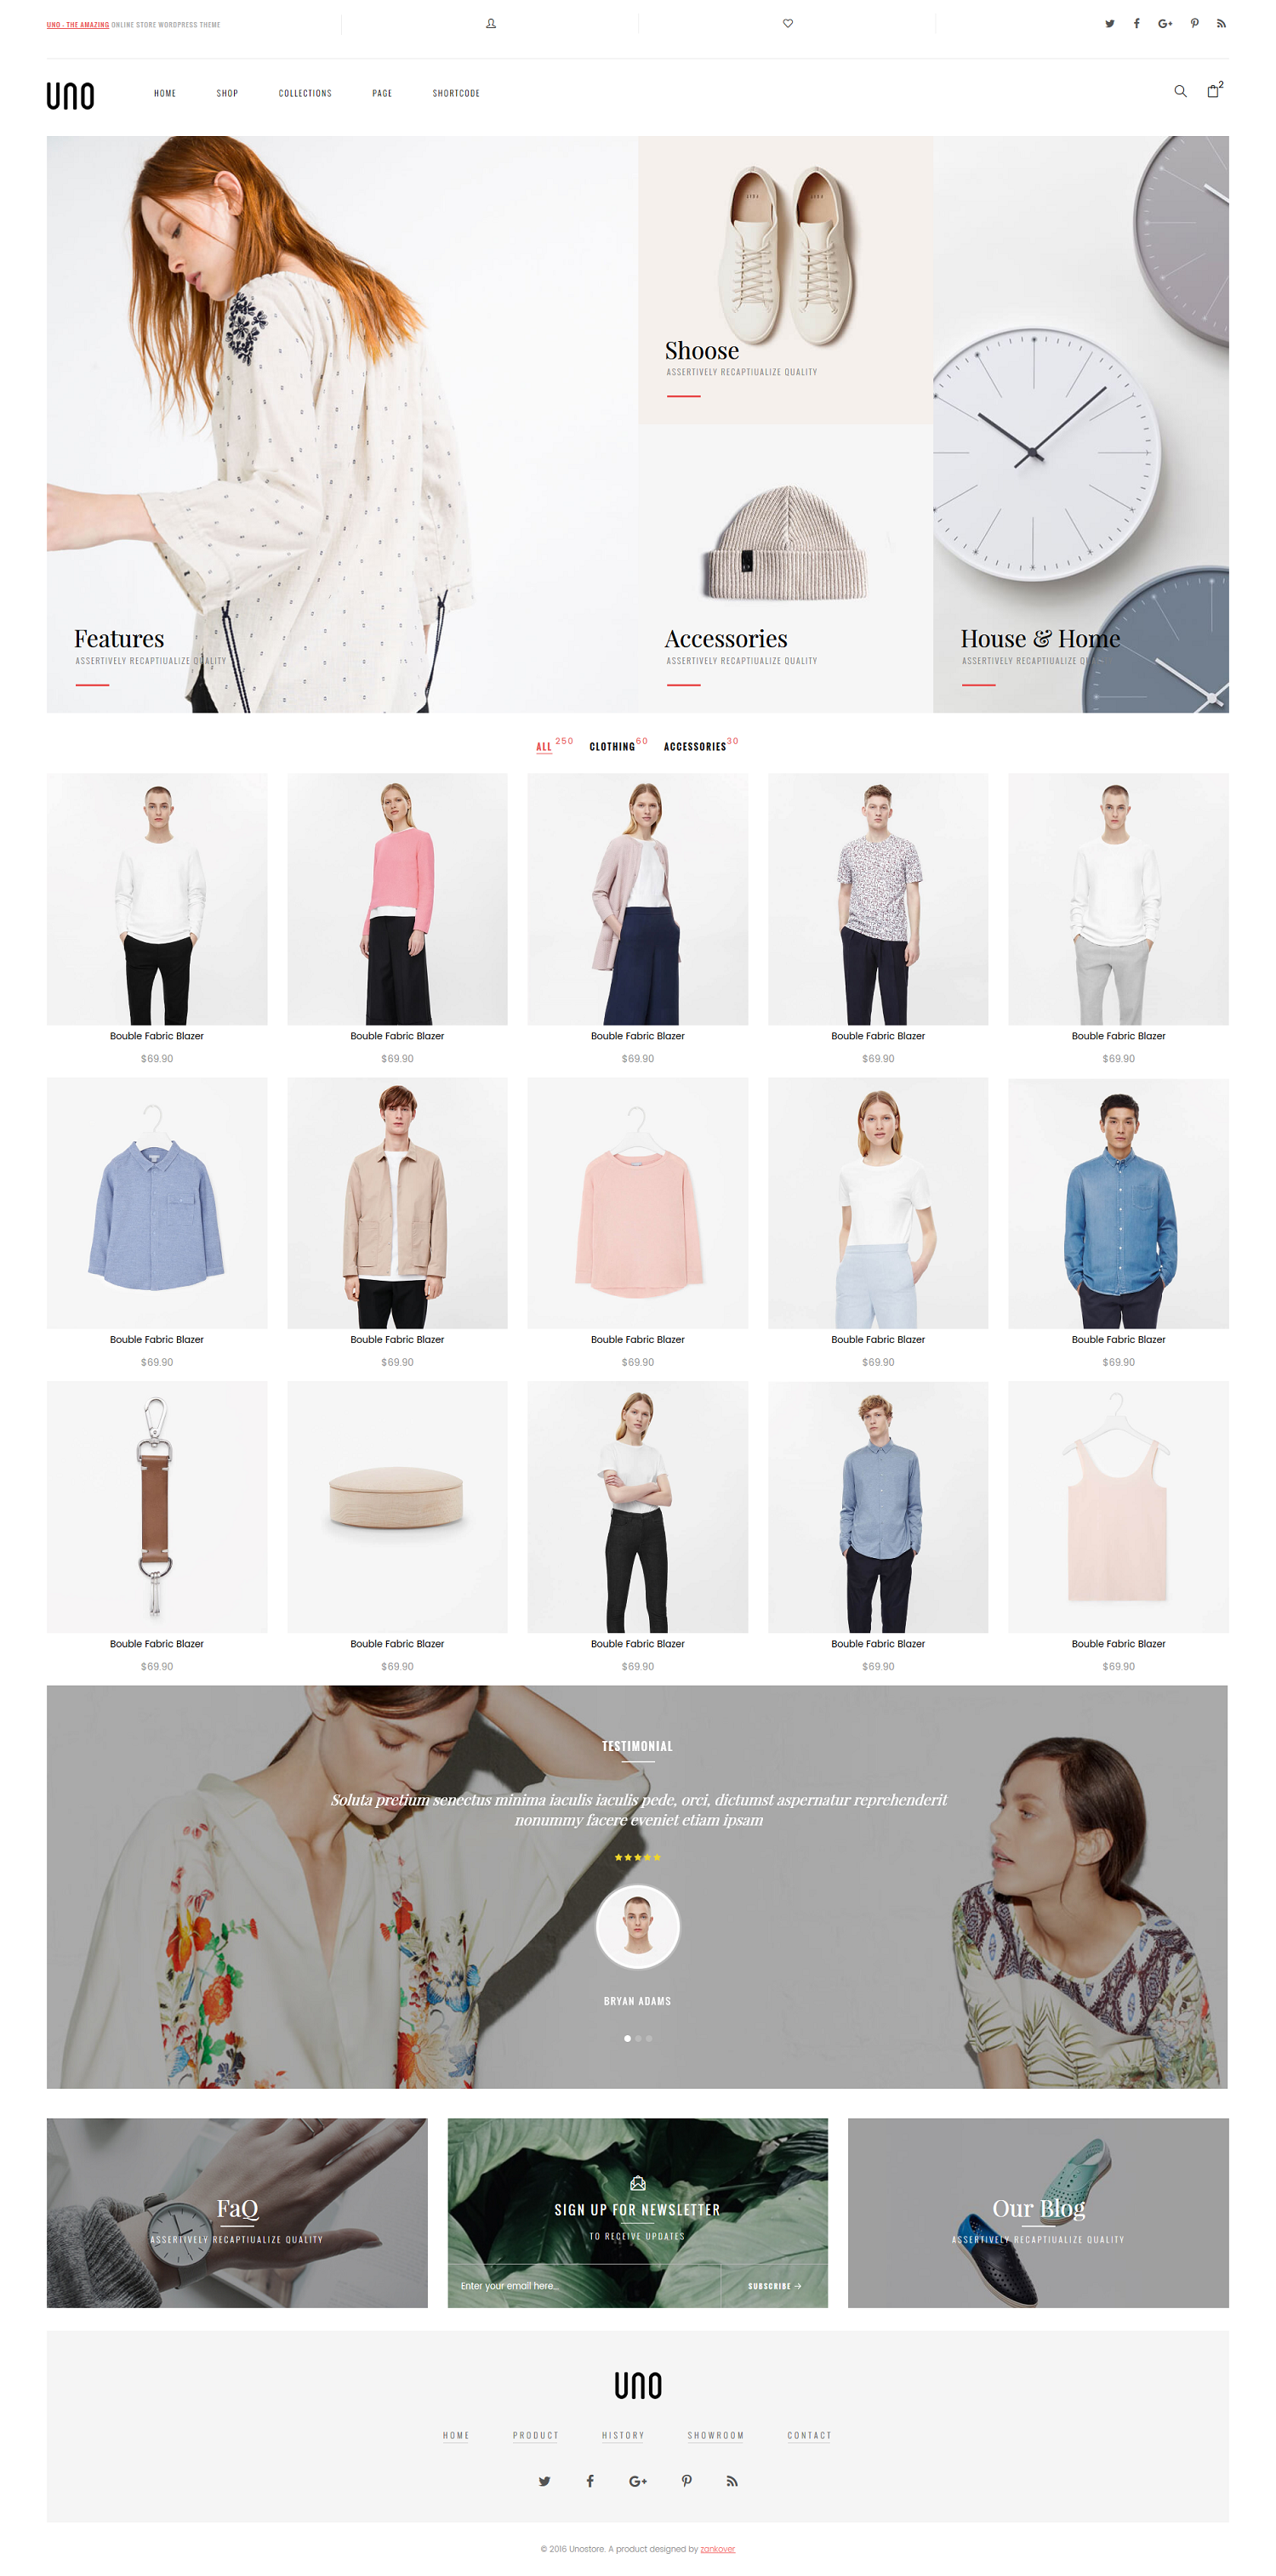
Home page 4
In Home page 4, we used sections bellow:
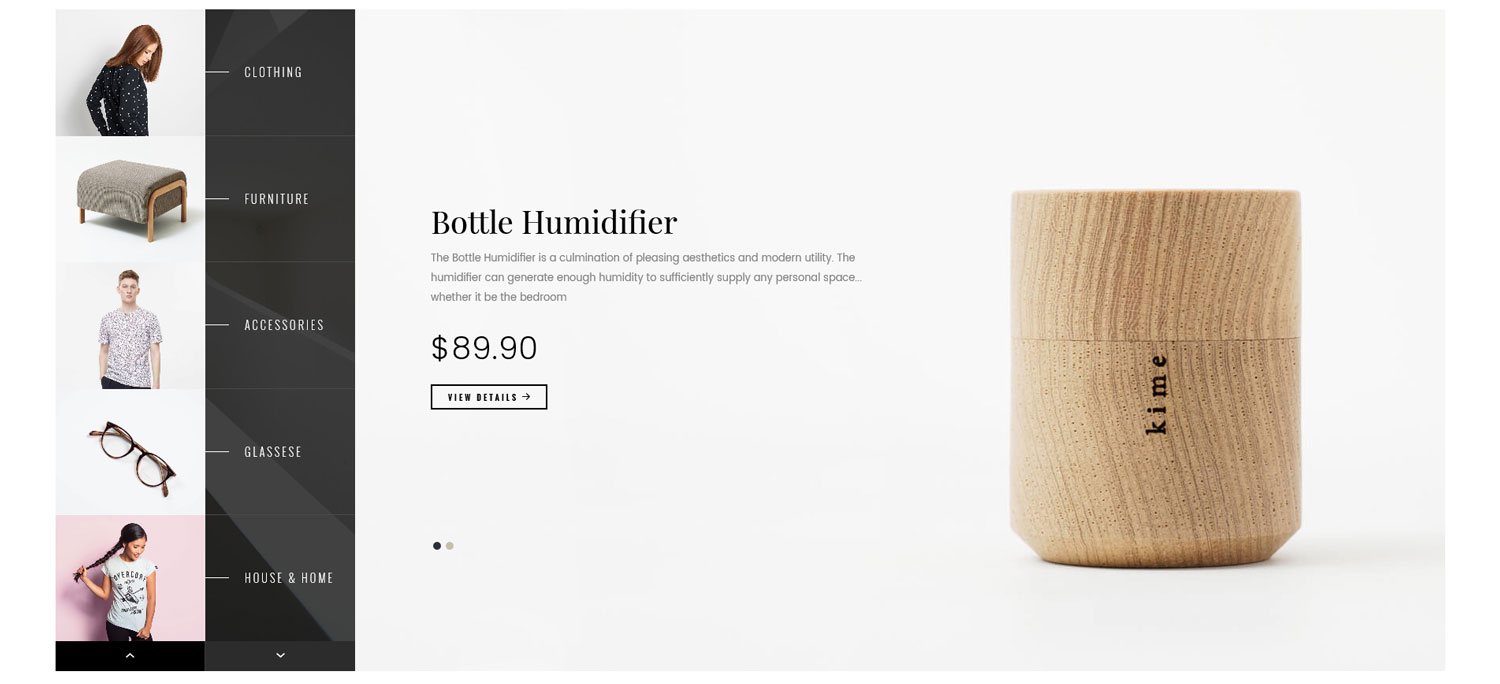
- s10.1Section Interactive Banner v1
- s14.2Section Collection Tabs v2
- s12Section Testimonial
- s25Section iBanner & Newletter
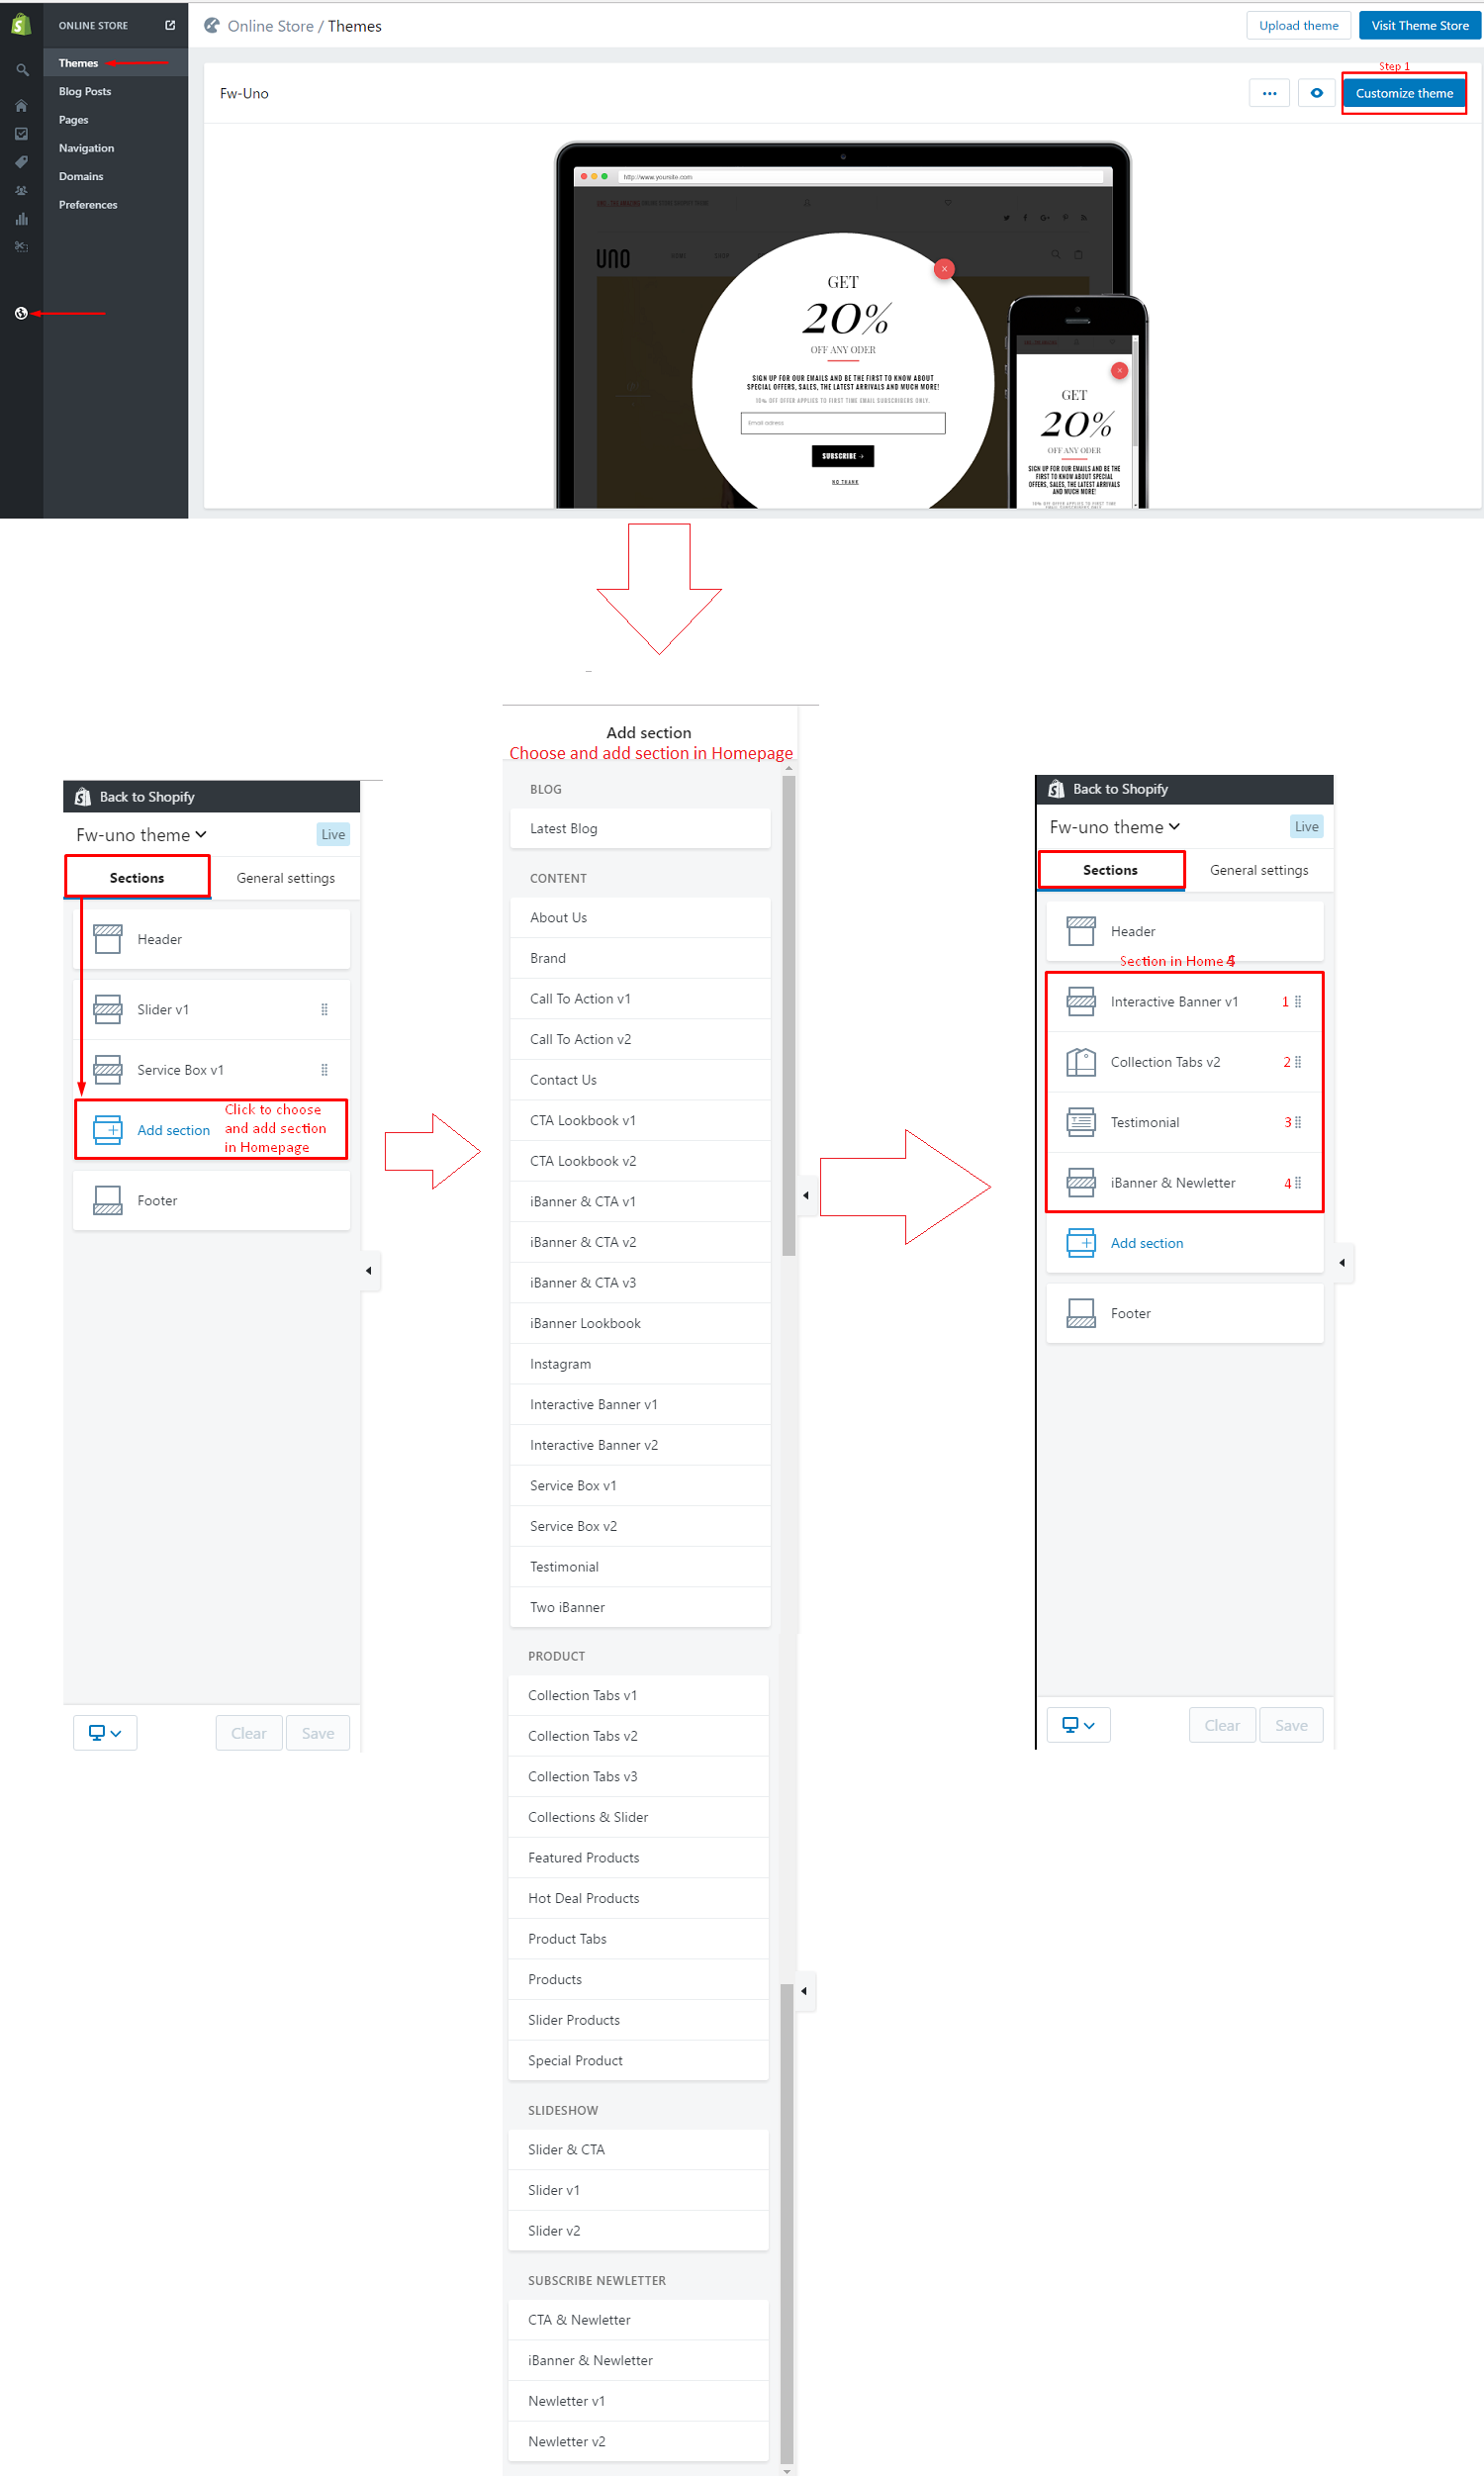
Header Style 1:
Footer Style 2:
Config position for each section in home 5, see photo bellow:
Choose and Add section in Homepage
Choose a section in Homepage (drag and drop then add section)
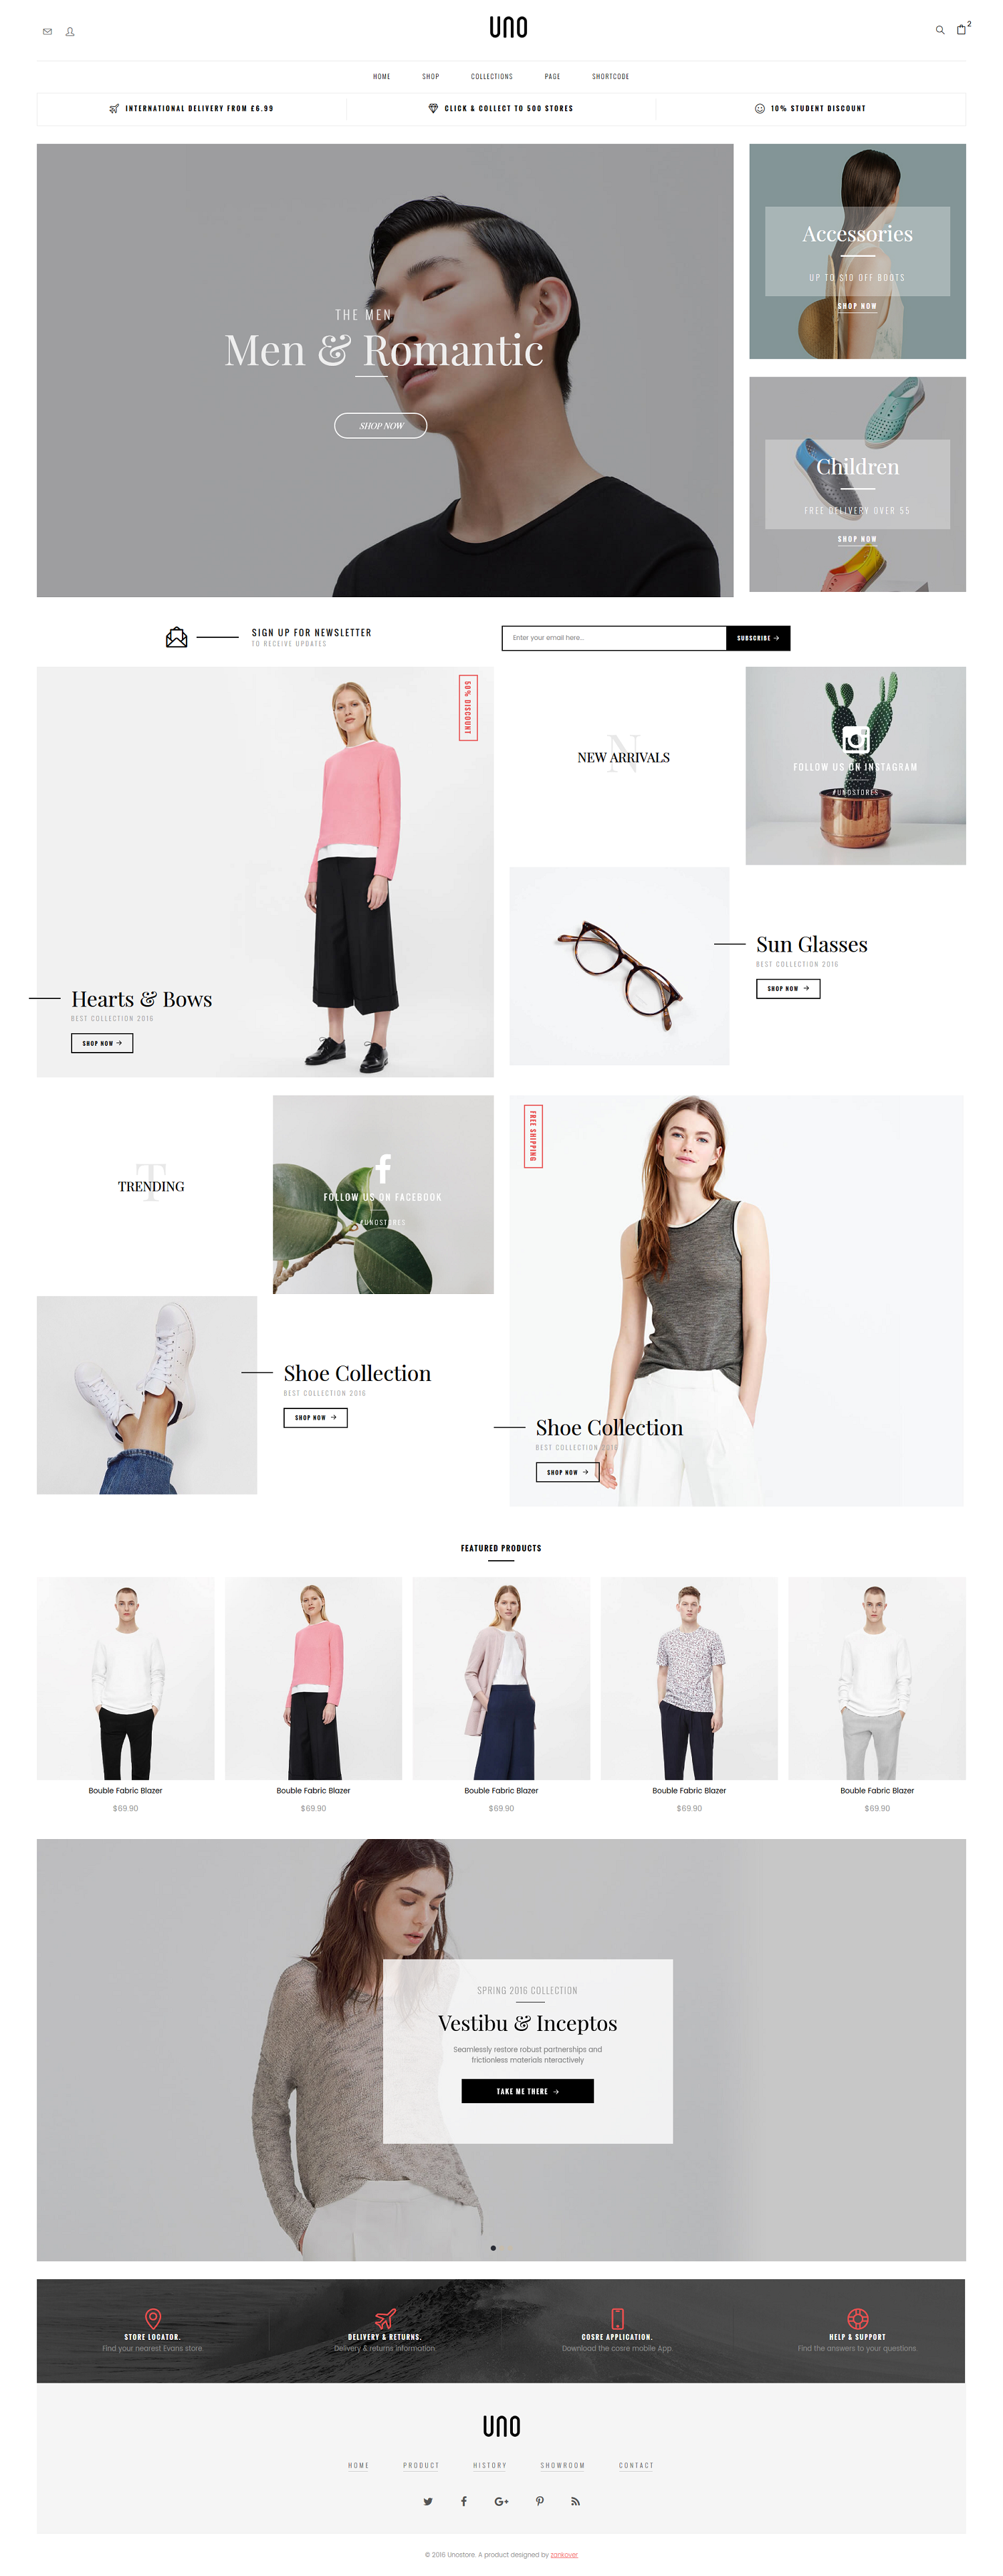
Home page 5
In Home page 5, we used sections bellow:
Header Style 3:
Footer Style 1:
Config position for each section in home 3, see photo bellow:
Choose and Add section in Homepage
Choose a section in Homepage (drag and drop then add section)

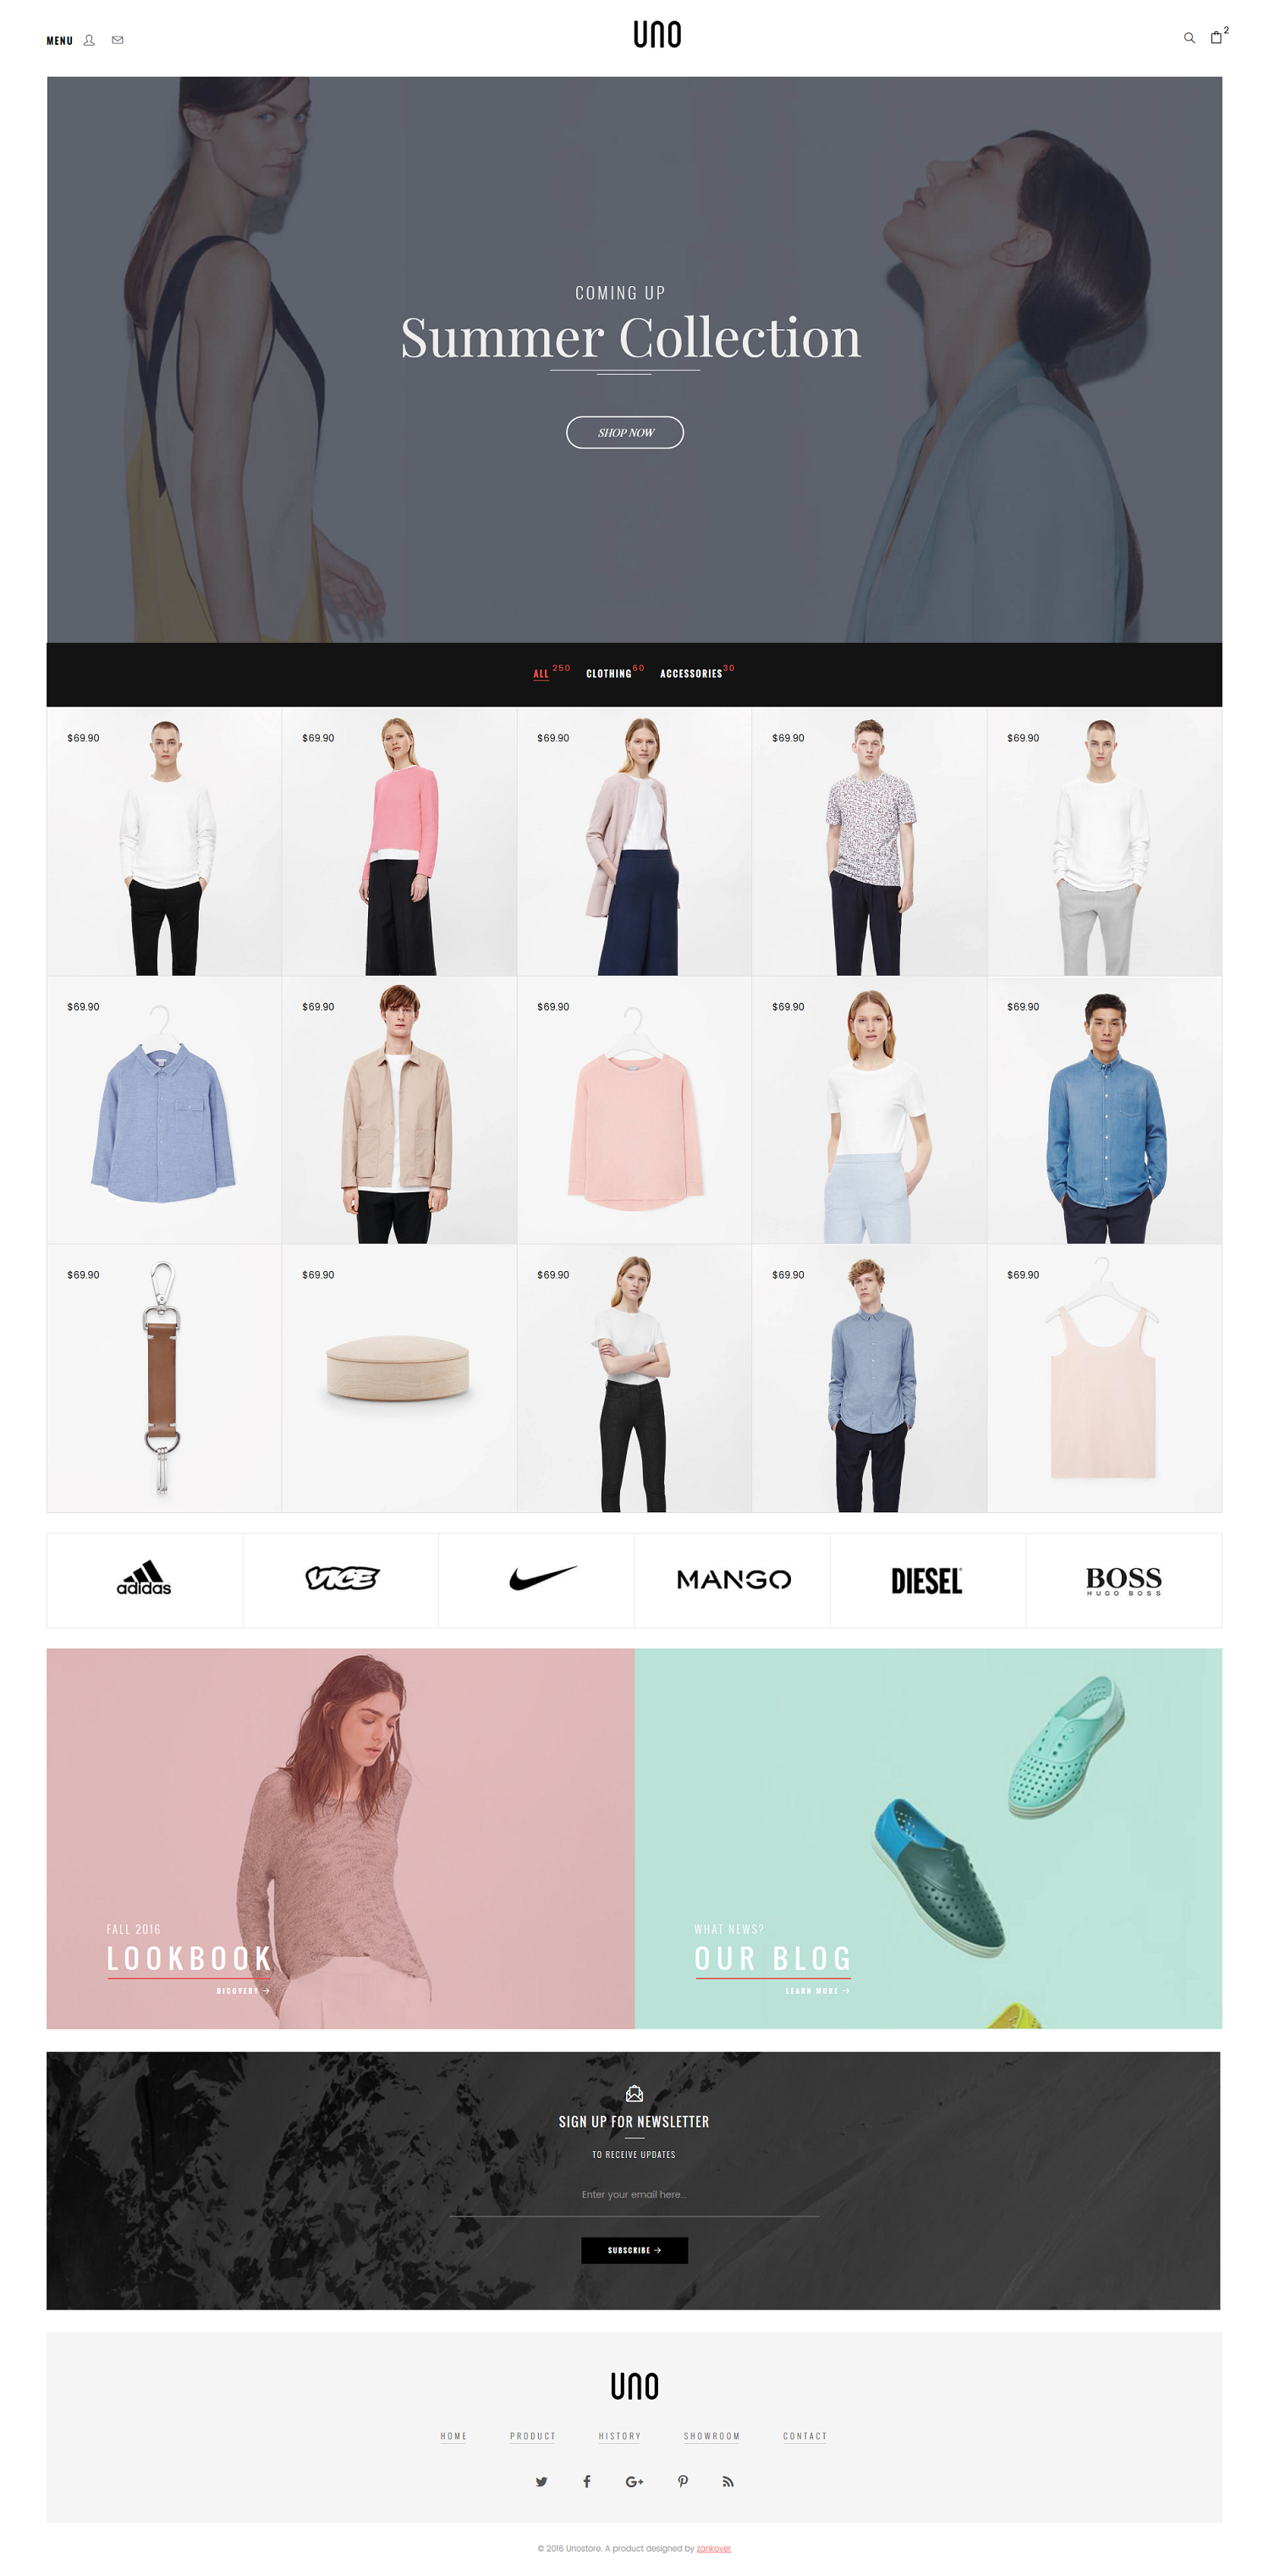
Home page 6
In Home page 6, we used sections bellow:
- s6.1Section CTA Lookbook v1
- s8Section iBanner Lookbook
- s19Section Products
- s13Section Two iBanner
- s19Section Products
- s6.2Section CTA Lookbook v2
- s8Section iBanner Lookbook
- s19Section Products
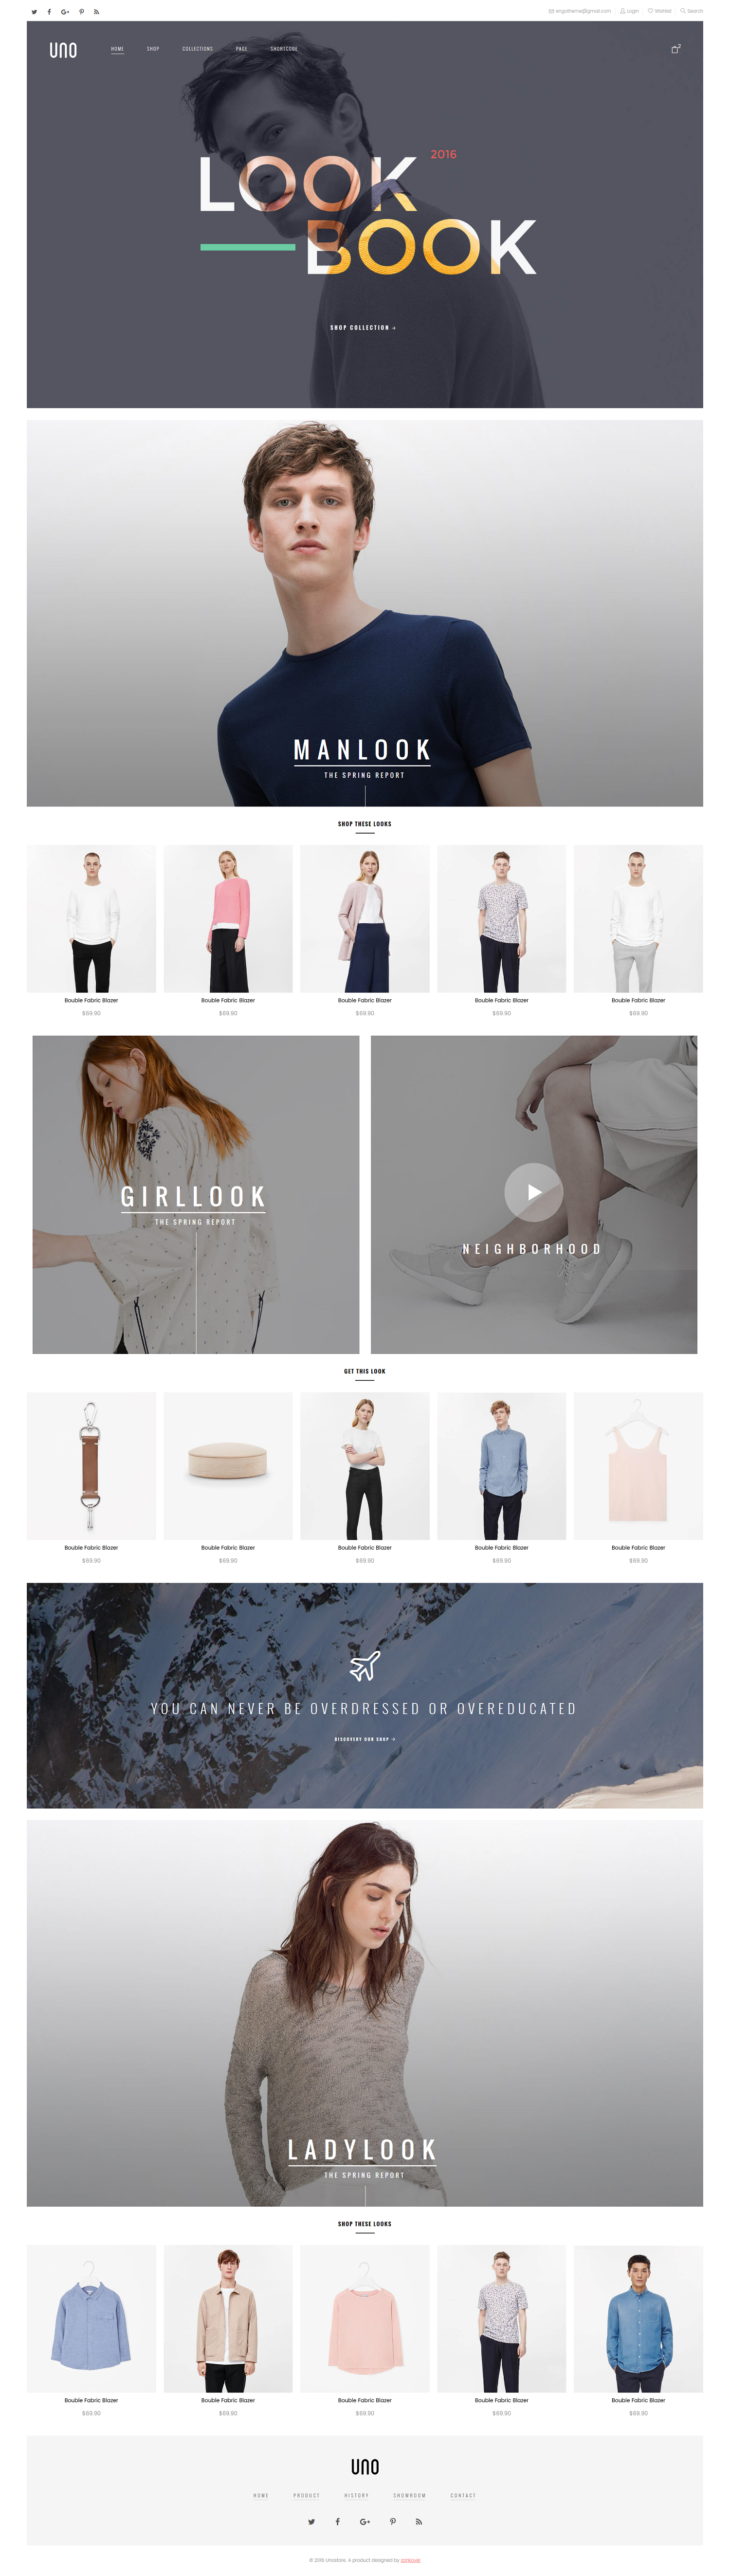
Header Style 2:
Footer Style 2:
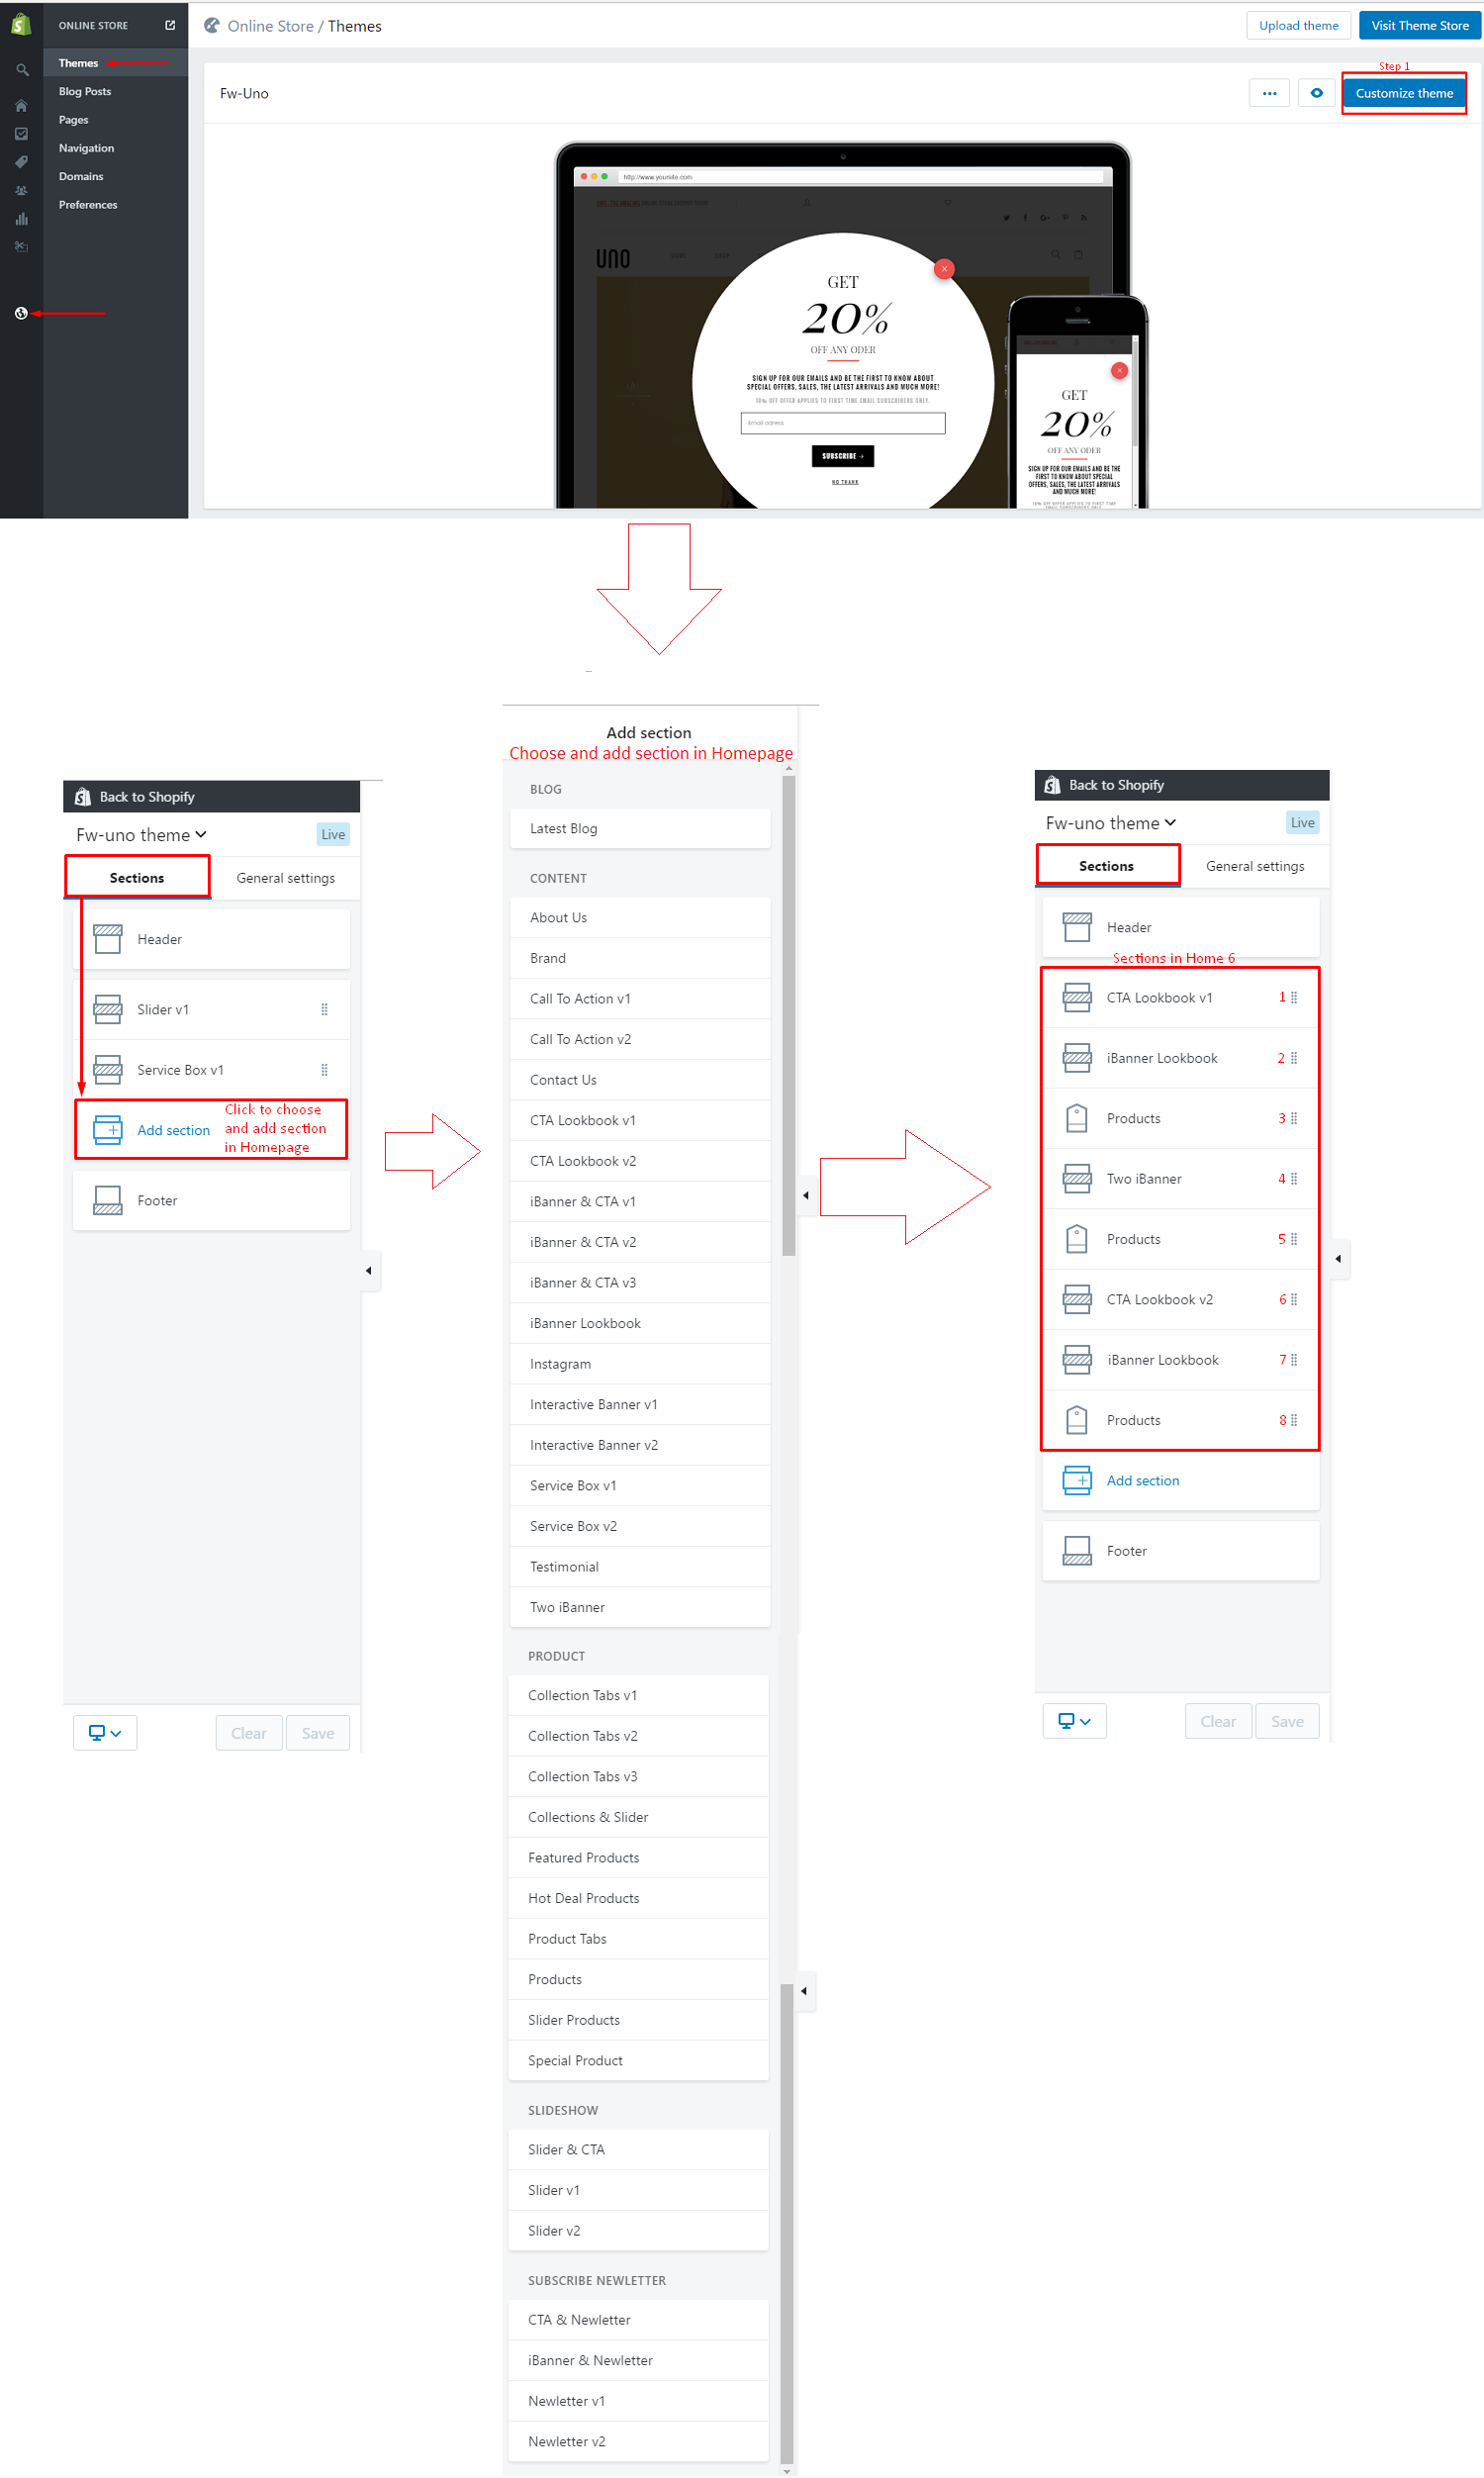
Config position for each section in home 6, see photo bellow:
Choose and Add section in Homepage
Choose a section in Homepage (drag and drop then add section)
Home page 7
In Home page 7, we used sections bellow:
- s22.2Section Slider v2
- s14.3Section Collection Tabs v3
- s3Section Brand
- s4.1Section Call To Action v1
- s26.2Section Newletter v2
Header Style 4:

Footer Style 2:
Config position for each section in home 7, see photo bellow:
Choose and Add section in Homepage
Choose a section in Homepage (drag and drop then add section)

Home page 8
In Home page 8, we used sections bellow:
- s22.2Section Slider v2
- s2Section About Us
- s20Section Slider Products
- s20Section Slider Products
- s7.2Section iBanner & CTA v2
- s1Section Latest Blog
- s9Section Instagram
Header Style 5:

Footer Style 2:
Config position for each section in home 8, see photo bellow:
Choose and Add section in Homepage
Choose a section in Homepage (drag and drop then add section)

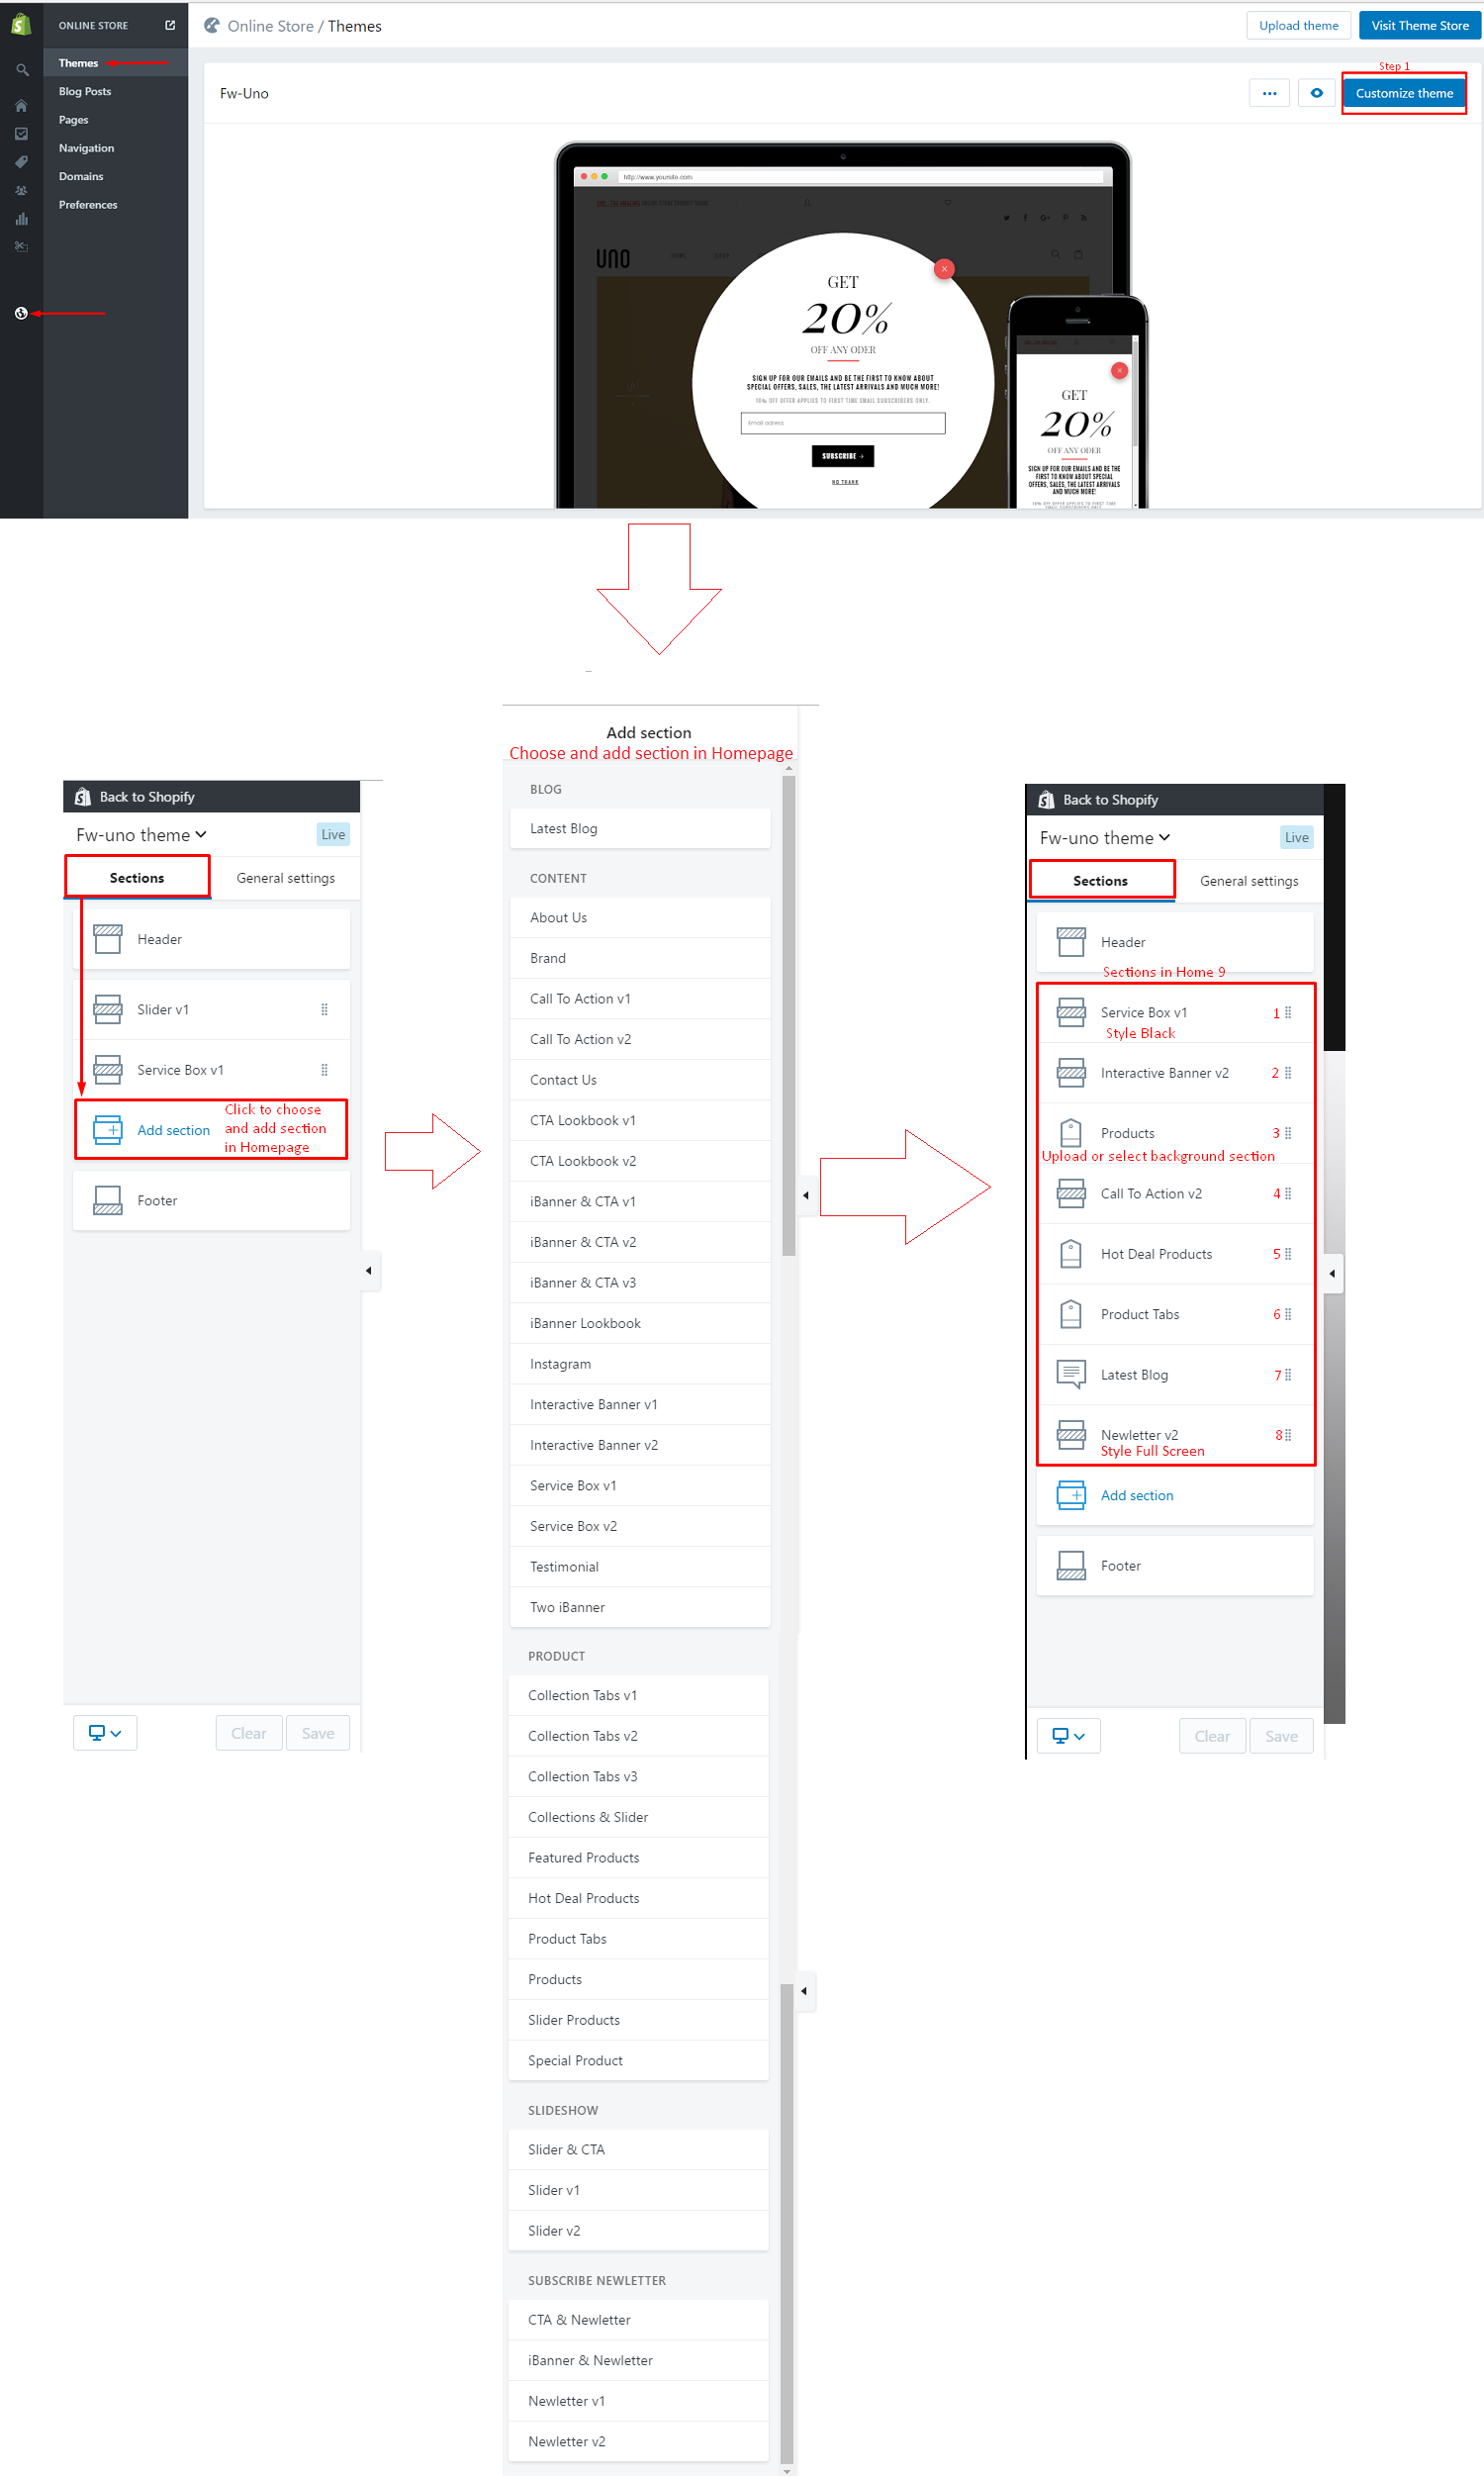
Home page 9
In Home page 9, we used sections bellow:
- s11.1Section Service Box v1
- s10.2Section Interactive Banner v2
- s19Section Products
- s4.2Section Call To Action v2
- s17Section Hot Deal Products
- s18Section Product Tabs
- s1Section Latest Blog
- s26.2Section Newletter v2
Header Style 6:

Footer Style 2:
Config position for each section in home 9, see photo bellow:
Choose and Add section in Homepage
Choose a section in Homepage (drag and drop then add section)
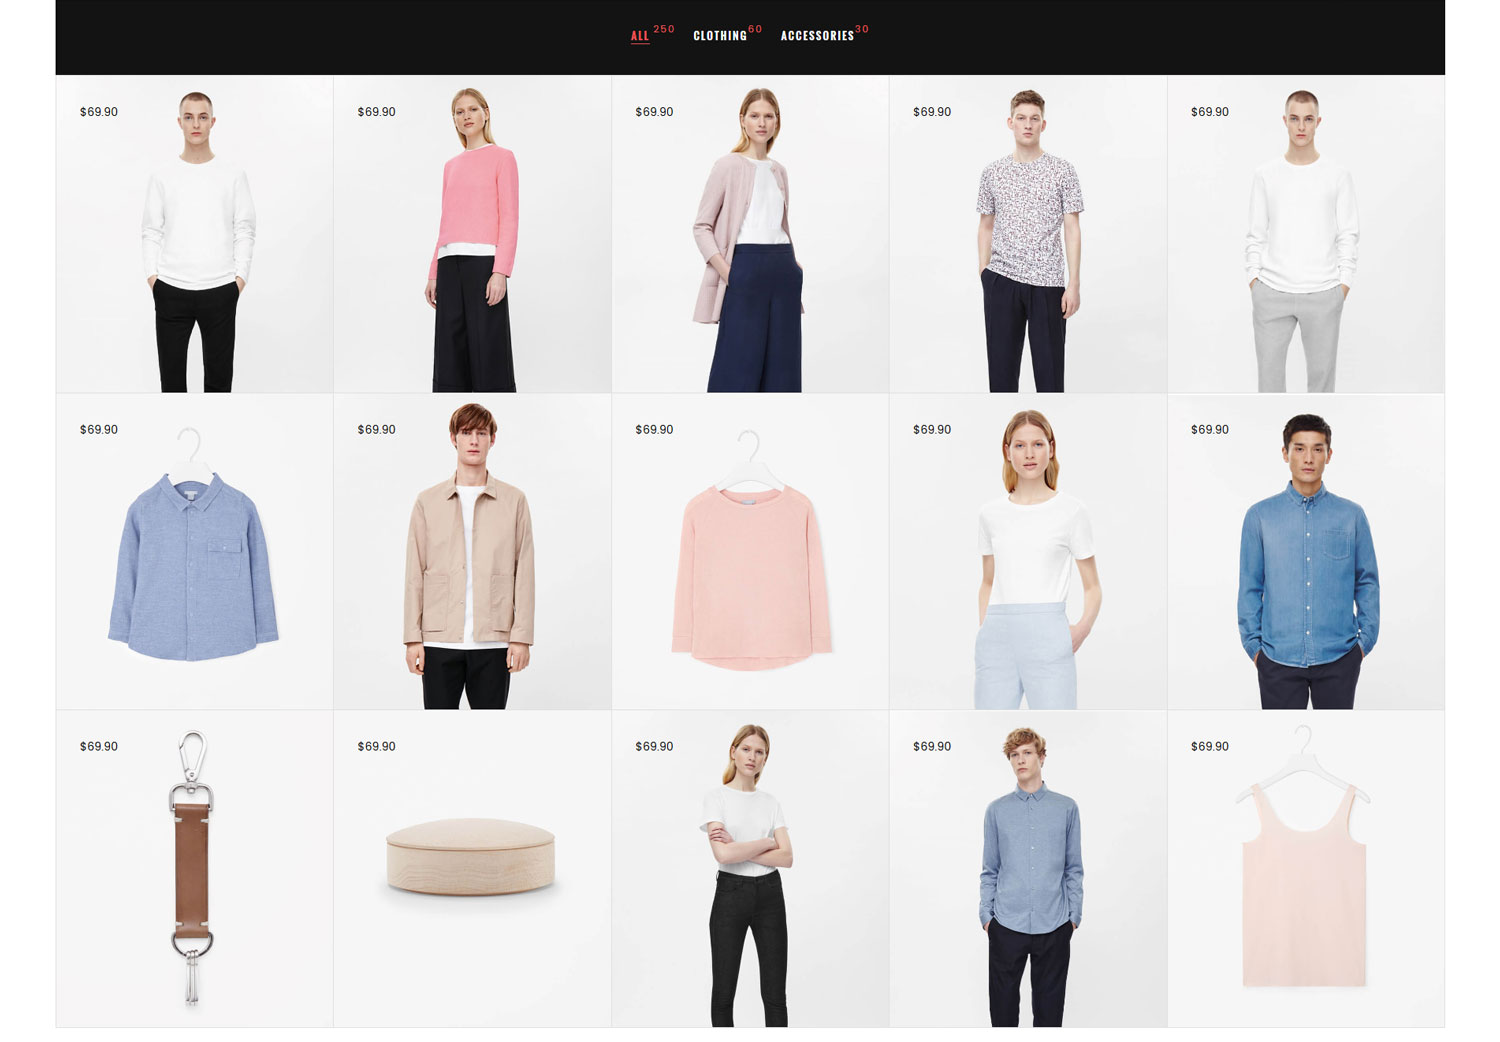
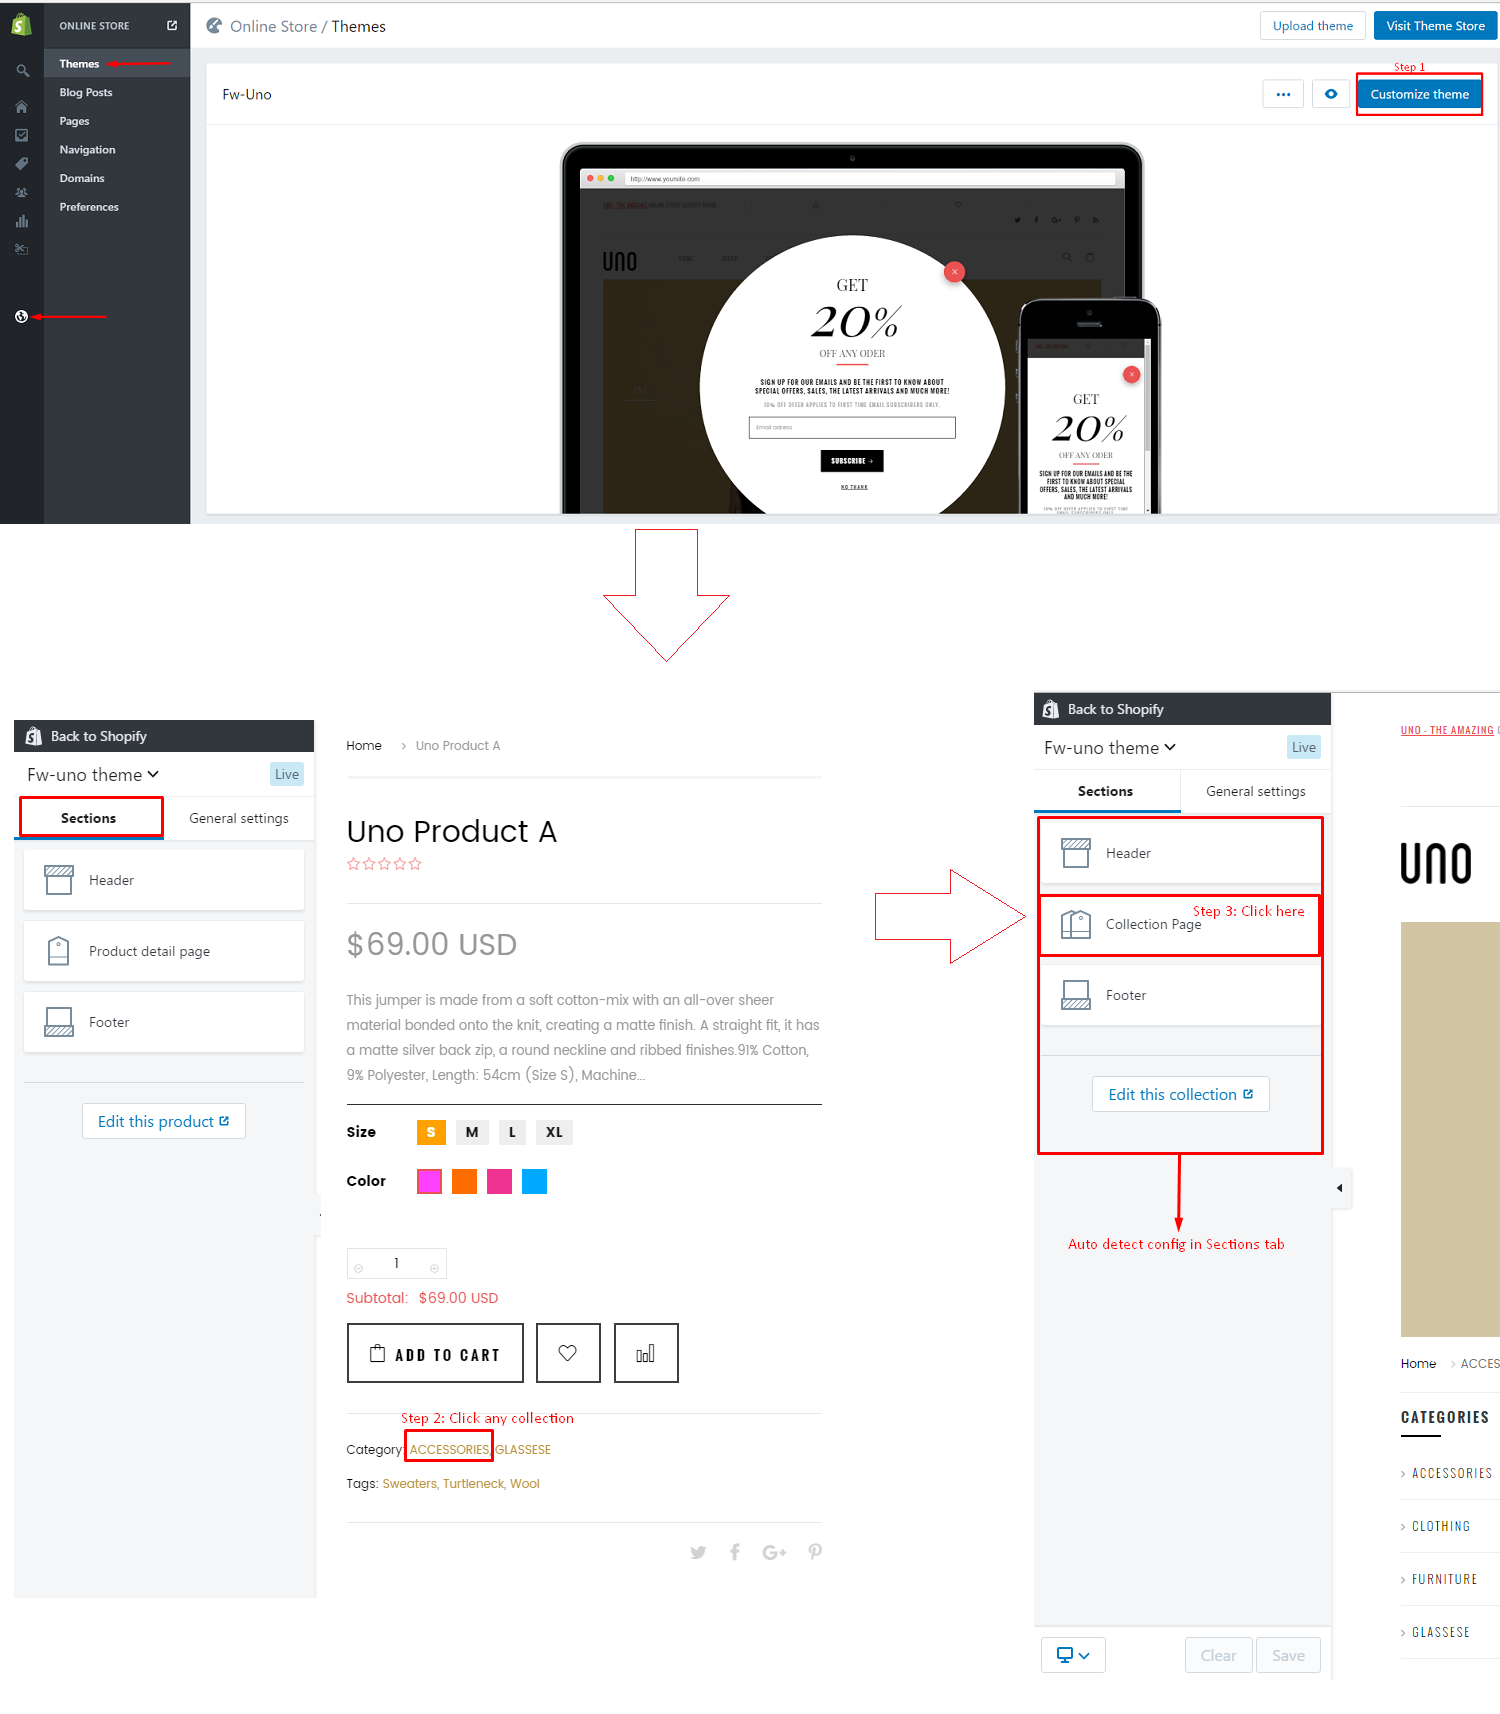
Shop page
Collection page
in this theme, our support 3 view mode for collection, you can sellect an option for each collection as photo bellow
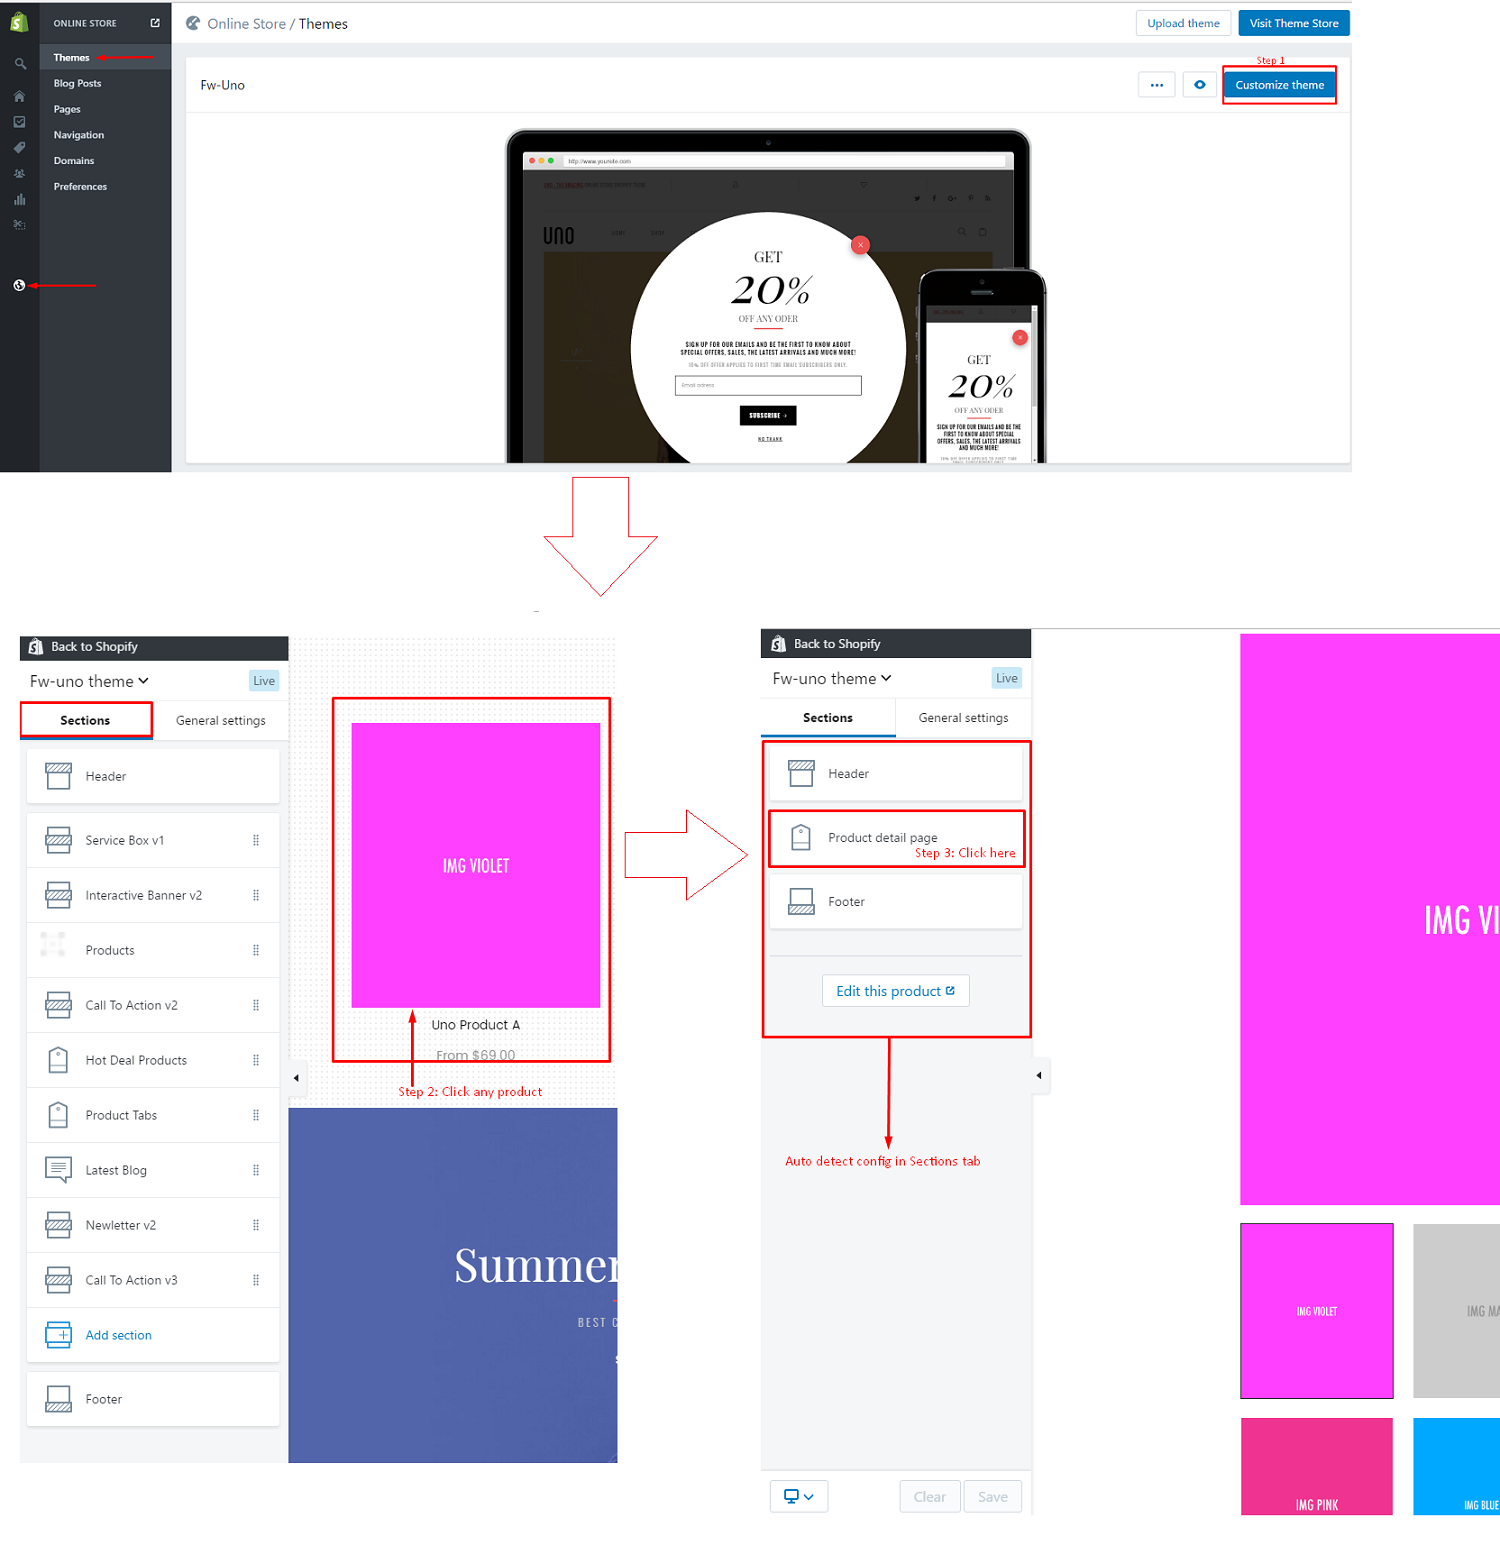
Product Detail page
Images for Product: 1000 x 1142 .png recommended
Config Product detail page: 3 steps
Template Product Detail (2 template)
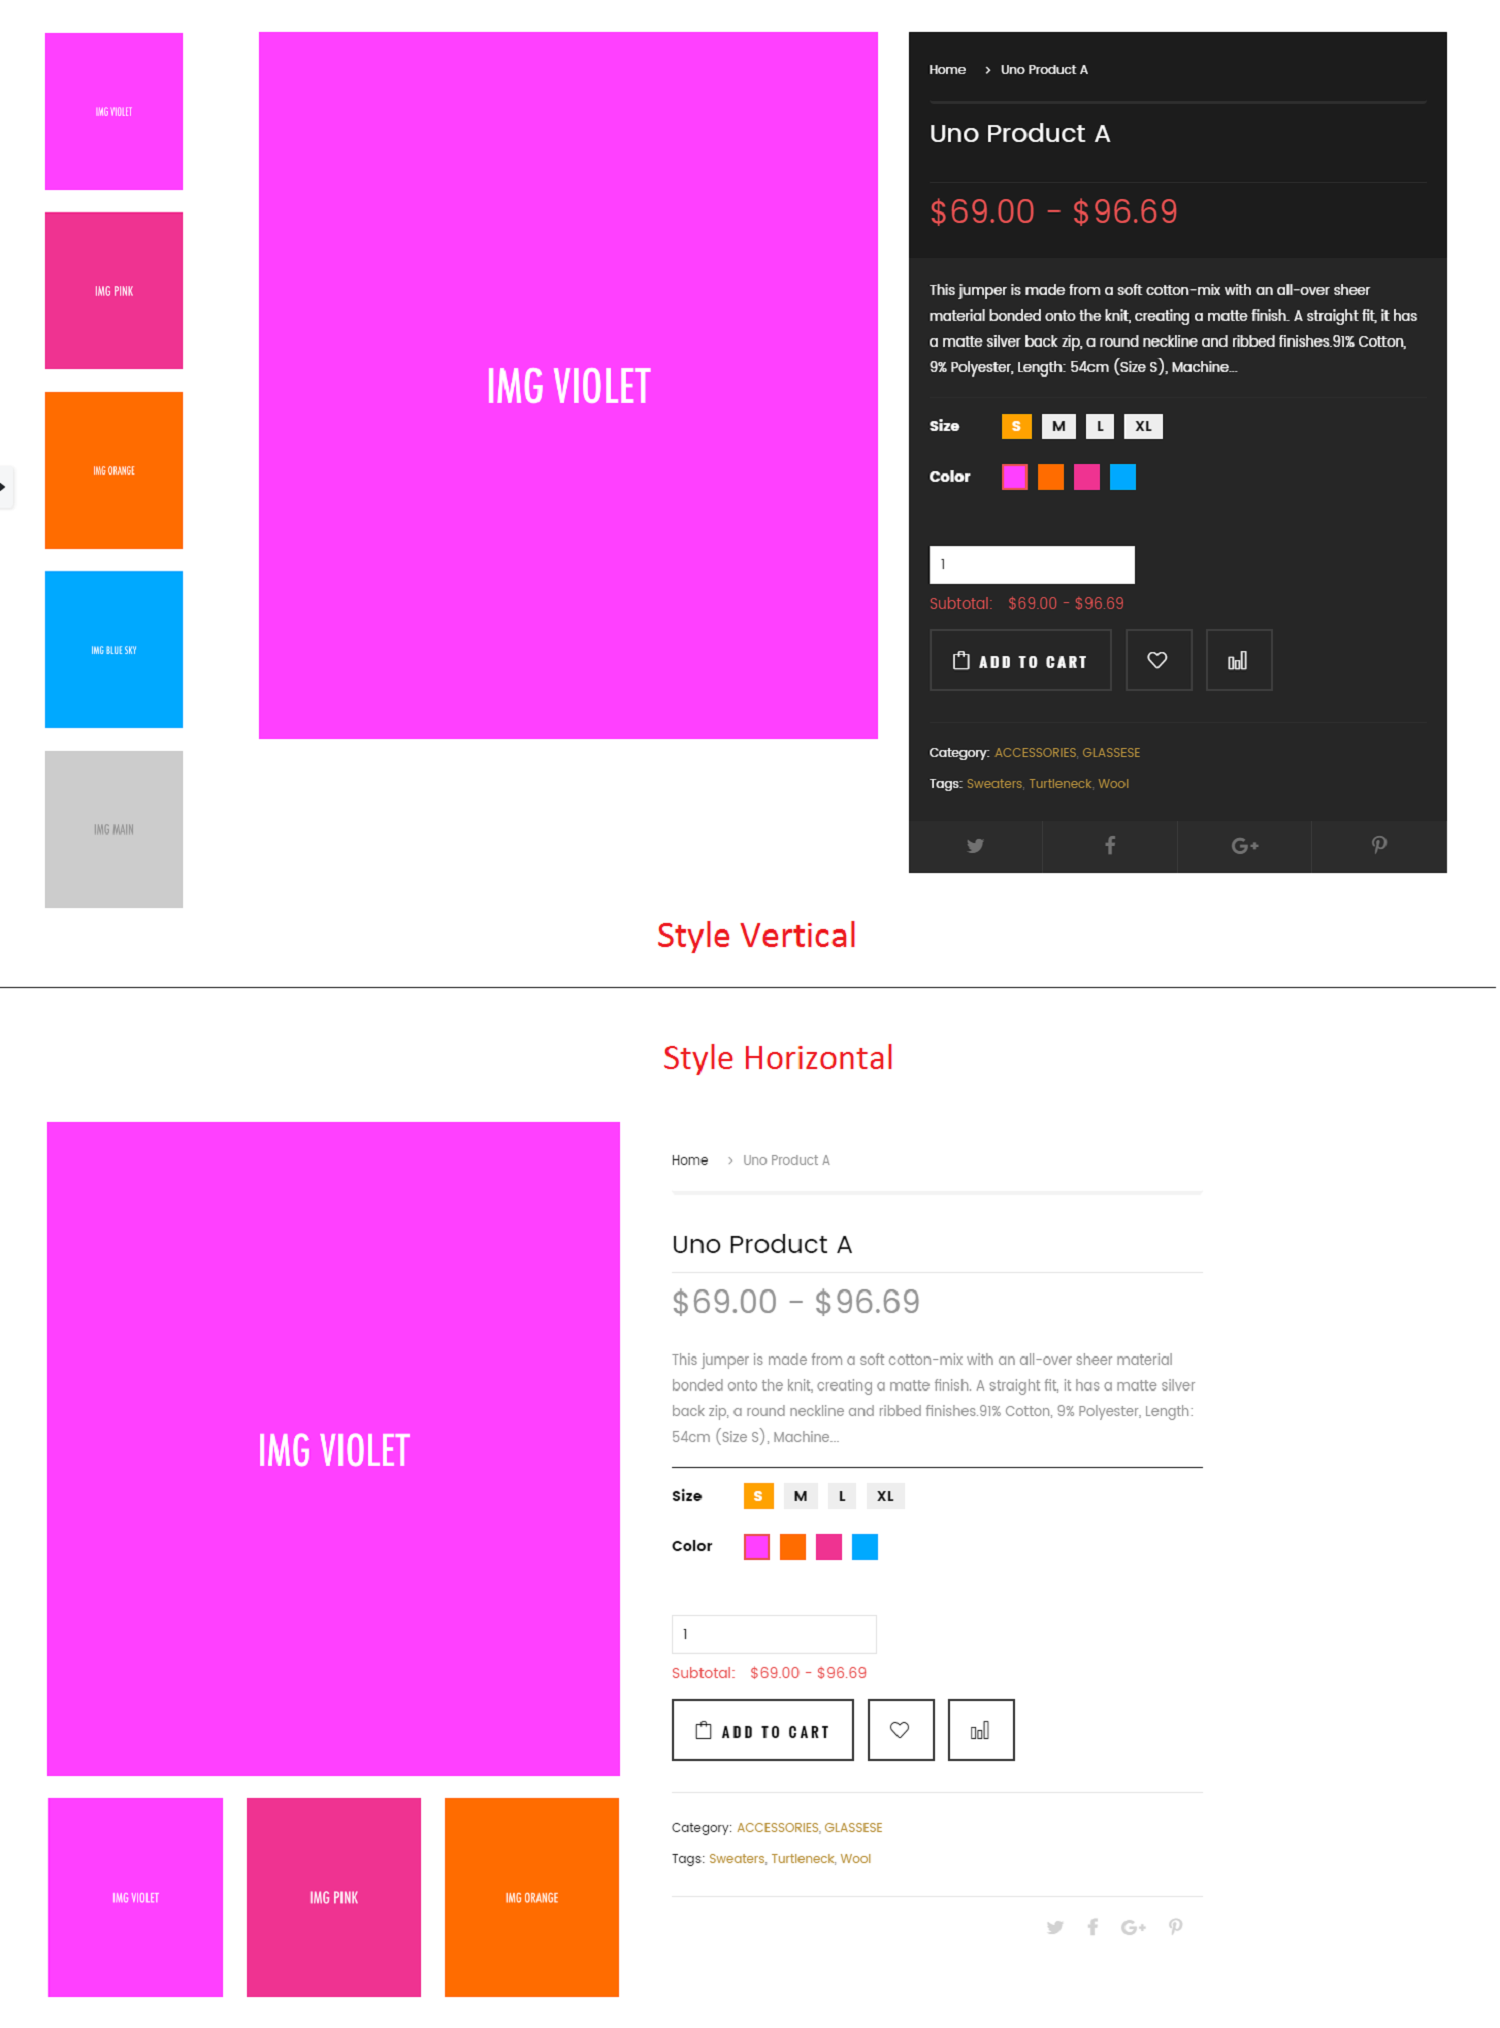
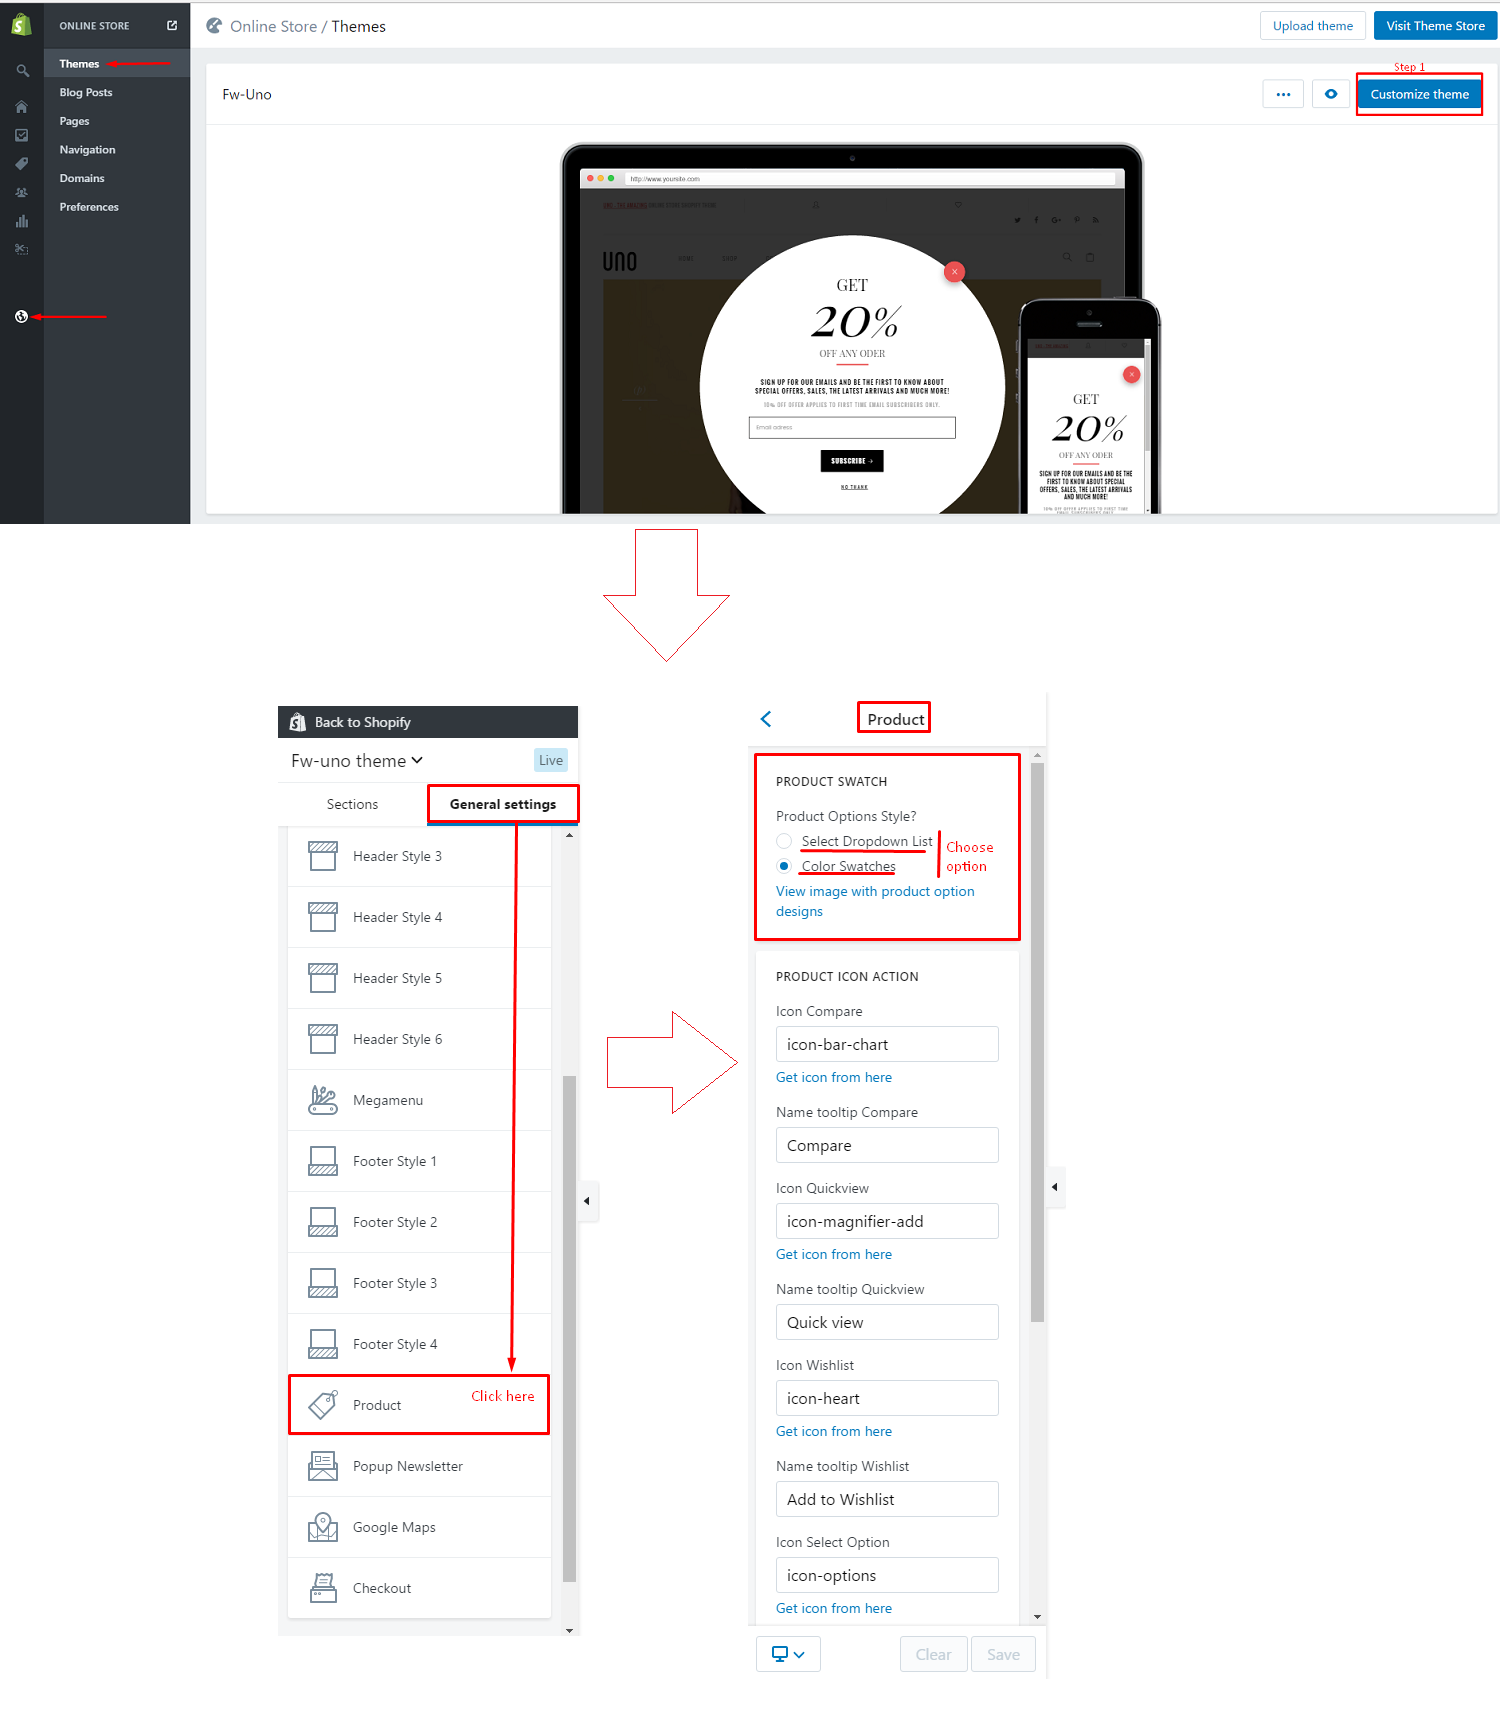
Select Product Options (2 styles)
Choose in Login Store > Customize theme > Settings tab > Product > choose Product options style?
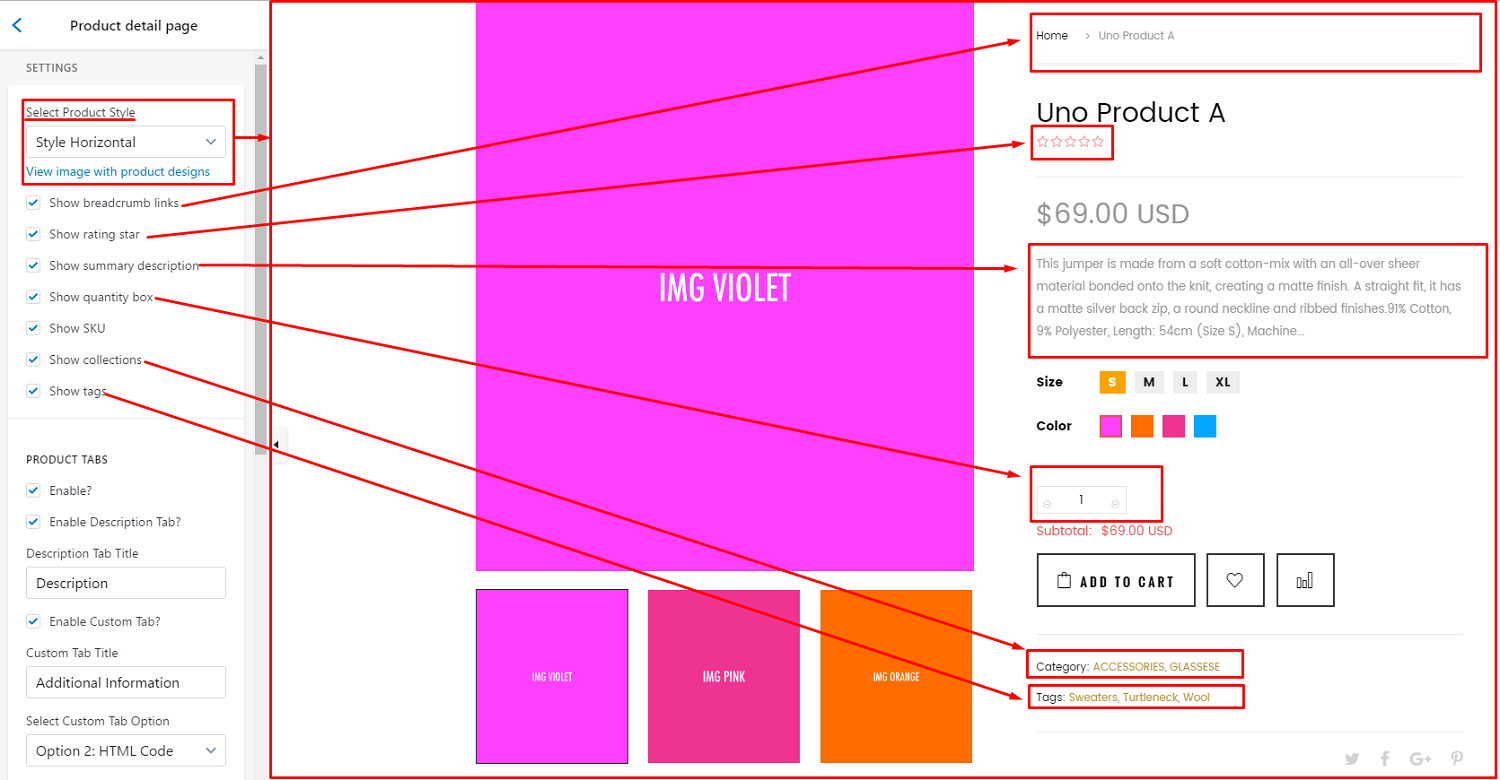
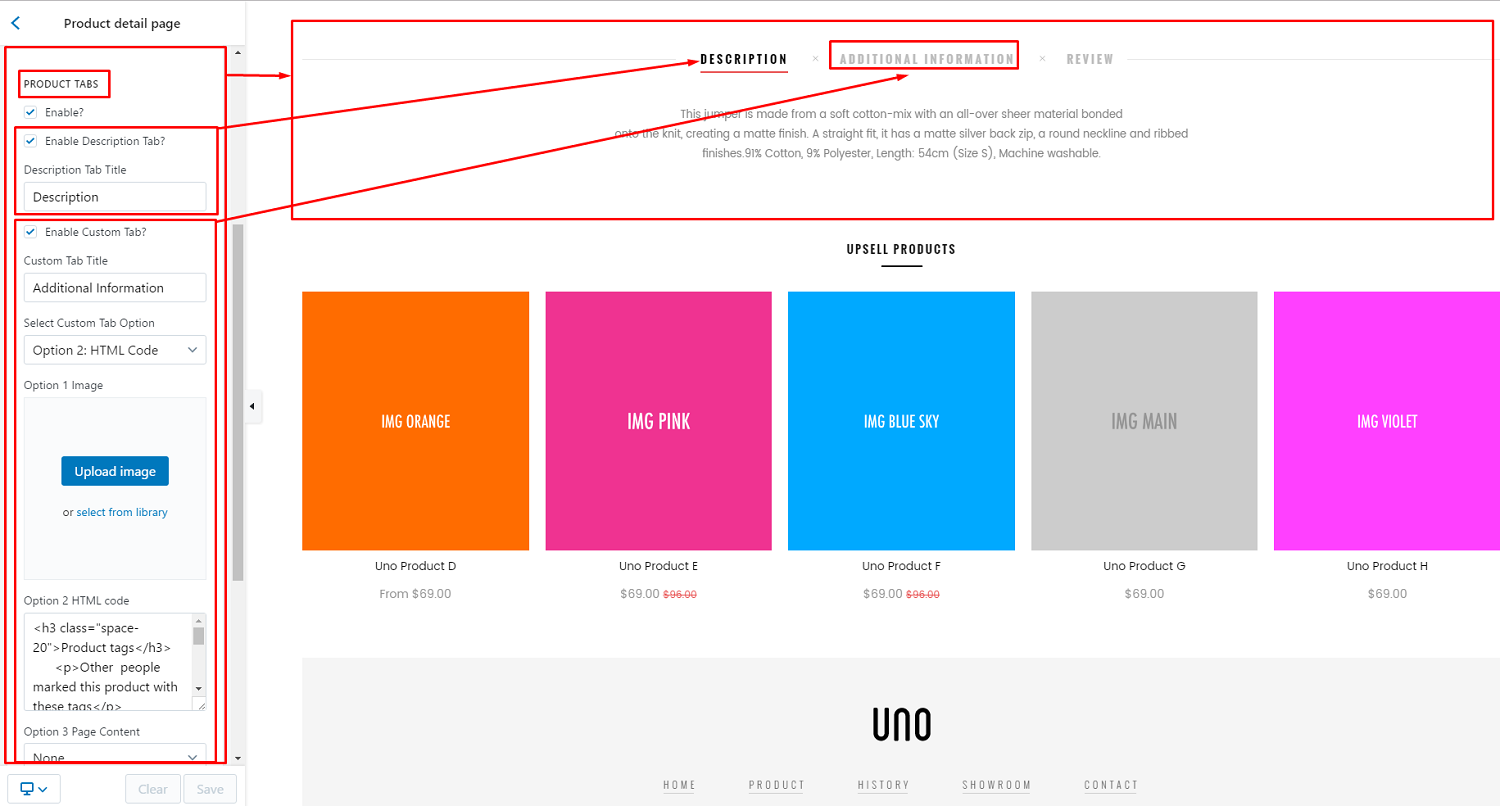
Setting for product detail page
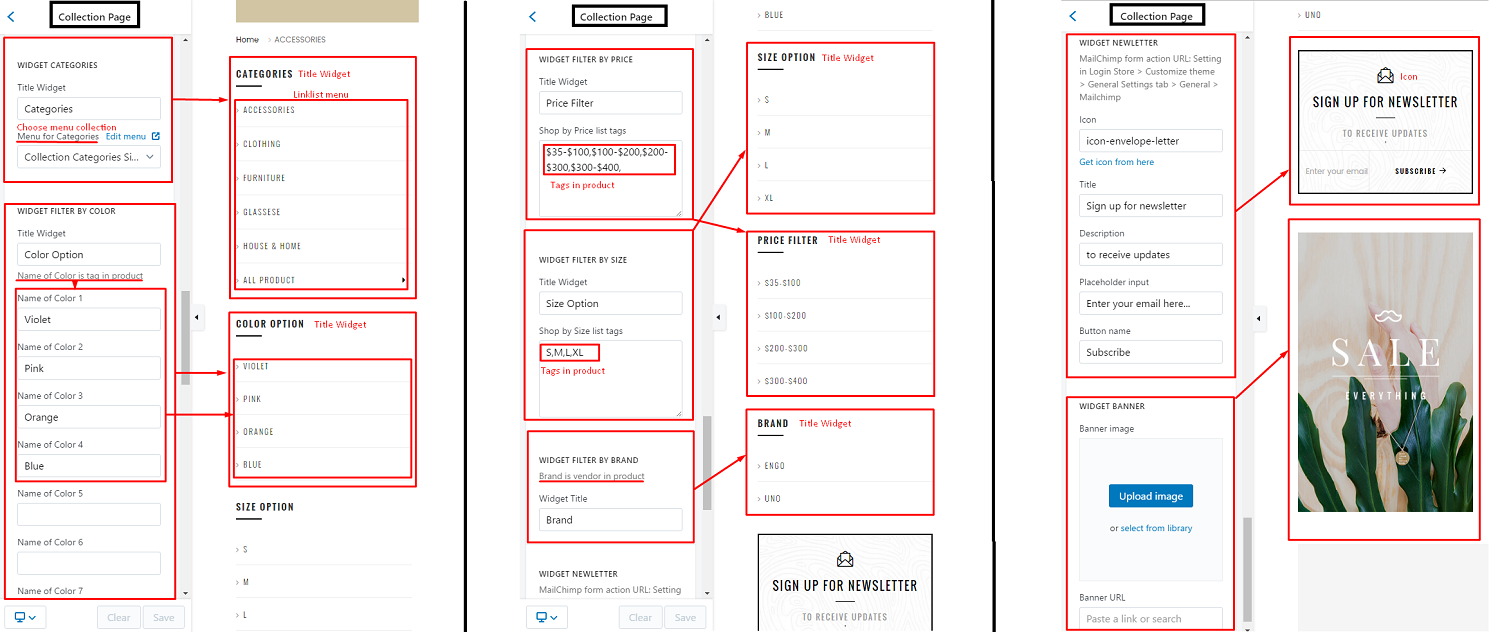
Sidebar
3 step setting widgets in sidebar collection page
Uno support 7 widget for sidebar
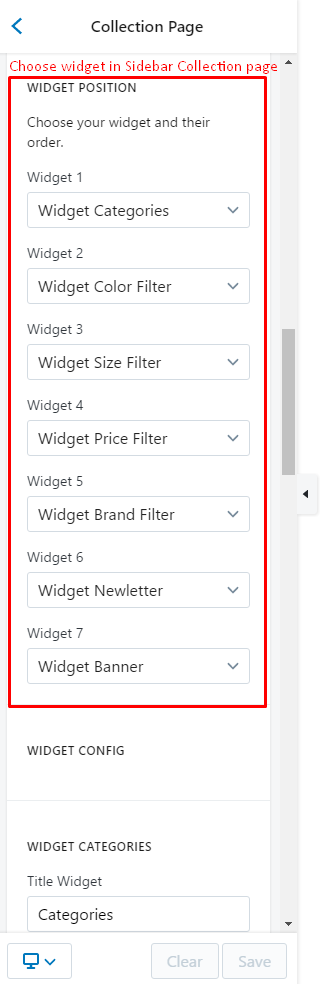
Follow photo bellow to config your widgets
Get support
If you are unable to find your answer here in our documentation, please go to our forum and post up a new topic with all the details we need. Please be sure to include your site URL as well or send us an email.
Our support scope
Our support covers configuration, building site as demo, trouble using any features, and bug fixes. We don't provide support for customizations or 3rd party extension.
Our support time
We try our best to monitor the email around the clock, however, this is not always possible due to different time zones. We will try to reply you as fast as we can.
Our working time is 8.00 AM - 5.30 PM, Monday to Friday (GMT+7). So if ask for help in the weekend, you may have to wait a little bit for support and please be patient.